 Zhuoli's Blog
缓存作为开发中提高服务性能相对有效的一种方式,在实际开发中得到广泛使用。在Spring 3.1之前,如果想使用缓存,相对是比较麻烦的,往往在业务代码中要掺杂缓存的逻辑,比如判断缓存是否存在,存在则取缓存,不存在在从DB中读取,然后再讲数据存入缓存中,使用起来相当不方便。Spring 3.1引入了基于注释的缓存技术,它本质上不是一个具体的缓存实现方案(例如EHCache、Redis、MemoryCache),而是一个对缓存使用的抽象,通过在代码中添加少量注解,即能够达到缓存方法的返回对象的效果。也就是说底层具体缓存实现对于开发人员来讲是透明的,实现缓存和具体业务代码的解耦。目前Spring注解支持的缓存有java.util.concurrent.ConcurrentMap,Ehcache 2.x,Redis等。本文介绍如何通过Spring注解结合底层Redis实现缓存,首先要引入如下两个包:
spring-boot-starter-data-redis
spring-boot-starter-cache
redis.clients.jedis
1. 项目结构
|   pom.xml
|   springboot-13-redis-cache.iml
+---src
|   +---main
|   |   +---java
|   |   |   \---com
|   |   |       \---zhuoli
|   |   |           \---service
|   |   |               \---springboot
|   |   |                   \---redis
|   |   |                       \---cache
|   |   |                           |   SpringBootRedisCacheApplicationContext.java
|   |   |                           |
|   |   |                           +---controller
|   |   |                           |       UserController.java
|   |   |                           |
|   |   |                           +---repository
|   |   |                           |   +---conf
|   |   |                           |   |       DataSourceConfig.java
|   |   |                           |   |       RedisCacheConfig.java
|   |   |                           |   |
|   |   |                           |   +---mapper
|   |   |                           |   |       UserMapper.java
|   |   |                           |   |
|   |   |                           |   +---model
|   |   |                           |   |       User.java
|   |   |                           |   |       UserExample.java
|   |   |                           |   |
|   |   |                           |   \---service
|   |   |                           |       |   UserRepository.java
|   |   |                           |       |
|   |   |                           |       \---impl
|   |   |                           |               UserRepositoryImpl.java
|   |   |                           |
|   |   |                           \---service
|   |   |                               |   UserControllerService.java
|   |   |                               |
|   |   |                               \---impl
|   |   |                                       UserControllerServiceImpl.java
|   |   |
|   |   \---resources
|   |       |   application.properties
|   |       |
|   |       +---autogen
|   |       |       generatorConfig_zhuoli.xml
|   |       |
|   |       \---base
|   |           \---com
|   |               \---zhuoli
|   |                   \---service
|   |                       \---springboot
|   |                           \---redis
|   |                               \---cache
|   |                                   \---repository
|   |                                       \---mapper
|   |                                               UserMapper.xml
|   |
|   \---test
|       \---java
2. pom.xml
<?xml version="1.0" encoding="UTF-8"?>
<project xmlns="http://maven.apache.org/POM/4.0.0"
         xmlns:xsi="http://www.w3.org/2001/XMLSchema-instance"
         xsi:schemaLocation="http://maven.apache.org/POM/4.0.0 http://maven.apache.org/xsd/maven-4.0.0.xsd">
    <modelVersion>4.0.0</modelVersion>

    <groupId>com.zhuoli.service</groupId>
    <artifactId>springboot-13-redis-cache</artifactId>
    <version>1.0-SNAPSHOT</version>

    <!-- Spring Boot 启动父依赖 -->
    <parent>
        <groupId>org.springframework.boot</groupId>
        <artifactId>spring-boot-starter-parent</artifactId>
        <version>2.0.3.RELEASE</version>
    </parent>

    <build>
        <plugins>
            <plugin>
                <groupId>org.mybatis.generator</groupId>
                <artifactId>mybatis-generator-maven-plugin</artifactId>
                <version>1.3.5</version>
                <!--如果不配置configuration节点,配置文件名字必须为generatorConfig.xml-->
                <configuration>
                    <!--可以自定义generatorConfig文件名-->
                    <configurationFile>src/main/resources/autogen/generatorConfig_zhuoli.xml</configurationFile>
                    <verbose>true</verbose>
                    <overwrite>true</overwrite>
                </configuration>
            </plugin>
            <plugin>
                <groupId>org.apache.maven.plugins</groupId>
                <artifactId>maven-compiler-plugin</artifactId>
                <configuration>
                    <source>1.8</source>
                    <target>1.8</target>
                </configuration>
            </plugin>
        </plugins>
    </build>

    <dependencies>
        <!-- Exclude Spring Boot's Default Logging -->
        <dependency>
            <groupId>org.springframework.boot</groupId>
            <artifactId>spring-boot-starter</artifactId>
        </dependency>

        <dependency>
            <groupId>org.springframework.boot</groupId>
            <artifactId>spring-boot-starter-web</artifactId>
        </dependency>

        <dependency>
            <groupId>org.mybatis.spring.boot</groupId>
            <artifactId>mybatis-spring-boot-starter</artifactId>
            <version>1.3.2</version>
        </dependency>

        <dependency>
            <groupId>mysql</groupId>
            <artifactId>mysql-connector-java</artifactId>
        </dependency>

        <!-- https://mvnrepository.com/artifact/org.springframework.boot/spring-boot-starter-data-redis -->
        <dependency>
            <groupId>org.springframework.boot</groupId>
            <artifactId>spring-boot-starter-data-redis</artifactId>
        </dependency>

        <!-- https://mvnrepository.com/artifact/org.springframework.boot/spring-boot-starter-cache -->
        <dependency>
            <groupId>org.springframework.boot</groupId>
            <artifactId>spring-boot-starter-cache</artifactId>
        </dependency>

        <!-- https://mvnrepository.com/artifact/redis.clients/jedis -->
        <dependency>
            <groupId>redis.clients</groupId>
            <artifactId>jedis</artifactId>
            <version>2.9.0</version>
        </dependency>

        <!-- https://mvnrepository.com/artifact/org.projectlombok/lombok -->
        <dependency>
            <groupId>org.projectlombok</groupId>
            <artifactId>lombok</artifactId>
            <version>1.18.2</version>
            <scope>provided</scope>
        </dependency>

    </dependencies>

</project>
3. RedisCache配置
@Configuration
public class RedisCacheConfig {

    @Bean
    public RedisConnectionFactory redisConnectionFactory() {
        RedisStandaloneConfiguration redisStandaloneConfiguration = new RedisStandaloneConfiguration("127.0.0.1", 6379);
        return new JedisConnectionFactory(redisStandaloneConfiguration);
    }

    @Bean
    public RedisTemplate<String, Object> redisTemplate(RedisConnectionFactory redisConnectionFactory) {
        RedisTemplate<String, Object> template = new RedisTemplate<>();
        template.setConnectionFactory(redisConnectionFactory);
        template.setKeySerializer(new StringRedisSerializer());
        template.setValueSerializer(new GenericJackson2JsonRedisSerializer());
        return template;
    }

    @Bean
    public CacheManager cacheManager(RedisConnectionFactory redisConnectionFactory) {
        return new RedisCacheManager(
                RedisCacheWriter.nonLockingRedisCacheWriter(redisConnectionFactory),
                this.getRedisCacheConfigurationWithTtl(600), // 默认策略,未配置的key会使用这个
                this.getRedisCacheConfigurationMap() // 指定key策略
        );
    }

    private Map<String, RedisCacheConfiguration> getRedisCacheConfigurationMap() {
        Map<String, RedisCacheConfiguration> redisCacheConfigurationMap = new HashMap<>();
        redisCacheConfigurationMap.put("user", this.getRedisCacheConfigurationWithTtl(10));
        redisCacheConfigurationMap.put("other", this.getRedisCacheConfigurationWithTtl(18000));

        return redisCacheConfigurationMap;
    }

    private RedisCacheConfiguration getRedisCacheConfigurationWithTtl(Integer seconds) {
        Jackson2JsonRedisSerializer<Object> jackson2JsonRedisSerializer = new Jackson2JsonRedisSerializer<>(Object.class);
        ObjectMapper om = new ObjectMapper();
        om.setVisibility(PropertyAccessor.ALL, JsonAutoDetect.Visibility.ANY);
        om.enableDefaultTyping(ObjectMapper.DefaultTyping.NON_FINAL);
        jackson2JsonRedisSerializer.setObjectMapper(om);

        RedisCacheConfiguration redisCacheConfiguration = RedisCacheConfiguration.defaultCacheConfig();
        redisCacheConfiguration = redisCacheConfiguration.serializeValuesWith(
                RedisSerializationContext
                        .SerializationPair
                        .fromSerializer(jackson2JsonRedisSerializer)
        ).entryTtl(Duration.ofSeconds(seconds));

        return redisCacheConfiguration;
    }
}
这里分别讲一下RedisCacheConfig中的几个Bean配置
3.1 RedisConnectionFactory定义
RedisConnectionFactory主要用来定义Redis数据源连接,最开始我的想法是,通过调用JedisConnectionFactory的setHostName等方法去指定数据源连接的,如下:
@Bean
JedisConnectionFactory jedisConnectionFactory() {
    JedisConnectionFactory jedisConFactory
            = new JedisConnectionFactory();

    jedisConFactory.setHostName("localhost");
    jedisConFactory.setPort(6379);
    return jedisConFactory;
}但是查看官方文档发现,Spring Boot 2.0后setHostName、setPort方法都已经过期了,Spring Boot 2.0后使用RedisStandaloneConfiguration替代 查看文档后,RedisConnectionFactory Bean定义如下:
@Bean
public RedisConnectionFactory redisConnectionFactory() {
    RedisStandaloneConfiguration redisStandaloneConfiguration = new RedisStandaloneConfiguration("127.0.0.1", 6379);
    return new JedisConnectionFactory(redisStandaloneConfiguration);
}
3.2 定制RedisTemplate
自动配置的RedisTemplate并不能满足大部分项目的需求,比如我们基本都需要设置特定的Serializer(RedisTemplate默认会使用JdkSerializationRedisSerializer)。
Redis底层中存储的数据只是字节,虽然Redis本身支持各种类型(List, Hash等),但在大多数情况下,这些指的是数据的存储方式,而不是它所代表的内容(内容都是byte),用户自己来决定数据如何被转换成String或任何其他对象。用户自定义类型和原始数据类型之间的互相转换通过RedisSerializer接口(org.springframework.data.redis.serializer)来处理,顾名思义,它负责处理序列化/反序列化过程。包中多个实现可以开箱即用,比如:StringRedisSerializer和JdkSerializationRedisSerialize、用来处理JSON格式的数据的Jackson2JsonRedisSerializer或GenericJackson2JsonRedisSerializer。
上述RedisTemplate ValueSerializer序列化使用GenericJackson2JsonRedisSerializer而不是Jackson2JsonRedisSerializer,因为Jackson2JsonRedisSerializer需要为每一个需要序列化进Redis的类指定一个Jackson2JsonRedisSerializer,因为其构造函数中需要指定一个类型来做反序列化:
redis.setValueSerializer(new Jackson2JsonRedisSerializer<Product>(Product.class));如果应用中有大量对象需要缓存,这显然是不合适的。而GenericJackson2JsonRedisSerializer直接把类型信息序列化到了JSON格式中,让一个实例可以操作多个对象的反序列化。
3.3 定制RedisCacheManager
有时候Spring Boot自动给我们配置的RedisCacheManager不能满足我们应用的需求,比如我们要对缓存的key进行设置声明周期,这时候可以通过自定义CacheManager的方式实现。由于Spring Boot2.0之后,RedisCacheManager类发生了很多改变,原来的一堆方法比如setExpires、setUsePrefix、setDefaultExpiration都已经不存在了,通过查看源码及文档,最终找到一种Spring Boot 2.*版本复合需求的RedisCache设置缓存声明周期的方法。其实RedisCacheManager还有很多其他的构造函数,可以按照具体需求选择。上述配置实现cache名称为user的缓存生命周期为10S,名称为other的缓存生命周期为18000S,除此之外所有cache的声明周期默认为600S。
4. 缓存注解介绍
Spring针对缓存提供的注解主要包含@Cacheable、@CachePut、@CacheEvict 三个,具体含义如下: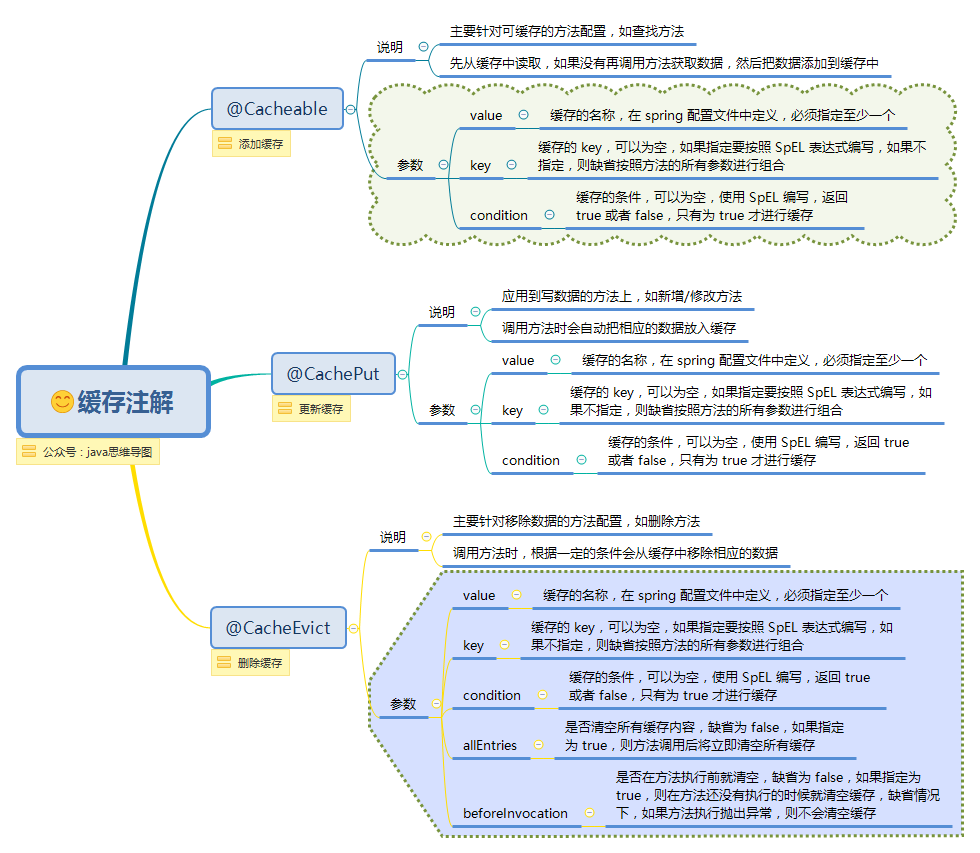 4.1 示例说明
@CachePut(value = “user”, key = “#user.id”,condition = “#user.username.length() < 10”) 只缓存用户名长度少于10的数据
@Cacheable(value = “user”, key = “#id”,condition = “#id < 10″) 只缓存ID小于10的数据
@Cacheable(value=”user”,key=”#user.username.concat(##user.password)”) 缓存后的redis key为 user::username::password(其中username和password为EL表达式)
@CacheEvict(value=”user”,allEntries=true,beforeInvocation=true) 加上beforeInvocation=true后,不管内部是否报错,缓存都将被清除
5. 缓存使用
我在repository查询方法上添加缓存,实际开发中也可以把缓存放在service层。repository层缓存使用如下:
@Cacheable(value = "user", key = "#id")
@Override
public User getUserById(Long id) {
    log.info("数据库取数据");
    return userMapper.selectByPrimaryKey(id);
}@Cacheable注解表示当第一次调用getUserById方法时,会进行数据库查询,并将查询到的结果User缓存到Redis,redis的key为user::id,@Cacheable注解中,key属性支持EL表达式,#id表示具体的参数id,比如方法请求id为6,则最终Redis缓存的key为user::6
@CacheEvict(value = "user", key = "#id")
@Override
public int delUserById(Long id) {
UserExample example = new UserExample();
example.createCriteria().andIdEqualTo(id);
return userMapper.deleteByExample(example);
/*等价于
return userMapper.deleteByPrimaryKey(id);
*/
}
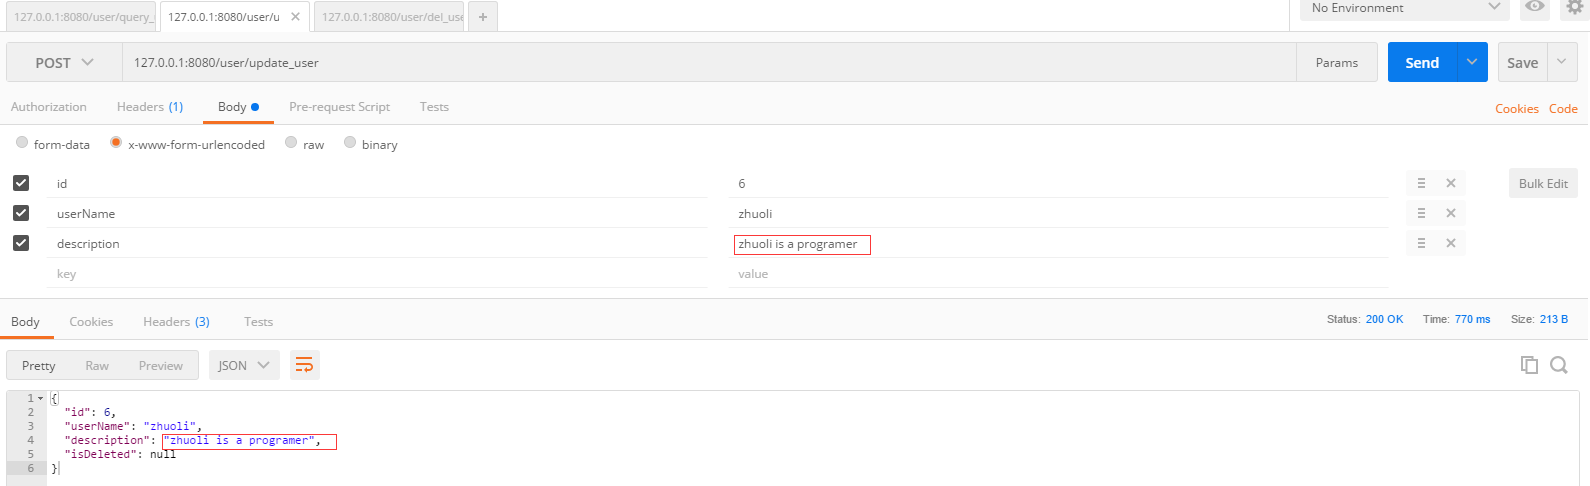
@CachePut(value = "user", key = "#user.id")
@Override
public User updateUser(User user) {
userMapper.updateByPrimaryKey(user);
return userMapper.selectByPrimaryKey(user.getId());
}6. 开启缓存功能
@EnableCaching注解,打开缓存功能,如下:
@SpringBootApplication
@EnableCaching
@Import(value = {DataSourceConfig.class, RedisCacheConfig.class})
public class SpringBootRedisCacheApplicationContext {
    public static void main(String[] args) {
        SpringApplication.run(SpringBootRedisCacheApplicationContext.class, args);
    }
}
篇幅原因,controller层、service层的代码这里就不展示了,有兴趣的同学可以到文章底部链接看一下示例代码。
7. 测试
之前在RedisCacheConfig中,我将名称为user的缓存声明周期设置为10S,是为了测试声明周期设置是否生效,根据测试结果显示,声明周期是生效的。正式进行测试之前,注意将user缓存声明周期设置为一个较大值。
7.1 @Cacheable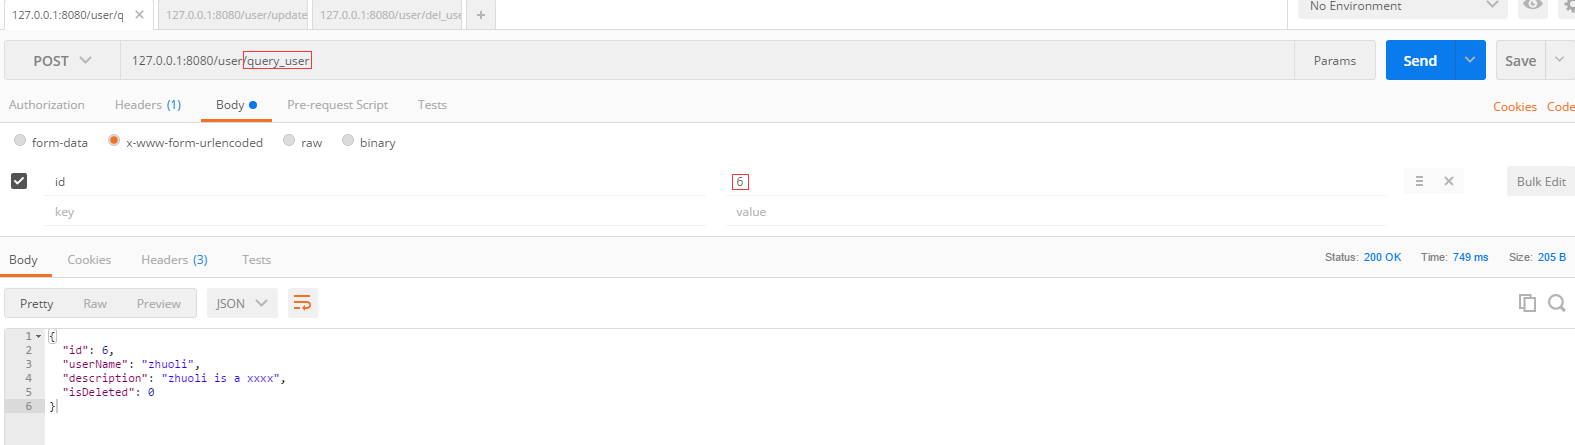

7.2 @CachePut


7.3 @CacheEvict
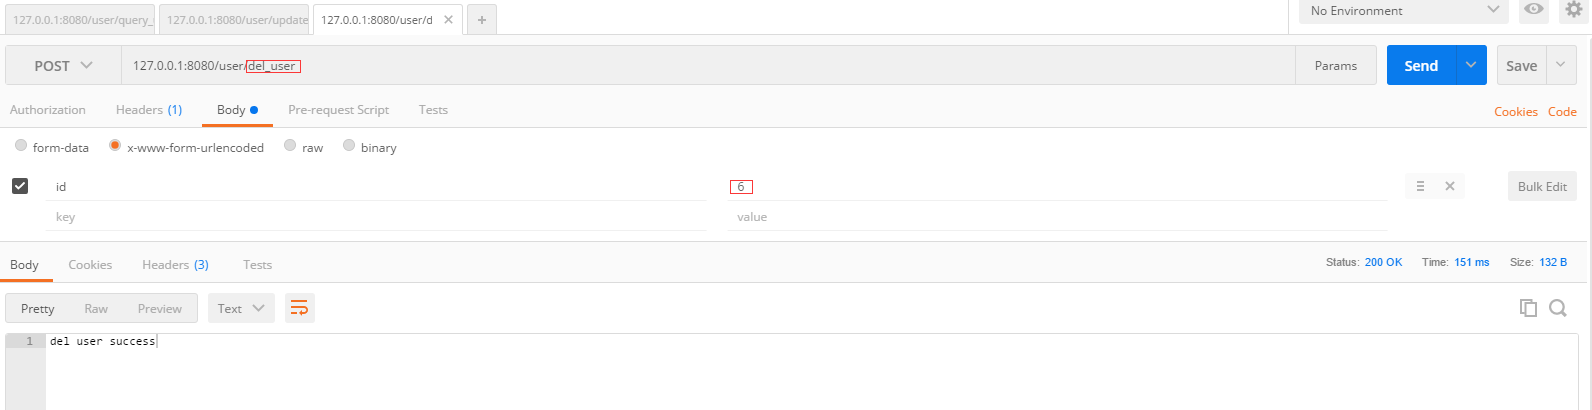

 默认情况下,RedisCache 不会缓存任何null values,因为Redis会丢弃没有value的keys。使用CacheEvict清楚缓存后,会使用org.springframework.cache.support.NullValue作为占位符存储。
示例代码:码云 – 卓立 – Spring Boot + Redis实现缓存
参考链接: