 Zhuoli's Blog
上篇文章我们介绍了Mybatis如何将配置文件解析为Configuration对象,Mybatis中还有一个重要的SQL映射文件(mapper映射文件),用于配置sql相关信息,也需要被解析。在Mybatis配置文件中,通过”<mappers>”标签将SQL映射文件引入。
<!-- mapper文件映射配置 -->
<mappers>
    <package name="com.zhuoli.service.mybatis.explore.mapper"/>
</mappers>
<!-- mapper文件映射配置 -->
<mappers>
<mapper resource="mapper/user_info.xml"/>
</mappers><!-- mapper文件映射配置 -->
<mappers>
<mapper url="file:///Users/chenhao/Documents/IdeaProject/mybatis-explore/src/main/resources/mapper/user_info.xml"/>
</mappers><!-- mapper文件映射配置 -->
<mappers>
<mapper class="com.zhuoli.service.mybatis.explore.mapper.UserInfoMapper"/>
</mappers>上篇文章我们也大致介绍了”<mappers>”标签解析的入口。
private void mapperElement(XNode parent) throws Exception {
if (parent != null) {
// 遍历<mappers>节点下的子节点
for (XNode child : parent.getChildren()) {
// 如果子节点为<package>
if ("package".equals(child.getName())) {
String mapperPackage = child.getStringAttribute("name");
configuration.addMappers(mapperPackage);
} else {
// 否则子节点为<mapper>,则获取子节点<mapper>的"resource"、"url"、"class"属性,三个属性只能定义其中的一个
String resource = child.getStringAttribute("resource");
String url = child.getStringAttribute("url");
String mapperClass = child.getStringAttribute("class");
if (resource != null && url == null && mapperClass == null) {
// "resource"不为空
ErrorContext.instance().resource(resource);
InputStream inputStream = Resources.getResourceAsStream(resource);
XMLMapperBuilder mapperParser = new XMLMapperBuilder(inputStream, configuration, resource, configuration.getSqlFragments());
mapperParser.parse();
} else if (resource == null && url != null && mapperClass == null) {
// "url"属性不为空
ErrorContext.instance().resource(url);
InputStream inputStream = Resources.getUrlAsStream(url);
XMLMapperBuilder mapperParser = new XMLMapperBuilder(inputStream, configuration, url, configuration.getSqlFragments());
mapperParser.parse();
} else if (resource == null && url == null && mapperClass != null) {
// "class"属性不为空
Class<?> mapperInterface = Resources.classForName(mapperClass);
configuration.addMapper(mapperInterface);
} else {
throw new BuilderException("A mapper element may only specify a url, resource or class, but not more than one.");
}
}
}
}
}本篇文章我们就来详细介绍”<mappers>”标签解析的细节实现。”<mappers>”有四种配置方式,无论使用哪种配置方式,其实SQL映射文件解析最终是通过XMLMapperBuilder完成的,这点我们接下来会介绍原因。
1. package配置
<!-- mapper文件映射配置 -->
<mappers>
<package name="com.zhuoli.service.mybatis.explore.mapper"/>
</mappers>这种方式,看似好像我们只配置了Mapper类所在的包,那么这些Mapper类对应的xml配置文件是如何解析的?
if ("package".equals(child.getName())) {
String mapperPackage = child.getStringAttribute("name");
configuration.addMappers(mapperPackage);
}可以看出,是通过调用Configuration类的addMappers方法实现的。
public void addMappers(String packageName) {
mapperRegistry.addMappers(packageName);
}在Configuration类的addMappers方法中,调用了MapperRegistry类的addMappers方法。
**
* Adds the mappers.
*
* @param packageName
* the package name
* @since 3.2.2
*/
public void addMappers(String packageName) {
addMappers(packageName, Object.class);
}public void addMappers(String packageName, Class<?> superType) {
ResolverUtil<Class<?>> resolverUtil = new ResolverUtil<>();
// 1. 查找包下所有父类为superType(Object.class)的类(Mapper接口)
resolverUtil.find(new ResolverUtil.IsA(superType), packageName);
Set<Class<? extends Class<?>>> mapperSet = resolverUtil.getClasses();
// 2. 遍历从包中扫描到的类(Mapper接口),调用addMapper方法解析
for (Class<?> mapperClass : mapperSet) {
addMapper(mapperClass);
}
}public <T> void addMapper(Class<T> type) {
if (type.isInterface()) {
if (hasMapper(type)) {
throw new BindingException("Type " + type + " is already known to the MapperRegistry.");
}
boolean loadCompleted = false;
try {
// 1. 将Mapper接口,添加到knownMappers,value为MapperProxyFactory,用于生成接口的代理对象
knownMappers.put(type, new MapperProxyFactory<>(type));
// 2. 初始化MapperAnnotationBuilder,解析Mapper接口
MapperAnnotationBuilder parser = new MapperAnnotationBuilder(config, type);
parser.parse();
loadCompleted = true;
} finally {
if (!loadCompleted) {
knownMappers.remove(type);
}
}
}
}MapperRegistry的knownMappers,用于存储接口类型到该接口代理工厂的映射,至于该代理工厂的作用,我们后面介绍sql执行时再详细介绍。
然后就是初始化了一个MapperAnnotationBuilder,并调用parse方法,解析Mapper接口。
public void parse() {
String resource = type.toString();
// 如果resource(Mapper接口类toString)还没被加载
// resource = "interface com.zhuoli.service.mybatis.explore.mapper.UserInfoMapper"
if (!configuration.isResourceLoaded(resource)) {
// 1. 加载并解析xml SQL映射文件
loadXmlResource();
// 2. 将resource添加到loadedResources中
configuration.addLoadedResource(resource);
// 3. MapperBuilderAssistant将currentNamespace设置为接口类名
assistant.setCurrentNamespace(type.getName());
// 4. 解析Mapper接口类@CacheNamespace
parseCache();
// 5. 解析Mapper接口类@CacheNamespaceRef
parseCacheRef();
// 6. 遍历Mapper接口类中所有方法,解析直接配置在接口方法上的注解,比如@select
for (Method method : type.getMethods()) {
if (!canHaveStatement(method)) {
continue;
}
if (getAnnotationWrapper(method, false, Select.class, SelectProvider.class).isPresent()
&& method.getAnnotation(ResultMap.class) == null) {
parseResultMap(method);
}
try {
parseStatement(method);
} catch (IncompleteElementException e) {
configuration.addIncompleteMethod(new MethodResolver(this, method));
}
}
}
parsePendingMethods();
}接下来,继续来看一下,loadXmlResource方法。
private void loadXmlResource() {
// Spring may not know the real resource name so we check a flag
// to prevent loading again a resource twice
// this flag is set at XMLMapperBuilder#bindMapperForNamespace
if (!configuration.isResourceLoaded("namespace:" + type.getName())) {
String xmlResource = type.getName().replace('.', '/') + ".xml";
// #1347
InputStream inputStream = type.getResourceAsStream("/" + xmlResource);
if (inputStream == null) {
// Search XML mapper that is not in the module but in the classpath.
try {
inputStream = Resources.getResourceAsStream(type.getClassLoader(), xmlResource);
} catch (IOException e2) {
// ignore, resource is not required
}
}
if (inputStream != null) {
XMLMapperBuilder xmlParser = new XMLMapperBuilder(inputStream, assistant.getConfiguration(), xmlResource, configuration.getSqlFragments(), type.getName());
xmlParser.parse();
}
}
}可以看到,最终使用了XMLMapperBuilder来解析SQL映射文件对应的文件流。还有一个细节需要注意,这里获取SQL映射文件流的方式是:
String xmlResource = type.getName().replace('.', '/') + ".xml";
InputStream inputStream = type.getResourceAsStream("/" + xmlResource);使用的是Class.getResourceAsStream(String path),并且path以”/”打头,所以默认获取的是classpath下对应文件夹下的xml映射文件,举个例子,我们的Mapper接口全路径为”com.zhuoli.service.mybatis.explore.mapper.UserInfoMapper”,则必须保证classpath下SQL映射文件路径为”/com/zhuoli/service/mybatis/explore/mapper/UserInfoMapper.xml”,否则无法读取到SQL映射文件。
由于其它几种mapper映射文件配置最终也会使用到XMLMapperBuilder,所以XMLMapperBuilder如何解析配置文件的,我们留在后面介绍。
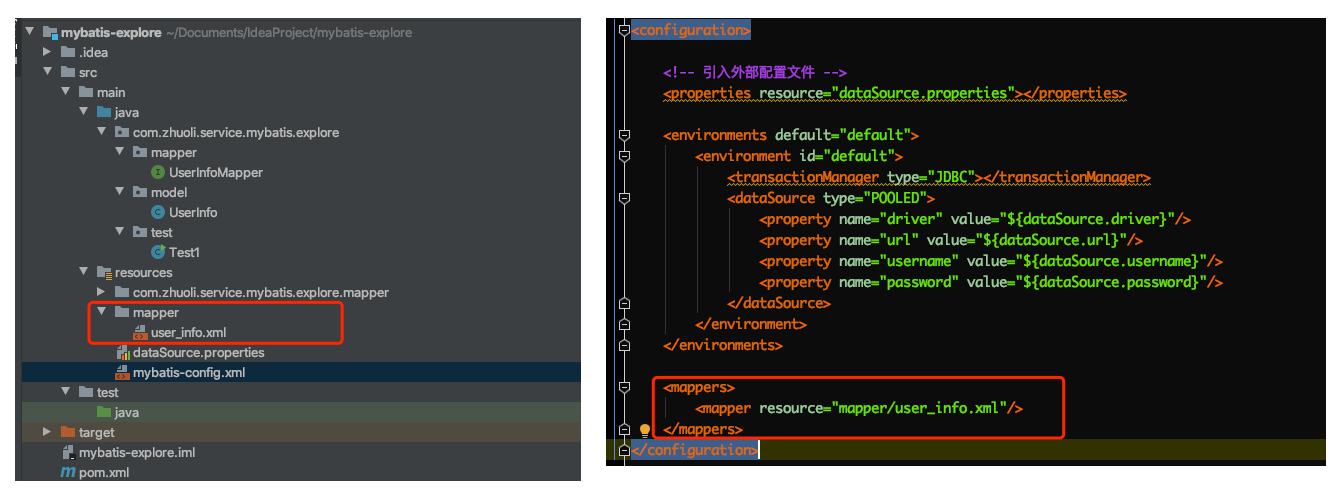
2. resource配置
<!-- mapper文件映射配置 -->
<mappers>
    <mapper resource="mapper/user_info.xml"/>
</mappers>resource配置的方式,我们配置了SQL映射文件的路径,注意这里是相对classpath的相对路径。
if (resource != null && url == null && mapperClass == null) {
ErrorContext.instance().resource(resource);
InputStream inputStream = Resources.getResourceAsStream(resource);
XMLMapperBuilder mapperParser = new XMLMapperBuilder(inputStream, configuration, resource, configuration.getSqlFragments());
mapperParser.parse();
}可以看到,也是先获取SQL映射文件的InputStream,然后调用XMLMapperBuilder的parse方法解析SQL映射文件的。
关于获取文件流,我们来看一下为什么配置文件中配置的是相对路径。跟进一下Resources类的getResourceAsStream方法:
# Resources
public static InputStream getResourceAsStream(String resource) throws IOException {
return getResourceAsStream(null, resource);
}
public static InputStream getResourceAsStream(ClassLoader loader, String resource) throws IOException {
InputStream in = classLoaderWrapper.getResourceAsStream(resource, loader);
if (in == null) {
throw new IOException("Could not find resource " + resource);
}
return in;
}可以看到,最终是通过ClassLoader.getResourceAsStream完成文件流获取的,所以,SQL映射文件必须配置在classpath下,并且路径配置不能以”/”打头。
3. url配置
<!-- mapper文件映射配置 -->
<mappers>
    <mapper url="file:///Users/chenhao/Documents/IdeaProject/mybatis-explore/src/main/resources/mapper/user_info.xml"/>
</mappers>url配置方式,我们可以配置一些文件系统的绝对路径,也可以配置网络环境的映射文件地址。
if (resource == null && url != null && mapperClass == null) {
ErrorContext.instance().resource(url);
InputStream inputStream = Resources.getUrlAsStream(url);
XMLMapperBuilder mapperParser = new XMLMapperBuilder(inputStream, configuration, url, configuration.getSqlFragments());
mapperParser.parse();
}可以看到,解析步骤跟上述resource配置方式一致,也是先获取SQL映射文件流,然后调用XMLMapperBuilder的parse方法解析SQL映射文件。这里url配置支持本地文件绝对路径方式,也支持网络url远端配置。
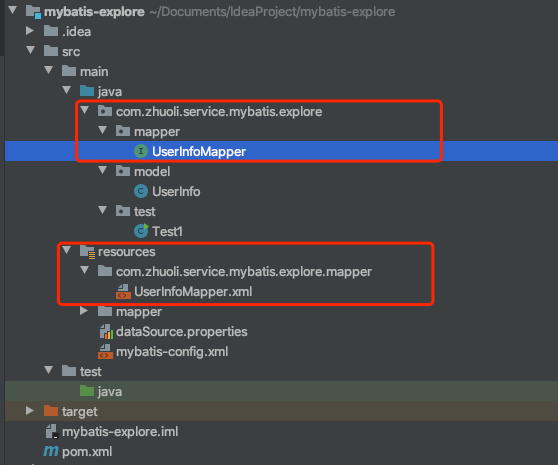
4. class配置
<!-- mapper文件映射配置 -->
<mappers>
    <mapper class="com.zhuoli.service.mybatis.explore.mapper.UserInfoMapper"/>
</mappers>class配置方式,我们配置了映射文件类的类名。
if (resource == null && url == null && mapperClass != null) {
  Class<?> mapperInterface = Resources.classForName(mapperClass);
  configuration.addMapper(mapperInterface);
}可以看到,class配置方式,先获取了配置的Mapper接口Class,然后调用configuration的addMapper方法解析。之前介绍package配置的时候,已经介绍过,addMapper方法中也会获取文件流,然后调用XMLMapperBuilder类的parse方法解析SQL映射文件,后续流程其实跟package方式是相同的。
5. XMLMapperBuilder
上面介绍到,无论通过什么方式配置SQL映射文件,最终解析SQL映射文件内容的都是通过XMLMapperBuilder完成的。接下来我们就来详细看一下XMLMapperBuilder是如何解析SQL映射文件的。
public XMLMapperBuilder(InputStream inputStream, Configuration configuration, String resource, Map<String, XNode> sqlFragments) {
  this(new XPathParser(inputStream, true, configuration.getVariables(), new XMLMapperEntityResolver()),
      configuration, resource, sqlFragments);
}

private XMLMapperBuilder(XPathParser parser, Configuration configuration, String resource, Map<String, XNode> sqlFragments) {
  super(configuration);
  this.builderAssistant = new MapperBuilderAssistant(configuration, resource);
  this.parser = parser;
  this.sqlFragments = sqlFragments;
  this.resource = resource;
}

public XPathParser(InputStream inputStream, boolean validation, Properties variables, EntityResolver entityResolver) {
  commonConstructor(validation, variables, entityResolver);
  this.document = createDocument(new InputSource(inputStream));
}
首先是构造函数,XMLMapperBuilder类继承关系如下:
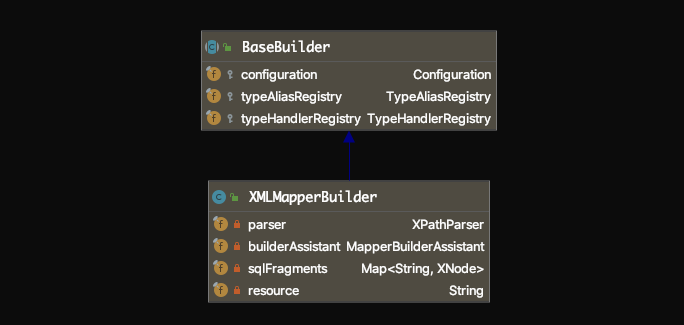
之前的文章介绍Mybatis配置文件解析的时候,介绍过一个XMLConfigBuilder,同样继承于BaseBuilder。BaseBuilder中存在两个三个成员变量:
- configuration:Mybatis配置文件解析后生成的对应对象(之前通过XMLConfigBuilder解析生成的)
- typeAliasRegistry:别名配置,configuration的成员变量,解析Mybatis配置文件过程中生成
- typeHandlerRegistry:类型处理器,用于JDBC类型和java类型的转换,解析Mybatis配置文件过程中生成
XMLMapperBuilder中存在如下几个重要的成员变量:
- parser:用于从SQL映射文件流中获取处理某个节点,即XML DOM解析
- builderAssistant:SQL映射文件处理器,用于辅助解析一些SQL映射文件中的节点,如”cache”节点
- sqlFragments:SQL映射文件中”sql”节点,id -> XNode存储
- resource:SQL映射文件路径,XMLConfigBuilder中只适用于判断SQL映射文件是否已经被解析,因为SQL映射文件流已经在构造函数中传入了
接下来我们来看一下XMLMapperBuilder解析SQL映射文件的入口,也就是parse方法。
public void parse() {
  // 如果SQL映射文件还未被解析过,则解析SQL映射文件
  if (!configuration.isResourceLoaded(resource)) {
    // 1. 解析"mapper"节点
    configurationElement(parser.evalNode("/mapper"));
    // 2. 将资源SQL映射文件添加到"已解析资源"集合中
    configuration.addLoadedResource(resource);
    // 3. 为nameSpace绑定Mapper接口
    bindMapperForNamespace();
  }

  parsePendingResultMaps();
  parsePendingCacheRefs();
  parsePendingStatements();
}
该解析方法的核心就在上述步骤1、3,接下来我们来看一下细节实现。
5.1 mapper节点解析
一份完整的SQL映射文件配置如下:
<?xml version="1.0" encoding="UTF-8"?>
<!DOCTYPE mapper PUBLIC "-//mybatis.org//DTD Mapper 3.0//EN" "http://mybatis.org/dtd/mybatis-3-mapper.dtd">
<mapper namespace="com.zhuoli.service.mybatis.explore.mapper.UserInfoMapper">

    <resultMap id="userInfoResult" type="com.zhuoli.service.mybatis.explore.model.UserInfo">
        <result property="id" column="id" jdbcType="BIGINT"/>
        <result property="name" column="name" jdbcType="VARCHAR"/>
        <result property="age" column="age" jdbcType="INTEGER"/>
    </resultMap>

    <cache/>

    <sql id="table">user_info</sql>

    <select id="queryAllUser" resultMap="userInfoResult">
        select * from <include refid="table"/>;
    </select>

    <select id="queryUserInfoById" resultMap="userInfoResult" parameterType="java.lang.Long">
        select * from user_info where id = #{id};
    </select>

    <insert id="addUser" parameterType="com.zhuoli.service.mybatis.explore.model.UserInfo" useGeneratedKeys="true" keyProperty="id">
        insert into user_info (name, age) values (#{name}, #{age})
    </insert>

    <delete id="delUserById" parameterType="java.lang.Long">
        delete from user_info where id = #{id};
    </delete>

    <update id="updateUserAge">
        update user_info set age = #{age} where id = #{id}
    </update>
</mapper>
在SQL配置文件中,根节点是<mapper>,在根节点<mapper>下,我们可以配置多种节点,比如 <cache>、<resultMap>、<sql> 、 <select>、<insert>、<delete>、<update> 等。而SQL映射文件中<mapper>节点解析,就是该节点下配置的各子节点的解析过程,解析方法是configurationElement方法。
private void configurationElement(XNode context) {
  try {
    // 获取mapper节点的"namespace"属性,比如"com.zhuoli.service.mybatis.explore.mapper.UserInfoMapper"
    String namespace = context.getStringAttribute("namespace");
    if (namespace == null || namespace.isEmpty()) {
      throw new BuilderException("Mapper's namespace cannot be empty");
    }
    // 将命名空间设置到到builderAssistant的currentNamespace成员中
    builderAssistant.setCurrentNamespace(namespace);
    // 解析<cache-ref>节点
    cacheRefElement(context.evalNode("cache-ref"));
    // 解析<cache>节点
    cacheElement(context.evalNode("cache"));
    // 解析<parameterMap>节点,老式风格的参数映射,此元素已被废弃
    parameterMapElement(context.evalNodes("/mapper/parameterMap"));
    // 解析<resultMap>节点
    resultMapElements(context.evalNodes("/mapper/resultMap"));
    // 解析<sql>节点
    sqlElement(context.evalNodes("/mapper/sql"));
    // 解析 <select>、<insert>、<update>、<delete> 节点
    buildStatementFromContext(context.evalNodes("select|insert|update|delete"));
  } catch (Exception e) {
    throw new BuilderException("Error parsing Mapper XML. The XML location is '" + resource + "'. Cause: " + e, e);
  }
}
5.1.1 cache节点解析——cacheElement
MyBatis提供了一、二级缓存,其中一级缓存是SqlSession级别的,默认开启。二级缓存配置在映射文件中,使用者需要显示配置才能开启(也就是在SQL映射文件中通过<cache>节点配置)。如下:
<cache/>我们也可以对二级缓存做一些配置,如下:
<cache eviction="LRU" flushInterval="60000" size="512" readOnly="true"/>- eviction:缓存淘汰策略,这里使用LRU算法,即当缓存需要淘汰时,优先淘汰最久未使用的对象
- flushInterval:缓存刷新时间,这里配置每60秒刷新一次
- size:缓存的容量,这里配置512个对象引用
- readOnly:只读缓存,默认为false,这里设置为true,表明用户从缓存中获取对象后,不要再修改对象进行修改,否则会影响其他用户的查询
cacheElement方法用于解析<cache>节点,其实Mybatis二级缓存在使用上存在一些问题,所以线上使用较少,即使使用也是一些特定的场景。
private void cacheElement(XNode context) {
  if (context != null) {
    // 获取type属性,如果未指定type,默认为PERPETUAL(typeAliases中注册,类型为PerpetualCache)
    String type = context.getStringAttribute("type", "PERPETUAL");
    // 通过缓存类型名,解析该别名对应的Class
    Class<? extends Cache> typeClass = typeAliasRegistry.resolveAlias(type);
    // 获取缓存淘汰方式,如果未指定,默认为"LRU"
    String eviction = context.getStringAttribute("eviction", "LRU");
    // 获取缓存淘汰方式别名,解析该别名对应的Class
    Class<? extends Cache> evictionClass = typeAliasRegistry.resolveAlias(eviction);
    // 获取缓存刷新时间
    Long flushInterval = context.getLongAttribute("flushInterval");
    // 获取缓存容量大小
    Integer size = context.getIntAttribute("size");
    // 获取缓存readOnly属性
    boolean readWrite = !context.getBooleanAttribute("readOnly", false);
    boolean blocking = context.getBooleanAttribute("blocking", false);
    // 获取<cache>节点下的<property>子节点name-value对,生成properties
    Properties props = context.getChildrenAsProperties();
    // 构建缓存对象
    builderAssistant.useNewCache(typeClass, evictionClass, flushInterval, size, readWrite, blocking, props);
  }
大致可以分为两部分,首先是获取<cache>属性配置,其次是调用builderAssistant的userNewCache方法,生成Cache对象。接下来我们来看一下如何构建Cache对象的。
public Cache useNewCache(Class<? extends Cache> typeClass,
    Class<? extends Cache> evictionClass,Long flushInterval,
    Integer size,boolean readWrite,boolean blocking,Properties props) {

    // 使用构造者模式构建缓存实例
    Cache cache = new CacheBuilder(currentNamespace)
        .implementation(valueOrDefault(typeClass, PerpetualCache.class))
        .addDecorator(valueOrDefault(evictionClass, LruCache.class))
        .clearInterval(flushInterval)
        .size(size)
        .readWrite(readWrite)
        .blocking(blocking)
        .properties(props)
        .build();

    // 添加缓存到Configuration对象中
    configuration.addCache(cache);

    // 设置currentCache属性,即当前使用的缓存
    currentCache = cache;
    return cache;
}
这里Cache的生成,使用了构造者模式,即CacheBuilder。
public Cache build() {
    // 设置默认的缓存类型(PerpetualCache)和缓存装饰器(LruCache)
    setDefaultImplementations();

    // 通过反射创建缓存
    Cache cache = newBaseCacheInstance(implementation, id);
    setCacheProperties(cache);
    // 对PerpetualCache缓存应用装饰器
    if (PerpetualCache.class.equals(cache.getClass())) {
        // 遍历装饰器集合,应用装饰器
        for (Class<? extends Cache> decorator : decorators) {
            // 通过反射创建装饰器实例
            cache = newCacheDecoratorInstance(decorator, cache);
            // 设置属性值到缓存实例中
            setCacheProperties(cache);
        }
        // 应用标准的装饰器,比如 LoggingCache、SynchronizedCache
        cache = setStandardDecorators(cache);
    } else if (!LoggingCache.class.isAssignableFrom(cache.getClass())) {
        // 应用具有日志功能的缓存装饰器
        cache = new LoggingCache(cache);
    }
    return cache;
}

private void setDefaultImplementations() {
    if (this.implementation == null) {
        //设置默认缓存类型为PerpetualCache
        this.implementation = PerpetualCache.class;
        if (this.decorators.isEmpty()) {
            this.decorators.add(LruCache.class);
        }
    }
}

private Cache newBaseCacheInstance(Class<? extends Cache> cacheClass, String id) {
    //获取构造器
    Constructor cacheConstructor = this.getBaseCacheConstructor(cacheClass);

    try {
        //通过构造器实例化Cache
        return (Cache)cacheConstructor.newInstance(id);
    } catch (Exception var5) {
        throw new CacheException("Could not instantiate cache implementation (" + cacheClass + "). Cause: " + var5, var5);
    }
}
如上就完成了<cache>节点的解析,解析结果就是创建了一个Cache的实例对象,然后添加到Configuration中,并且设置到BuilderAssistant的currentCache属性中,至于cache是如何生效的,后面的文章中再介绍。
5.1.2 resultMap节点解析——resultMapElements
resultMap主要用于结果映射,之前介绍的文章中,我们使用JDBC时,结果到对象的映射需要程序员自己遍历ResultSet,完成查询结果到对象的映射。而Mybatis支持通过自定义配置<resultMap>的方式,帮我们自动完成查询结果到对象的映射。resultMap节点配置如下:
<resultMap id="userInfoResult" type="com.zhuoli.service.mybatis.explore.model.UserInfo">
    <result property="id" column="id" jdbcType="BIGINT"/>
    <result property="name" column="name" jdbcType="VARCHAR"/>
    <result property="age" column="age" jdbcType="INTEGER"/>
</resultMap>
resultMap节点是通过resultMapElements方法解析的。
private void resultMapElements(List<XNode> list) {
  // 遍历处理每一个<resultMap>节点
  for (XNode resultMapNode : list) {
    try {
      resultMapElement(resultMapNode);
    } catch (IncompleteElementException e) {
      // ignore, it will be retried
    }
  }
}
private ResultMap resultMapElement(XNode resultMapNode) {
return resultMapElement(resultMapNode, Collections.emptyList(), null);
}
private ResultMap resultMapElement(XNode resultMapNode, List<ResultMapping> additionalResultMappings, Class<?> enclosingType) {
ErrorContext.instance().activity("processing " + resultMapNode.getValueBasedIdentifier());
// 获取<resultMap>节点type属性
String type = resultMapNode.getStringAttribute("type",
resultMapNode.getStringAttribute("ofType",
resultMapNode.getStringAttribute("resultType",
resultMapNode.getStringAttribute("javaType"))));
// 获取type对应的Class
Class<?> typeClass = resolveClass(type);
if (typeClass == null) {
typeClass = inheritEnclosingType(resultMapNode, enclosingType);
}
Discriminator discriminator = null;
// 创建ResultMapping集合,该集合中存储当前<resultMap>节点的子节点
List<ResultMapping> resultMappings = new ArrayList<>(additionalResultMappings);
// 获取<resultMap>所有的子节点
List<XNode> resultChildren = resultMapNode.getChildren();
// 遍历<resultMap>所有的子节点
for (XNode resultChild : resultChildren) {
if ("constructor".equals(resultChild.getName())) {
processConstructorElement(resultChild, typeClass, resultMappings);
} else if ("discriminator".equals(resultChild.getName())) {
discriminator = processDiscriminatorElement(resultChild, typeClass, resultMappings);
} else {
// <id>节点&<result>节点处理
List<ResultFlag> flags = new ArrayList<>();
if ("id".equals(resultChild.getName())) {
flags.add(ResultFlag.ID);
}
// 将id或result节点生成相应的ResultMapping,并添加到resultMappings集合中
resultMappings.add(buildResultMappingFromContext(resultChild, typeClass, flags));
}
}
// 获取<resultMap>节点id属性
String id = resultMapNode.getStringAttribute("id",
resultMapNode.getValueBasedIdentifier());
// 获取<resultMap>节点extends属性
String extend = resultMapNode.getStringAttribute("extends");
// 获取<resultMap>节点autoMapping属性
Boolean autoMapping = resultMapNode.getBooleanAttribute("autoMapping");
// 创建ResultMapResolver对象
ResultMapResolver resultMapResolver = new ResultMapResolver(builderAssistant, id, typeClass, extend, discriminator, resultMappings, autoMapping);
try {
// 通过ResultMapResolver构建ResultMap对象
return resultMapResolver.resolve();
} catch (IncompleteElementException e) {
configuration.addIncompleteResultMap(resultMapResolver);
throw e;
}
}上述<resultMap>节点解析的核心是<resultMap>节点的子节点转换为ResultMapping对象的过程,也就是buildResultMappingFromContext方法,我们来跟进一下该方法。
private ResultMapping buildResultMappingFromContext(XNode context, Class<?> resultType, List<ResultFlag> flags) {
  String property;
  if (flags.contains(ResultFlag.CONSTRUCTOR)) {
    property = context.getStringAttribute("name");
  } else {
    property = context.getStringAttribute("property");
  }
  String column = context.getStringAttribute("column");
  String javaType = context.getStringAttribute("javaType");
  String jdbcType = context.getStringAttribute("jdbcType");
  // 获取嵌套select查询属性
  String nestedSelect = context.getStringAttribute("select");
  // 获取嵌套结果映射属性
  String nestedResultMap = context.getStringAttribute("resultMap", () ->
      processNestedResultMappings(context, Collections.emptyList(), resultType));
  String notNullColumn = context.getStringAttribute("notNullColumn");
  String columnPrefix = context.getStringAttribute("columnPrefix");
  String typeHandler = context.getStringAttribute("typeHandler");
  String resultSet = context.getStringAttribute("resultSet");
  String foreignColumn = context.getStringAttribute("foreignColumn");
  // 获取延迟查询属性,跟上述嵌套select相关,允许延迟查询,则嵌套查询结果不会立即返回
  boolean lazy = "lazy".equals(context.getStringAttribute("fetchType", configuration.isLazyLoadingEnabled() ? "lazy" : "eager"));
  // 获取javaType属性对应的Class
  Class<?> javaTypeClass = resolveClass(javaType);
  // 获取typeHandler对应的Class类型
  Class<? extends TypeHandler<?>> typeHandlerClass = resolveClass(typeHandler);
  // 获取jdbcType枚举
  JdbcType jdbcTypeEnum = resolveJdbcType(jdbcType);
  // 构建ResultMapping对象
  return builderAssistant.buildResultMapping(resultType, property, column, javaTypeClass, jdbcTypeEnum, nestedSelect, nestedResultMap, notNullColumn, columnPrefix, typeHandlerClass, flags, resultSet, foreignColumn, lazy);
}关于子节点解析时,嵌套select查询和嵌套结果映射,这里再详细介绍一下。分别对应”select”属性和”resultMap”属性。这两个属性只出现在<association>和<collection>两个子节点中(association是一个类型的关联,collection是一个集合的关联,详细参考Mybatis官方文档)。如果包含”select”属性,则表明为嵌套select查询,如果包含”resultMap”属性,则表名为嵌套结果映射。关于嵌套select查询和嵌套结果映射,这里简单的介绍一下区别就是,嵌套select查询需要额外的sql查询,而嵌套结果映射不需要再做额外的sql查询(只是结果映射,一般用于处理sql join的结果映射)。
所以嵌套结果映射,需要获取嵌套映射对应的resultMap,也就是:
String nestedResultMap = context.getStringAttribute("resultMap", () ->
      processNestedResultMappings(context, Collections.emptyList(), resultType));
如果<association>和<collection>节点存在resultMap属性,则直接获取该属性返回;否则调用processNestedResultMappings方法尝试生成ResultMap对象,并返回生成resultMap的id。之所以需要processNestedResultMappings方法,是因为嵌套结果映射存在两种配置方式,如下:
<resultMap id="blogResult" type="Blog">
  <id property="id" column="blog_id" />
  <result property="title" column="blog_title"/>
  <association property="author" column="blog_author_id" javaType="Author" resultMap="authorResult"/>
</resultMap>

<resultMap id="authorResult" type="Author">
  <id property="id" column="author_id"/>
  <result property="username" column="author_username"/>
  <result property="password" column="author_password"/>
  <result property="email" column="author_email"/>
  <result property="bio" column="author_bio"/>
</resultMap>
这种方式,authorResult对应的resultMap是可以复用的。但是也存在一些不需要复用的resultMap,我们可以使用第二种方式配置:
<resultMap id="blogResult" type="Blog">
  <id property="id" column="blog_id" />
  <result property="title" column="blog_title"/>
  <association property="author" javaType="Author">
    <id property="id" column="author_id"/>
    <result property="username" column="author_username"/>
    <result property="password" column="author_password"/>
    <result property="email" column="author_email"/>
    <result property="bio" column="author_bio"/>
  </association>
</resultMap>
使用这种方式配置时,就需要使用processNestedResultMappings方法,生成ResultMap嵌套的对象。
如上两种配置,都可以完成如下查询的映射:
<select id="selectBlog" resultMap="blogResult">
  select
    B.id            as blog_id,
    B.title         as blog_title,
    B.author_id     as blog_author_id,
    A.id            as author_id,
    A.username      as author_username,
    A.password      as author_password,
    A.email         as author_email,
    A.bio           as author_bio
  from Blog B left outer join Author A on B.author_id = A.id
  where B.id = #{id}
</select>
接下来我们来看一下ResultMapping的构建过程,也就是builderAssistant.buildResultMapping方法:
public ResultMapping buildResultMapping(
    Class<?> resultType,
    String property,
    String column,
    Class<?> javaType,
    JdbcType jdbcType,
    String nestedSelect,
    String nestedResultMap,
    String notNullColumn,
    String columnPrefix,
    Class<? extends TypeHandler<?>> typeHandler,
    List<ResultFlag> flags,
    String resultSet,
    String foreignColumn,
    boolean lazy) {
  // 获取当前<resultMap>子节点配置,对应的javaType,由于存在嵌套结果映射,则如果是嵌套结果映射,则取上面获取的resultType
  Class<?> javaTypeClass = resolveResultJavaType(resultType, property, javaType);
  TypeHandler<?> typeHandlerInstance = resolveTypeHandler(javaTypeClass, typeHandler);
  List<ResultMapping> composites;
  if ((nestedSelect == null || nestedSelect.isEmpty()) && (foreignColumn == null || foreignColumn.isEmpty())) {
    composites = Collections.emptyList();
  } else {
    composites = parseCompositeColumnName(column);
  }
  // 构造器模式,构建ResultMapping对象
  return new ResultMapping.Builder(configuration, property, column, javaTypeClass)
      .jdbcType(jdbcType)
      .nestedQueryId(applyCurrentNamespace(nestedSelect, true))
      .nestedResultMapId(applyCurrentNamespace(nestedResultMap, true))
      .resultSet(resultSet)
      .typeHandler(typeHandlerInstance)
      .flags(flags == null ? new ArrayList<>() : flags)
      .composites(composites)
      .notNullColumns(parseMultipleColumnNames(notNullColumn))
      .columnPrefix(columnPrefix)
      .foreignColumn(foreignColumn)
      .lazy(lazy)
      .build();
}
这里就完成了<resultMap>下子节点的解析,每个子节点会解析为一个ResultMapping对象。然后这些对象会被添加到一个集合中,最后通过调用resultMapResolver.resolve()方法,完成<resultMap>节点到ResultMap对象的解析。我们来看一下ResultMap对象的生成。
public class ResultMapResolver {
  private final MapperBuilderAssistant assistant;
  private final String id;
  private final Class<?> type;
  private final String extend;
  private final Discriminator discriminator;
  private final List<ResultMapping> resultMappings;
  private final Boolean autoMapping;

  public ResultMapResolver(MapperBuilderAssistant assistant, String id, Class<?> type, String extend, Discriminator discriminator, List<ResultMapping> resultMappings, Boolean autoMapping) {
    this.assistant = assistant;
    this.id = id;
    this.type = type;
    this.extend = extend;
    this.discriminator = discriminator;
    this.resultMappings = resultMappings;
    this.autoMapping = autoMapping;
  }

  public ResultMap resolve() {
    return assistant.addResultMap(this.id, this.type, this.extend, this.discriminator, this.resultMappings, this.autoMapping);
  }

}
我们通过ResultMapResolver的resolve方法,完成了ResultMap对象的生成,而该方法中调用了MapperBuilderAssistant的addResultMap方法。
public ResultMap addResultMap(
    String id,
    Class<?> type,
    String extend,
    Discriminator discriminator,
    List<ResultMapping> resultMappings,
    Boolean autoMapping) {
  id = applyCurrentNamespace(id, false);
  extend = applyCurrentNamespace(extend, true);

  if (extend != null) {
    if (!configuration.hasResultMap(extend)) {
      throw new IncompleteElementException("Could not find a parent resultmap with id '" + extend + "'");
    }
    ResultMap resultMap = configuration.getResultMap(extend);
    List<ResultMapping> extendedResultMappings = new ArrayList<>(resultMap.getResultMappings());
    extendedResultMappings.removeAll(resultMappings);
    // Remove parent constructor if this resultMap declares a constructor.
    boolean declaresConstructor = false;
    for (ResultMapping resultMapping : resultMappings) {
      if (resultMapping.getFlags().contains(ResultFlag.CONSTRUCTOR)) {
        declaresConstructor = true;
        break;
      }
    }
    if (declaresConstructor) {
      extendedResultMappings.removeIf(resultMapping -> resultMapping.getFlags().contains(ResultFlag.CONSTRUCTOR));
    }
    resultMappings.addAll(extendedResultMappings);
  }
  // 构造器模式,构建ResultMap对象
  ResultMap resultMap = new ResultMap.Builder(configuration, id, type, resultMappings, autoMapping)
      .discriminator(discriminator)
      .build();
  // 将生成的ResultMap对象添加到configuration中
  configuration.addResultMap(resultMap);
  return resultMap;
}
以上就完成了<resultMap>节点的解析。
5.1.3 sql节点解析——sqlElement
sql节点可以用来定义可重用的SQL代码片段,以便在其它语句中使用。比如表名、列名等。官方文档中示例如下:
<sql id="userColumns"> ${alias}.id,${alias}.username,${alias}.password </sql>

<select id="selectUsers" resultType="map">
  select
    <include refid="userColumns"><property name="alias" value="t1"/></include>,
    <include refid="userColumns"><property name="alias" value="t2"/></include>
  from some_table t1
    cross join some_table t2
</select>
当然,我们也可以用的非常简单,比如就用来复用一个表名:
<sql id="table">user_info</sql>

<select id="queryAllUser" resultMap="userInfoResult">
    select * from <include refid="table"/>;
</select>
sql节点的解析,是通过sqlElement方法完成的。
private void sqlElement(List<XNode> list) {
  if (configuration.getDatabaseId() != null) {
    sqlElement(list, configuration.getDatabaseId());
  }
  sqlElement(list, null);
}可以看到如果databaseId不为null,会解析尝试解析两次sql节点。databaseId其实是用来支持多套sql定义的,比如针对Oracle的sql标签上用databaseId=“oracle”,针对mysql的sql标签上用databaseId=“mysql”。
而configuration类的databaseId成员的设置是在XMLConfigBuilder.databaseIdProviderElement方法,用于解析Mybatis配置文件中的如下节点:
<databaseIdProvider type="DB_VENDOR">
  <property name="MySQL" value="mysql" />
   <property name="Oracle" value="oracle" />
</databaseIdProvider>
知道databaseId的作用后,我们继续来看sqlElement,由于我们之前Mybatis配置文件中没有定义databaseIdProvider,所以会进入如下分支:
sqlElement(list, null);private void sqlElement(List<XNode> list, String requiredDatabaseId) {
// 遍历解析sql节点
for (XNode context : list) {
// 获取sql节点"databaseId"属性
String databaseId = context.getStringAttribute("databaseId");
// 获取sql节点"id"属性
String id = context.getStringAttribute("id");
// id = currentNamespace + "." + id
id = builderAssistant.applyCurrentNamespace(id, false);
// 当前databaseId和requiredDatabaseId是否一致,示例中都为null,所以一致
if (databaseIdMatchesCurrent(id, databaseId, requiredDatabaseId)) {
// 将id -> XNode键值对添加到XMLMapperBuilder的sqlFragments成员中,以供后面的sql语句使用
sqlFragments.put(id, context);
}
}
}5.1.4 select|insert|update|delete节点解析——buildStatementFromContext
<select>、<insert>、<update> 以及 <delete> 等节点用于定义sql语句。
<select id="queryUserInfoById" resultMap="userInfoResult" parameterType="java.lang.Long">
    select * from user_info where id = #{id};
</select>

<insert id="addUser" parameterType="com.zhuoli.service.mybatis.explore.model.UserInfo" useGeneratedKeys="true" keyProperty="id">
    insert into user_info (name, age) values (#{name}, #{age})
</insert>

<delete id="delUserById" parameterType="java.lang.Long">
    delete from user_info where id = #{id};
</delete>

<update id="updateUserAge">
    update user_info set age = #{age} where id = #{id}
</update>
这些sql语句节点的解析是通过buildStatementFromContext方法完成的。
private void buildStatementFromContext(List<XNode> list) {
  if (configuration.getDatabaseId() != null) {
    buildStatementFromContext(list, configuration.getDatabaseId());
  }
  buildStatementFromContext(list, null);
}
这里也有databaseId是否为空的判断,原因在上述sql节点解析时相同。我们这里databaseId为空,所以直接进入如下分支:
buildStatementFromContext(list, null);private void buildStatementFromContext(List<XNode> list, String requiredDatabaseId) {
// 遍历解析所有的sql定义节点,<select>、<insert>、<update>、<delete>
for (XNode context : list) {
// 创建XMLStatementBuilder解析类,用于解析sql定义节点
final XMLStatementBuilder statementParser = new XMLStatementBuilder(configuration, builderAssistant, context, requiredDatabaseId);
try {
// 解析sql定义节点为Statement对象,并存储到configuration的mappedStatements集合中
statementParser.parseStatementNode();
} catch (IncompleteElementException e) {
configuration.addIncompleteStatement(statementParser);
}
}
}所以解析的逻辑都在parseStatementNode方法中。
public void parseStatementNode() {
  // 获取sql定义节点的"id"属性
  String id = context.getStringAttribute("id");
  // 获取sql定义节点的"databaseId"属性
  String databaseId = context.getStringAttribute("databaseId");

  // 如果databaseId和requiredDatabaseId不符,则直接返回
  if (!databaseIdMatchesCurrent(id, databaseId, this.requiredDatabaseId)) {
    return;
  }

  // 获取sql定义节点名称,比如<select>节点名称select
  String nodeName = context.getNode().getNodeName();
  // 根据节点名称解析SqlCommandType
  SqlCommandType sqlCommandType = SqlCommandType.valueOf(nodeName.toUpperCase(Locale.ENGLISH));
  // 根据SqlCommandType,判断是否为<select>节点
  boolean isSelect = sqlCommandType == SqlCommandType.SELECT;
  // 是否需要刷新缓存
  boolean flushCache = context.getBooleanAttribute("flushCache", !isSelect);
  // 是否可以使用缓存
  boolean useCache = context.getBooleanAttribute("useCache", isSelect);
  // 获取sql定义节点的"resultOrdered"属性
  boolean resultOrdered = context.getBooleanAttribute("resultOrdered", false);

  // 解析<include>节点
  XMLIncludeTransformer includeParser = new XMLIncludeTransformer(configuration, builderAssistant);
  includeParser.applyIncludes(context.getNode());

  // 获取sql定义节点的"parameterType",并获取对应的Class类型
  String parameterType = context.getStringAttribute("parameterType");
  Class<?> parameterTypeClass = resolveClass(parameterType);

  String lang = context.getStringAttribute("lang");
  LanguageDriver langDriver = getLanguageDriver(lang);

  // 处理SelectKey节点,在这里会将KeyGenerator加入到Configuration.keyGenerators中
  processSelectKeyNodes(id, parameterTypeClass, langDriver);

  // Parse the SQL (pre: <selectKey> and <include> were parsed and removed)
  KeyGenerator keyGenerator;
  String keyStatementId = id + SelectKeyGenerator.SELECT_KEY_SUFFIX;
  keyStatementId = builderAssistant.applyCurrentNamespace(keyStatementId, true);
  // 判断是否已经有解析好的KeyGenerator
  if (configuration.hasKeyGenerator(keyStatementId)) {
    keyGenerator = configuration.getKeyGenerator(keyStatementId);
  } else {
    // 解析KeyGenerator,优先获取SQL定义中的"useGeneratedKeys",如果SQL定义中未配置,则使用全局配置
    keyGenerator = context.getBooleanAttribute("useGeneratedKeys",
        configuration.isUseGeneratedKeys() && SqlCommandType.INSERT.equals(sqlCommandType))
        ? Jdbc3KeyGenerator.INSTANCE : NoKeyGenerator.INSTANCE;
  }

  // 解析SQL语句
  SqlSource sqlSource = langDriver.createSqlSource(configuration, context, parameterTypeClass);
  StatementType statementType = StatementType.valueOf(context.getStringAttribute("statementType", StatementType.PREPARED.toString()));
  Integer fetchSize = context.getIntAttribute("fetchSize");
  Integer timeout = context.getIntAttribute("timeout");
  String parameterMap = context.getStringAttribute("parameterMap");
  String resultType = context.getStringAttribute("resultType");
  Class<?> resultTypeClass = resolveClass(resultType);
  String resultMap = context.getStringAttribute("resultMap");
  String resultSetType = context.getStringAttribute("resultSetType");
  ResultSetType resultSetTypeEnum = resolveResultSetType(resultSetType);
  if (resultSetTypeEnum == null) {
    resultSetTypeEnum = configuration.getDefaultResultSetType();
  }
  String keyProperty = context.getStringAttribute("keyProperty");
  String keyColumn = context.getStringAttribute("keyColumn");
  String resultSets = context.getStringAttribute("resultSets");

  // 构建MappedStatement对象,并存储到Configuration的mappedStatements集合中
  builderAssistant.addMappedStatement(id, sqlSource, statementType, sqlCommandType,
      fetchSize, timeout, parameterMap, parameterTypeClass, resultMap, resultTypeClass,
      resultSetTypeEnum, flushCache, useCache, resultOrdered,
      keyGenerator, keyProperty, keyColumn, databaseId, langDriver, resultSets);
}
该解析方法中,存在三点相对复杂的点,值得我们进一步跟进一下:
- <include>节点解析
- SQL语句解析为SqlSource对象
- MappedStatement对象构建
接下来我我们一一来看一看。
5.1.4.1 <include>节点解析
关于节点解析,简单的讲,其实就是把我们<select>、<insert>、<update> 以及 <delete> 中的<include>标签替换为真正的<sql>标签定义的内容。而解析方法是XMLIncludeTransformer.applyIncludes。
public void applyIncludes(Node source) {
  Properties variablesContext = new Properties();
  // 获取Configuration的variables成员内容
  Properties configurationVariables添加到 = configuration.getVariables();
  // 将configurationVariables添加到variablesContext
  Optional.ofNullable(configurationVariables).ifPresent(variablesContext::putAll);
  // 处理<select>等标签中的<include>节点
  applyIncludes(source, variablesContext, false);
}
/**
* Recursively apply includes through all SQL fragments.
*
* @param source
* Include node in DOM tree
* @param variablesContext
* Current context for static variables with values
*/
private void applyIncludes(Node source, final Properties variablesContext, boolean included) {
// 第一个条件分支,处理<include>节点
if ("include".equals(source.getNodeName())) {
// 获取<include>节点关联的<sql>节点,也是我们要替换的内容
Node toInclude = findSqlFragment(getStringAttribute(source, "refid"), variablesContext);
Properties toIncludeContext = getVariablesContext(source, variablesContext);
applyIncludes(toInclude, toIncludeContext, true);
if (toInclude.getOwnerDocument() != source.getOwnerDocument()) {
toInclude = source.getOwnerDocument().importNode(toInclude, true);
}
// 将<select>节点中的<include>节点替换为<sql>节点
source.getParentNode().replaceChild(toInclude, source);
while (toInclude.hasChildNodes()) {
// 将<sql>中的内容插入到<sql>节点之前
toInclude.getParentNode().insertBefore(toInclude.getFirstChild(), toInclude);
}
// 从<select>节点中将<sql>节点删除,因为之前已经将<sql>中的内容插入到<sql>节点之前了
toInclude.getParentNode().removeChild(toInclude);
// 第二个条件分支(不是<include>的xml Node节点)
} else if (source.getNodeType() == Node.ELEMENT_NODE) {
if (included && !variablesContext.isEmpty()) {
// replace variables in attribute values
NamedNodeMap attributes = source.getAttributes();
for (int i = 0; i < attributes.getLength(); i++) {
Node attr = attributes.item(i);
// 将source节点属性中的占位符 ${} 替换成具体的属性值
attr.setNodeValue(PropertyParser.parse(attr.getNodeValue(), variablesContext));
}
}
// 获取souce节点子节点
NodeList children = source.getChildNodes();
// 遍历子节点,递归调用applyIncludes,解析子节点
for (int i = 0; i < children.getLength(); i++) {
applyIncludes(children.item(i), variablesContext, included);
}
// 第三个条件分支,处理文本节点
} else if (included && (source.getNodeType() == Node.TEXT_NODE || source.getNodeType() == Node.CDATA_SECTION_NODE)
&& !variablesContext.isEmpty()) {
// 将文本(text)节点中的属性占位符 ${} 替换成具体的属性值
source.setNodeValue(PropertyParser.parse(source.getNodeValue(), variablesContext));
}
}我们来看一下我们的SQL映射文件中<include>节点的解析。
<sql id="table">user_info</sql>

<select id="queryAllUser" resultMap="userInfoResult">
    select * from <include refid="table"/>;
</select>
第一次调用applyIncludes方法时,source为<select>节点,节点类型为ELEMENT_NODE,此时会进入第二个分支,获取到获取 <select> 子节点列表,遍历子节点列表,将子节点作为参数,进行递归调用applyIncludes 。 <select> 节点的子节点如下:
| 子节点 | 类型 |
| select * from | TEXT_NODE |
| <include refid=”table”/> | ELEMENT_NODE |
第一个子节点调用applyIncludes方法,source为select * from节点,节点类型为TEXT_NODE,进入分支三,没有${},不会替换,则节点一结束返回,什么都没有做。
第二个节点调用applyIncludes方法,此时source为<include refid=”table”/>节点,节点类型为ELEMENT_NODE,进入分支一,通过refid找到sql节点,也就是toInclude节点,执行source.getParentNode().replaceChild(toInclude, source);,直接将<include refid=”table”/>节点的父节点,也就是<select>节点中的<include>节点替换成<sql>节点,然后调用toInclude.getParentNode().insertBefore(toInclude.getFirstChild(), toInclude);,将<sql>中的内容插入到<sql>节点之前,也就是将user插入到<sql>节点之前,最后不需要<sql>节点了,将该节点从dom中移除。
5.1.4.2 SQL语句解析为SqlSource对象
SqlSource对象的构建是通过LanguageDriver.createSqlSource方法完成的,由于我们在<select>等定义语句中,未指定”lang”属性,所以会使用默认LanguageDriver,即XMLLanguageDriver(在Configuration类通过languageRegistry.setDefaultDriverClass注册的)。
public SqlSource createSqlSource(Configuration configuration, XNode script, Class<?> parameterType) {
  // 构建XMLScriptBuilder
  XMLScriptBuilder builder = new XMLScriptBuilder(configuration, script, parameterType);
  // 解析<select>节点为SqlSource
  return builder.parseScriptNode();
}
public SqlSource parseScriptNode() {
// 解析SQL语句节点(<select>|<insert>|<update>|<delete>)
MixedSqlNode rootSqlNode = parseDynamicTags(context);
SqlSource sqlSource = null;
// 根据isDynamic状态创建不同的SqlSource
if (isDynamic) {
sqlSource = new DynamicSqlSource(configuration, rootSqlNode);
} else {
sqlSource = new RawSqlSource(configuration, rootSqlNode, parameterType);
}
return sqlSource;
}继续跟进parseDynamicTags方法。
protected MixedSqlNode parseDynamicTags(XNode node) {
    List<SqlNode> contents = new ArrayList<SqlNode>();
    NodeList children = node.getNode().getChildNodes();
    // 遍历子节点
    for (int i = 0; i < children.getLength(); i++) {
        XNode child = node.newXNode(children.item(i));
        //如果节点是TEXT_NODE类型
        if (child.getNode().getNodeType() == Node.CDATA_SECTION_NODE || child.getNode().getNodeType() == Node.TEXT_NODE) {
            // 获取文本内容
            String data = child.getStringBody("");
            TextSqlNode textSqlNode = new TextSqlNode(data);
            // 若文本中包含 ${} 占位符,会被认为是动态节点
            if (textSqlNode.isDynamic()) {
                contents.add(textSqlNode);
                // 设置 isDynamic 为 true
                isDynamic = true;
            } else {
                // 创建 StaticTextSqlNode
                contents.add(new StaticTextSqlNode(data));
            }

        // child 节点是 ELEMENT_NODE 类型,比如 <if>、<where> 等
        } else if (child.getNode().getNodeType() == Node.ELEMENT_NODE) {
            // 获取节点名称,比如 if、where、trim 等
            String nodeName = child.getNode().getNodeName();
            // 根据节点名称获取 NodeHandler,也就是上面注册的nodeHandlerMap
            NodeHandler handler = nodeHandlerMap.get(nodeName);
            if (handler == null) {
                throw new BuilderException("Unknown element <" + nodeName + "> in SQL statement.");
            }
            // 处理 child 节点,生成相应的 SqlNode
            handler.handleNode(child, contents);

            // 设置 isDynamic 为 true
            isDynamic = true;
        }
    }
    return new MixedSqlNode(contents);
}
对于if、trim、where等这些动态节点,是通过对应的handler来解析的,如下:
NodeHandler handler = nodeHandlerMap.get(nodeName);
handler.handleNode(child, contents);
其中nodeHandlerMap是在构造函数中初始化的,如下:
public XMLScriptBuilder(Configuration configuration, XNode context, Class<?> parameterType) {
  super(configuration);
  this.context = context;
  this.parameterType = parameterType;
  initNodeHandlerMap();
}


private void initNodeHandlerMap() {
  nodeHandlerMap.put("trim", new TrimHandler());
  nodeHandlerMap.put("where", new WhereHandler());
  nodeHandlerMap.put("set", new SetHandler());
  nodeHandlerMap.put("foreach", new ForEachHandler());
  nodeHandlerMap.put("if", new IfHandler());
  nodeHandlerMap.put("choose", new ChooseHandler());
  nodeHandlerMap.put("when", new IfHandler());
  nodeHandlerMap.put("otherwise", new OtherwiseHandler());
  nodeHandlerMap.put("bind", new BindHandler());
}
NodeHandler用于处理动态SQL节点,并生成相应的SqlNode。下面来简单分析一下WhereHandler的代码。
private class WhereHandler implements NodeHandler {

    public WhereHandler() {
    }

    @Override
    public void handleNode(XNode nodeToHandle, List<SqlNode> targetContents) {
        // 调用 parseDynamicTags 解析 <where> 节点
        MixedSqlNode mixedSqlNode = parseDynamicTags(nodeToHandle);
        // 创建 WhereSqlNode
        WhereSqlNode where = new WhereSqlNode(configuration, mixedSqlNode);
        // 添加到 targetContents
        targetContents.add(where);
    }
}
通过如上createSqlSource方法,我们将SQL语句节点(<select>|<insert>|<update>|<delete>)解析为了SqlSource。
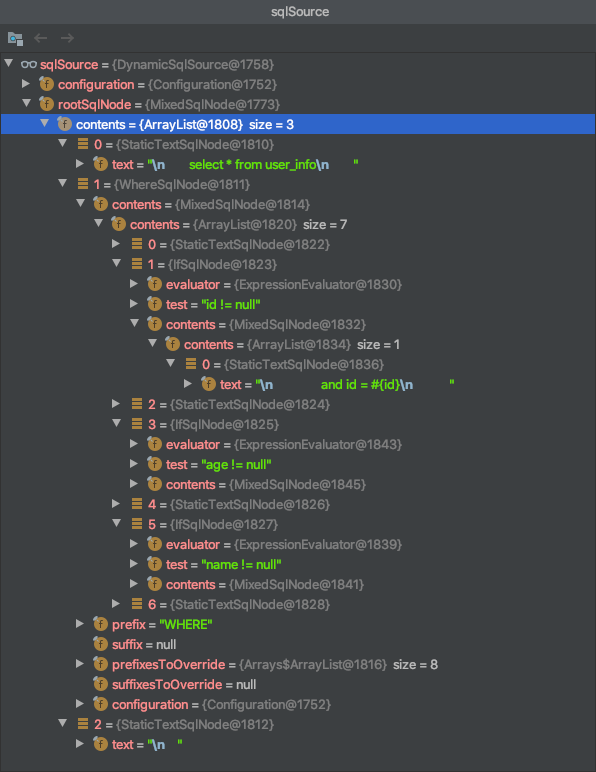
这里比较复杂的是动态sql(存在<if>、<where>等标签的sql)解析,比如我们有如下一段动态sql语句:
<select id="selectByCondition" resultMap="userInfoResult" parameterType="com.zhuoli.service.mybatis.explore.model.UserInfo">
    select * from user_info
    <where>
        <if test = "id != null">
            and id = #{id}
        </if>
        <if test = "age != null">
            and age = #{age}
        </if>
        <if test = "name != null">
            and name like #{name}
        </if>
    </where>
</select>
经过上述解析后获得的SqlSource如下
5.1.4.3 MappedStatement对象构建
SQL语句定义节点(<select>|<insert>|<update>|<delete>)可以定义很多属性,这些属性和属性值最终存储在 MappedStatement中。MappedStatement是通过MapperBuilderAssistant.addMappedStatement方法生成并添加到Configuration中的。
public MappedStatement addMappedStatement(
    String id,
    SqlSource sqlSource,
    StatementType statementType,
    SqlCommandType sqlCommandType,
    Integer fetchSize,
    Integer timeout,
    String parameterMap,
    Class<?> parameterType,
    String resultMap,
    Class<?> resultType,
    ResultSetType resultSetType,
    boolean flushCache,
    boolean useCache,
    boolean resultOrdered,
    KeyGenerator keyGenerator,
    String keyProperty,
    String keyColumn,
    String databaseId,
    LanguageDriver lang,
    String resultSets) {

  if (unresolvedCacheRef) {
    throw new IncompleteElementException("Cache-ref not yet resolved");
  }

  // id = nameSpace + "." + id
  id = applyCurrentNamespace(id, false);
  boolean isSelect = sqlCommandType == SqlCommandType.SELECT;

  // 构造器模式
  MappedStatement.Builder statementBuilder = new MappedStatement.Builder(configuration, id, sqlSource, sqlCommandType)
      .resource(resource)
      .fetchSize(fetchSize)
      .timeout(timeout)
      .statementType(statementType)
      .keyGenerator(keyGenerator)
      .keyProperty(keyProperty)
      .keyColumn(keyColumn)
      .databaseId(databaseId)
      .lang(lang)
      .resultOrdered(resultOrdered)
      .resultSets(resultSets)
      .resultMaps(getStatementResultMaps(resultMap, resultType, id)) // 当前<select>等SQL定义语句对应的ResultMap对象
      .resultSetType(resultSetType)
      .flushCacheRequired(valueOrDefault(flushCache, !isSelect))
      .useCache(valueOrDefault(useCache, isSelect))
      .cache(currentCache); // 之前<cache>节点解析后,将解析得到的Cache对象存储到MapperBuilderAssistant的currentCache中

  // 获取或创建 ParameterMap
  ParameterMap statementParameterMap = getStatementParameterMap(parameterMap, parameterType, id);
  if (statementParameterMap != null) {
    statementBuilder.parameterMap(statementParameterMap);
  }

  // 构建MappedStatement
  MappedStatement statement = statementBuilder.build();
  // 将生成的MappedStatement添加到Configuration的mappedStatements集合成员中
  configuration.addMappedStatement(statement);
  return statement;
}
可以看到一个SQL定义节点解析为一个MappedStatement,并添加到Configuration中。当Mapper接口中的某个方法被执行时,会定位到对应的MappedStatement,可以通过该MappedStatement执行sql。
5.2 为nameSpace绑定Mapper接口
SQL映射文件解析完成后,Mybatis会通过命名空间绑定Mapper接口。
public void parse() {
  // 如果SQL映射文件还未被解析过,则解析SQL映射文件
  if (!configuration.isResourceLoaded(resource)) {
    // 1. 解析"mapper"节点
    configurationElement(parser.evalNode("/mapper"));
    // 2. 将资源SQL映射文件添加到"已解析资源"集合中
    configuration.addLoadedResource(resource);
    // 3. 为nameSpace绑定Mapper接口
    bindMapperForNamespace();
  }

  parsePendingResultMaps();
  parsePendingCacheRefs();
  parsePendingStatements();
}
也就是我们上面的bindMapperForNamespace方法。
private void bindMapperForNamespace() {
    // 获取映射文件的命名空间
    String namespace = builderAssistant.getCurrentNamespace();
    if (namespace != null) {
        Class<?> boundType = null;
        try {
            // 根据命名空间解析 mapper 类型
            boundType = Resources.classForName(namespace);
        } catch (ClassNotFoundException e) {
        }
        if (boundType != null) {
            // 检测当前 mapper 类是否被绑定过
            if (!configuration.hasMapper(boundType)) {
                configuration.addLoadedResource("namespace:" + namespace);
                // 绑定 mapper 类
                configuration.addMapper(boundType);
            }
        }
    }
}

// Configuration
public <T> void addMapper(Class<T> type) {
    // 通过 MapperRegistry 绑定 mapper 类
    mapperRegistry.addMapper(type);
}

// MapperRegistry
public <T> void addMapper(Class<T> type) {
    if (type.isInterface()) {
        if (hasMapper(type)) {
            throw new BindingException("Type " + type + " is already known to the MapperRegistry.");
        }
        boolean loadCompleted = false;
        try {
            /*
             * 将 type 和 MapperProxyFactory 进行绑定,MapperProxyFactory 可为 mapper 接口生成代理类
             */
            knownMappers.put(type, new MapperProxyFactory<T>(type));

            MapperAnnotationBuilder parser = new MapperAnnotationBuilder(config, type);
            // 解析注解中的信息
            parser.parse();
            loadCompleted = true;
        } finally {
            if (!loadCompleted) {
                knownMappers.remove(type);
            }
        }
    }
}
其实就是获取当前映射文件的命名空间,并获取其Class,也就是获取每个Mapper接口,然后为每个Mapper接口创建一个代理类工厂,new MapperProxyFactory<T>(type),并放进 knownMappers 这个HashMap中,我们来看看这个MapperProxyFactory。
public class MapperProxyFactory<T> {
    //存放Mapper接口Class
    private final Class<T> mapperInterface;
    private final Map<Method, MapperMethod> methodCache = new ConcurrentHashMap();

    public MapperProxyFactory(Class<T> mapperInterface) {
        this.mapperInterface = mapperInterface;
    }

    public Class<T> getMapperInterface() {
        return this.mapperInterface;
    }

    public Map<Method, MapperMethod> getMethodCache() {
        return this.methodCache;
    }

    protected T newInstance(MapperProxy<T> mapperProxy) {
        //生成mapperInterface的代理类
        return Proxy.newProxyInstance(this.mapperInterface.getClassLoader(), new Class[]{this.mapperInterface}, mapperProxy);
    }

    public T newInstance(SqlSession sqlSession) {
        MapperProxy<T> mapperProxy = new MapperProxy(sqlSession, this.mapperInterface, this.methodCache);
        return this.newInstance(mapperProxy);
    }
}
MapperProxyFactory就是为了Mapper接口生成代理类对象的工厂,通过该代理对象,我们就能使用Mapper接口中的方法,执行SQL映射文件中定义的sql。至于原理,后面的文章我们再详细介绍。
参考链接:
1. Mybatis源码