 Zhuoli's Blog
之前的两篇文章我们分别介绍了什么是MVC,通过Spring MVC实现了一个简单的demo,以及如何通过Idea构建并部署Spring MVC应用,相信我们都可以重新回顾起Spring MVC的相关细节。本篇文章我们就正式开始分析Spring MVC的源码。
之前的文章已经介绍过Spring的相关实现细节,其实Spring MVC也具备Spring的所有特性,比如通过Bean管理、IOC和AOP的思想跟Spring是一致的,需要熟悉的可以到Spring源码分析系列文章提前熟悉一下。本篇文章我们就来介绍一下Spring MVC如何的启动过程。
上篇文章中,我们的web.xml配置文件中配置如下:
<?xml version="1.0" encoding="UTF-8"?>
<web-app xmlns="http://xmlns.jcp.org/xml/ns/javaee"
         xmlns:xsi="http://www.w3.org/2001/XMLSchema-instance"
         xsi:schemaLocation="http://xmlns.jcp.org/xml/ns/javaee http://xmlns.jcp.org/xml/ns/javaee/web-app_4_0.xsd"
         version="4.0">

    <display-name>Archetype Created Web Application</display-name>

    <!--指定Spring的配置文件地址-->
    <context-param>
        <param-name>contextConfigLocation</param-name>
        <param-value>classpath:spring.xml</param-value>
    </context-param>

    <!--Tomcat Context生命周期监听器-->
    <listener>
        <listener-class>org.springframework.web.context.ContextLoaderListener</listener-class>
    </listener>

    <!--配置Spring MVC 的DispatcherServlet,指定配置文件的路径,拦截所有的请求-->
    <servlet>
        <!--这个名称如果不特别指定的话,跟配置文件名称有关联。如果特别指定配置文件了,则此名称就无所谓了-->
        <servlet-name>springMvc</servlet-name>
        <servlet-class>org.springframework.web.servlet.DispatcherServlet</servlet-class>
        <init-param>
            <!--contextConfigLocation这个参数可以不配置,如果不配置的话,那么默认的value就是/WEB-INF/[servlet名字]-servlet.xml-->
            <param-name>contextConfigLocation</param-name>
            <param-value>classpath:spring-mvc.xml</param-value>
        </init-param>
        <!--表示启动容器时初始化该Servlet-->
        <load-on-startup>1</load-on-startup>
    </servlet>

    <servlet-mapping>
        <servlet-name>springMvc</servlet-name>
        <!--DispatcherServlet拦截所有的请求-->
        <url-pattern>/</url-pattern>
    </servlet-mapping>

</web-app>
配置文件主要实现了如下配置:
- 设置context-param的contextConfigLocation属性
- 设置Tomcat Context生命周期监听器ContextLoaderListener
- Servlet DispatcherServlet配置
- 为DispatcherServlet设置servlet-mapping
那么按照我们之前Tomcat的文章介绍,Spring MVC的启动过程肯定跟这个ContextLoaderListener有关,这是Spring MVC跟Tomcat的连接点。ContextLoaderListener实现了ServletContextListener接口,可以在Tomcat Context初始化后执行监听器内部的初始化逻辑。
public interface ServletContextListener extends EventListener {

    /**
     ** Notification that the web application initialization process is starting.
     * All ServletContextListeners are notified of context initialization before
     * any filter or servlet in the web application is initialized.
     * The default implementation is a NO-OP.
     * @param sce Information about the ServletContext that was initialized
     */
    public default void contextInitialized(ServletContextEvent sce) {
    }

    /**
     ** Notification that the servlet context is about to be shut down. All
     * servlets and filters have been destroyed before any
     * ServletContextListeners are notified of context destruction.
     * The default implementation is a NO-OP.
     * @param sce Information about the ServletContext that was destroyed
     */
    public default void contextDestroyed(ServletContextEvent sce) {
    }
}
除此之外,关于上述配置文件还有两项配置比较重要,那就是分别通过<context-param>和<servlet>的<init-param>配置的两个其它配置文件,spring.xml和spring-mvc.xml。这两个配置文件其实就是跟Spring MVC的父子容器的实现有关。关于Spring MVC的父子容器,主要过程为:
Tomcat启动时,监听器ContextLoaderListener创建一个XMLWebApplicationContext上下文容器,并加载<context-param>中的配置文件,完成容器的刷新后将上下文设置到ServletContext。当DispatcherServlet创建时,先进行初始化操作,从ServletContext中查询出ContextLoaderListener中创建的上下文对象,作为父类上下文来,并查找<servlet>的<init-param>配置的配置文件创建子上下文容器,然后完成容器的刷新。子容器可以访问父容器中的bean,反之则不行。
通常是将业务操作及数据库相关的bean维护在父容器中,而在子容器中只加载Controller相关的Bean。如果采用JavaEE三层架构开发代码,分为Controller、Service和DAO层,那么父容器中主要维护Service和DAO层的Bean,子容器中维护Controller相关的Bean。
1. ContextLoaderListener
Spring MVC的启动入口肯定在ContextLoaderListener覆盖的contextInitialized方法中。
@Override
public void contextInitialized(ServletContextEvent event) {
    initWebApplicationContext(event.getServletContext());
}
1.1 initWebApplicationContext
public WebApplicationContext initWebApplicationContext(ServletContext servletContext) {
    // 1. 获取ServletContext的ROOT_WEB_APPLICATION_CONTEXT_ATTRIBUTE属性,如果不为空,说明Spring MVC父容器已经初始化,直接抛异常
    // ROOT_WEB_APPLICATION_CONTEXT_ATTRIBUTE = "WebApplicationContext.ROOT"
    if (servletContext.getAttribute(WebApplicationContext.ROOT_WEB_APPLICATION_CONTEXT_ATTRIBUTE) != null) {
        throw new IllegalStateException(
                "Cannot initialize context because there is already a root application context present - " +
                "check whether you have multiple ContextLoader* definitions in your web.xml!");
    }

    Log logger = LogFactory.getLog(ContextLoader.class);
    servletContext.log("Initializing Spring root WebApplicationContext");
    if (logger.isInfoEnabled()) {
        logger.info("Root WebApplicationContext: initialization started");
    }
    long startTime = System.currentTimeMillis();

    try {
        // 2. 如果context(类型为WebApplicationContext)为空,创建Spring MVC父容器
        if (this.context == null) {
            this.context = createWebApplicationContext(servletContext);
        }

        // 3. 加载并刷新Spring MVC父容器,核心逻辑在configureAndRefreshWebApplicationContext
        if (this.context instanceof ConfigurableWebApplicationContext) {
            ConfigurableWebApplicationContext cwac = (ConfigurableWebApplicationContext) this.context;
            if (!cwac.isActive()) {
                // The context has not yet been refreshed -> provide services such as
                // setting the parent context, setting the application context id, etc
                if (cwac.getParent() == null) {
                    // The context instance was injected without an explicit parent ->
                    // determine parent for root web application context, if any.
                    ApplicationContext parent = loadParentContext(servletContext);
                    cwac.setParent(parent);
                }
                configureAndRefreshWebApplicationContext(cwac, servletContext);
            }
        }

        // 4. 将刷新后的Spring MVC父容器设置到servletContext
        servletContext.setAttribute(WebApplicationContext.ROOT_WEB_APPLICATION_CONTEXT_ATTRIBUTE, this.context);

        ClassLoader ccl = Thread.currentThread().getContextClassLoader();
        if (ccl == ContextLoader.class.getClassLoader()) {
            currentContext = this.context;
        }
        else if (ccl != null) {
            currentContextPerThread.put(ccl, this.context);
        }

        if (logger.isDebugEnabled()) {
            logger.debug("Published root WebApplicationContext as ServletContext attribute with name [" +
                    WebApplicationContext.ROOT_WEB_APPLICATION_CONTEXT_ATTRIBUTE + "]");
        }
        if (logger.isInfoEnabled()) {
            long elapsedTime = System.currentTimeMillis() - startTime;
            logger.info("Root WebApplicationContext: initialization completed in " + elapsedTime + " ms");
        }

        return this.context;
    }
    catch (RuntimeException ex) {
        logger.error("Context initialization failed", ex);
        servletContext.setAttribute(WebApplicationContext.ROOT_WEB_APPLICATION_CONTEXT_ATTRIBUTE, ex);
        throw ex;
    }
    catch (Error err) {
        logger.error("Context initialization failed", err);
        servletContext.setAttribute(WebApplicationContext.ROOT_WEB_APPLICATION_CONTEXT_ATTRIBUTE, err);
        throw err;
    }
}
initWebApplicationContext方法中主要完成四件事:
- 查看ServletContext中是否已存在”WebApplicationContext.ROOT”属性,如果存在,抛IllegalStateException
- 调用createWebApplicationContext,创建WebApplicationContext
- 调用configureAndRefreshWebApplicationContext,刷新步骤2创建的WebApplicationContext
- 将完成刷新的WebApplicationContext设置回ServletContext的”WebApplicationContext.ROOT”属性
关于上述步骤1、4,比较简单,下面不多介绍了。我们重点来看步骤2、3 WebApplicationContext的创建和刷新流程。
1.2 createWebApplicationContext
protected WebApplicationContext createWebApplicationContext(ServletContext sc) {
    // 1. 确定要创建的WebApplicationContext的Class类型
    Class<?> contextClass = determineContextClass(sc);
    // 如果确定的Class的父类不是ConfigurableWebApplicationContext,抛ApplicationContextException
    if (!ConfigurableWebApplicationContext.class.isAssignableFrom(contextClass)) {
        throw new ApplicationContextException("Custom context class [" + contextClass.getName() +
                "] is not of type [" + ConfigurableWebApplicationContext.class.getName() + "]");
    }
    // 2. 反射contextClass,创建WebApplicationContext实例
    return (ConfigurableWebApplicationContext) BeanUtils.instantiateClass(contextClass);
}
protected Class<?> determineContextClass(ServletContext servletContext) {
// 1. 从ServletContext(web.xml) init-param中尝试获取"contextClass"参数对应的value
String contextClassName = servletContext.getInitParameter(CONTEXT_CLASS_PARAM);
// 2. 如果web.xml init-param中配置了"contextClass"参数,直接返回配置的类型
if (contextClassName != null) {
try {
return ClassUtils.forName(contextClassName, ClassUtils.getDefaultClassLoader());
}
catch (ClassNotFoundException ex) {
throw new ApplicationContextException(
"Failed to load custom context class [" + contextClassName + "]", ex);
}
}
// 3. 如果web.xml init-param中未配置"contextClass"参数,返回默认类型
// 默认类型配置在ContextLoader.properties文件中,类型为XmlWebApplicationContext
else {
contextClassName = defaultStrategies.getProperty(WebApplicationContext.class.getName());
try {
return ClassUtils.forName(contextClassName, ContextLoader.class.getClassLoader());
}
catch (ClassNotFoundException ex) {
throw new ApplicationContextException(
"Failed to load default context class [" + contextClassName + "]", ex);
}
}
}# ContextLoader.properties
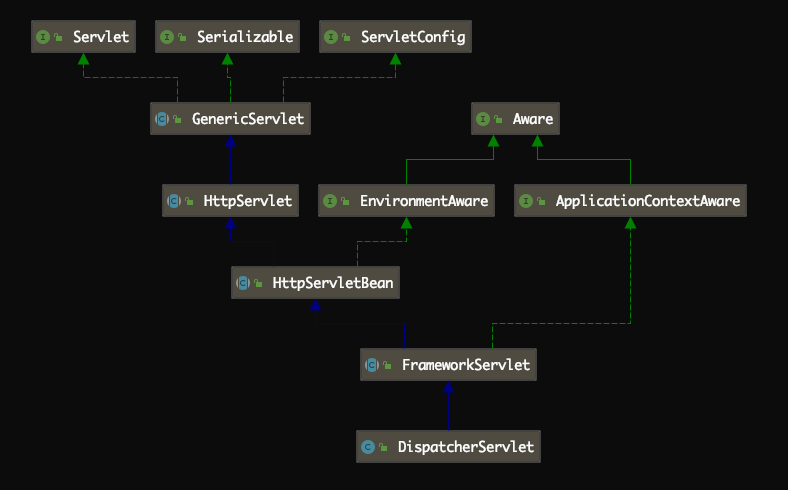
org.springframework.web.context.WebApplicationContext=org.springframework.web.context.support.XmlWebApplicationContextXmlWebApplicationContext继承关系如下:

确定了contextClass类型后,最后在createWebApplicationContext方法中,调用”BeanUtils.instantiateClass(contextClass)”方法,通过反射,完成WebApplicationContext实例创建。
1.3 configureAndRefreshWebApplicationContext
protected void configureAndRefreshWebApplicationContext(ConfigurableWebApplicationContext wac, ServletContext sc) {
    if (ObjectUtils.identityToString(wac).equals(wac.getId())) {
        // The application context id is still set to its original default value
        // -> assign a more useful id based on available information
        String idParam = sc.getInitParameter(CONTEXT_ID_PARAM);
        if (idParam != null) {
            wac.setId(idParam);
        }
        else {
            // Generate default id...
            wac.setId(ConfigurableWebApplicationContext.APPLICATION_CONTEXT_ID_PREFIX +
                    ObjectUtils.getDisplayString(sc.getContextPath()));
        }
    }

    // 1. 将ServletContext设置到ConfigurableWebApplicationContext
    wac.setServletContext(sc);

    // 2. 从ServletContext中init-param中获取"contextConfigLocation"属性,就是我们上面配置的"spring.xml"
    String configLocationParam = sc.getInitParameter(CONFIG_LOCATION_PARAM);
    if (configLocationParam != null) {
        // 将"spring.xml"配置文件的路径设置到容器的configLocation属性中
        wac.setConfigLocation(configLocationParam);
    }

    // The wac environment's #initPropertySources will be called in any case when the context
    // is refreshed; do it eagerly here to ensure servlet property sources are in place for
    // use in any post-processing or initialization that occurs below prior to #refresh
    ConfigurableEnvironment env = wac.getEnvironment();
    if (env instanceof ConfigurableWebEnvironment) {
        ((ConfigurableWebEnvironment) env).initPropertySources(sc, null);
    }

    customizeContext(sc, wac);

    // 3. 刷新父容器
    wac.refresh();
}
上述步骤2、3,是刷新容器的核心步骤。
首先将我们再web.xml中设置的”classpath:spring.xml”调用wac.setConfigLocation设置到web容器的configLocation属性。
其次调用web容器的refresh方法,完成容器刷新(跟我们之前介绍的Spring源码时类似,refresh方法中完成了BeanDefinition加载,以及Bean的实例化,依赖的注入等流程)。
1.4 wac.refresh()
调用wac.refresh()方法,我们知道wac的真实类型为XmlWebApplicationContext,而XmlWebApplicationContext方法的refresh方法继承自AbstractApplicationContext。而我们之前的文章Spring源码解读『IOC容器2-Bean加载过程』,介绍SpringBean加载过程的核心流程就是在介绍该refresh方法。
@Override
public void refresh() throws BeansException, IllegalStateException {
	synchronized (this.startupShutdownMonitor) {
		// 1. 准备刷新Spring上下文,主要用来记录Spring上下文加载开始时间,设置一些基础成员变量value
		prepareRefresh();

		// 2. 刷新BeanFactory,此方法内完成配置文件中配置的Bean到BeanDefinition的转化及注册
		ConfigurableListableBeanFactory beanFactory = obtainFreshBeanFactory();

		// 3. 准备Bean工厂,主要用来配置BeanFactory的基础信息,例如上下文的ClassLoader和后处理器
		prepareBeanFactory(beanFactory);

		try {
			// 4. 允许子context添加一些BeanFactoryPostProcessor,
			// 比如Web应用中AbstractRefreshableWebApplicationContext添加ServletContextAwareProcessor,
			// 可以暂时略过这个方法
			postProcessBeanFactory(beanFactory);

			// 5. 执行BeanFactoryPostProcessor中定义的方法
			invokeBeanFactoryPostProcessors(beanFactory);

			// 6. 注册所有的BeanPostProcessor,这部分BeanPostProcessor会在下面finishBeanFactoryInitialization方法
			// 过程中使用
			registerBeanPostProcessors(beanFactory);

			// 7. 初始化MessageSource,MessageSource是Spring定义的用于实现访问国际化的接口
			initMessageSource();

			// 8. 初始化上下文事件广播器
			initApplicationEventMulticaster();

			// 9. 模板方法,可以通过重写它添加特殊上下文刷新的工作
			onRefresh();

			// 10. 注册监听器
			registerListeners();

			// 11. 实例化所有定义的单例Bean
			finishBeanFactoryInitialization(beanFactory);

			// 结束Spring上下文刷新
			finishRefresh();
		}

		catch (BeansException ex) {
			if (logger.isWarnEnabled()) {
				logger.warn("Exception encountered during context initialization - " +
						"cancelling refresh attempt: " + ex);
			}

			// Destroy already created singletons to avoid dangling resources.
			destroyBeans();

			// Reset 'active' flag.
			cancelRefresh(ex);

			// Propagate exception to caller.
			throw ex;
		}

		finally {
			// Reset common introspection caches in Spring's core, since we
			// might not ever need metadata for singleton beans anymore...
			resetCommonCaches();
		}
	}
}
这里不详细再介绍了,相关细节可以到之前的文章中了解。
通过如上几个步骤,就完成了Spring MVC的父子容器中父容器的刷新(父容器中相关的Bean已经初始化完成)。
2. 子容器刷新
通过上述步骤,完成了Spring MVC的父容器的刷新,此时我们在spring.xml中配置的相关bean已经被容器成功初始化了。下面我们来看一下Spring MVC的子容器是如何刷新的。
我们在web.xml配置文件中配置了一个Servlet:
<servlet>
    <servlet-name>springMvc</servlet-name>
    <servlet-class>org.springframework.web.servlet.DispatcherServlet</servlet-class>
    <init-param>
        <!--contextConfigLocation这个参数可以不配置,如果不配置的话,那么默认的value就是/WEB-INF/[servlet名字]-servlet.xml-->
        <param-name>contextConfigLocation</param-name>
        <param-value>classpath:spring-mvc.xml</param-value>
    </init-param>
    <!--表示启动容器时初始化该Servlet-->
    <load-on-startup>1</load-on-startup>
</servlet>根据我们之前对Tomcat的介绍,这里配置了load-on-startup属性为1(若值大于等于0,表示Servlet在Tomcat启动过程中按从小到大的顺序依次被加载;若值小于0,表示启动过程中不加载。默认load-on-startup的值为-1。),所以会在Tomcat启动过程中(准确的说是StandardContext启动过程中)初始化该Servlet。初始化的方法在DispatcherServlet的init方法中。
DispatcherServlet的init方法继承自其父类HttpServletBean,如下:
public final void init() throws ServletException {
    if (logger.isDebugEnabled()) {
        logger.debug("Initializing servlet '" + getServletName() + "'");
    }

    //1. 从初始化参数中获取设置bean属性。例如init-param的contextConfigLocation=classpath*:spring-mvc.xml
    PropertyValues pvs = new ServletConfigPropertyValues(getServletConfig(), this.requiredProperties);
    if (!pvs.isEmpty()) {
        try {
            // 将DispatcherServlet转化成Spring里面的Bean
            BeanWrapper bw = PropertyAccessorFactory.forBeanPropertyAccess(this);
            // 加载配置信息
            ResourceLoader resourceLoader = new ServletContextResourceLoader(getServletContext());
            bw.registerCustomEditor(Resource.class, new ResourceEditor(resourceLoader, getEnvironment()));
            initBeanWrapper(bw);
            // 通过Spring的Bean赋值方式给DispatcherServlet初始化属性值
            bw.setPropertyValues(pvs, true);
        }
        catch (BeansException ex) {
            if (logger.isErrorEnabled()) {
                logger.error("Failed to set bean properties on servlet '" + getServletName() + "'", ex);
            }
            throw ex;
        }
    }

    //2. 模板方法,子类去自定义实现
    initServletBean();

    if (logger.isDebugEnabled()) {
        logger.debug("Servlet '" + getServletName() + "' configured successfully");
    }
}
initServletBean()方法的实现在子类FrameworkServlet中:
protected final void initServletBean() throws ServletException {
    getServletContext().log("Initializing Spring FrameworkServlet '" + getServletName() + "'");
    if (this.logger.isInfoEnabled()) {
        this.logger.info("FrameworkServlet '" + getServletName() + "': initialization started");
    }
    long startTime = System.currentTimeMillis();

    try {
        // 1. 创建Spring MVC子容器
        this.webApplicationContext = initWebApplicationContext();
        // 2. 模板方法,Spring MVC子容器完成刷新后,可以做一些其它的初始化操作,
        // 子类可以根据需要覆盖该方法,实现特殊的初始化逻辑
        initFrameworkServlet();
    }
    catch (ServletException | RuntimeException ex) {
        this.logger.error("Context initialization failed", ex);
        throw ex;
    }

    if (this.logger.isInfoEnabled()) {
        long elapsedTime = System.currentTimeMillis() - startTime;
        this.logger.info("FrameworkServlet '" + getServletName() + "': initialization completed in " +
                elapsedTime + " ms");
    }
}
这里我们就找到了Spring MVC子容器刷新的核心逻辑,initWebApplicationContext方法。
2.1 initWebApplicationContext
initWebApplicationContext定义在DispatcherServlet父类FrameworkServlet中。
protected WebApplicationContext initWebApplicationContext() {
    // 1. 从ServletContext获取Spring MVC父容器,之前在父容器刷新时,我们将父容器设置到了ServletContext中
    WebApplicationContext rootContext =
            WebApplicationContextUtils.getWebApplicationContext(getServletContext());
    WebApplicationContext wac = null;

    // 2. 如果Spring MVC的子容器不为空,则设置rootContext为其父容器,然后刷新
    if (this.webApplicationContext != null) {
        // A context instance was injected at construction time -> use it
        wac = this.webApplicationContext;
        if (wac instanceof ConfigurableWebApplicationContext) {
            ConfigurableWebApplicationContext cwac = (ConfigurableWebApplicationContext) wac;
            if (!cwac.isActive()) {
                // The context has not yet been refreshed -> provide services such as
                // setting the parent context, setting the application context id, etc
                if (cwac.getParent() == null) {
                    // The context instance was injected without an explicit parent -> set
                    // the root application context (if any; may be null) as the parent
                    cwac.setParent(rootContext);
                }
                configureAndRefreshWebApplicationContext(cwac);
            }
        }
    }

    // 3. 根据init-param配置的属性名称从ServletContext查找SpringMVC的子容器
    if (wac == null) {
        // No context instance was injected at construction time -> see if one
        // has been registered in the servlet context. If one exists, it is assumed
        // that the parent context (if any) has already been set and that the
        // user has performed any initialization such as setting the context id
        wac = findWebApplicationContext();
    }

    // 4. 若还为空,则创建一个新的上下文对象并刷新
    if (wac == null) {
        // No context instance is defined for this servlet -> create a local one
        wac = createWebApplicationContext(rootContext);
    }

    // 5. 模板方法,子类可以覆盖该方法,对Spring MVC子容器进行后续的操作
    // DispatcherServlet中覆盖了该方法,用于注册Spring MVC中的一些组件
    if (!this.refreshEventReceived) {
        // Either the context is not a ConfigurableApplicationContext with refresh
        // support or the context injected at construction time had already been
        // refreshed -> trigger initial onRefresh manually here.
        onRefresh(wac);
    }

    // 6. 将子容器设置到ServletContext
    if (this.publishContext) {
        // Publish the context as a servlet context attribute.
        String attrName = getServletContextAttributeName();
        getServletContext().setAttribute(attrName, wac);
        if (this.logger.isDebugEnabled()) {
            this.logger.debug("Published WebApplicationContext of servlet '" + getServletName() +
                    "' as ServletContext attribute with name [" + attrName + "]");
        }
    }

    return wac;
}
initWebApplicationContext方法中核心包括如下几个步骤:
- 从ServletContext中获取Spring MVC父容器,用于和子容器绑定
- 查找是否已经Spring MVC子容器,如果已存在则为其设置父容器并刷新
- 根据init-param配置的属性名称从ServletContext查找Spring MVC的子容器
- 如果步骤3未找到Spring MVC子容器,则以XmlWebApplicationContext作为Class类型创建Spring MVC子容器,设置父类上下文,并完成刷新
- 执行子类扩展方法onRefresh,初始化DispatcherServlet内所有Spring MVC相关组件
- 将Spring MVC子容器设置到ServletContext
这里我们重点来看一下步骤4、5,Spring MVC子容器的创建和刷新,以及Web组件的初始化过程。
2.2 createWebApplicationContext
org.springframework.web.servlet.FrameworkServlet#createWebApplicationContext。
protected WebApplicationContext createWebApplicationContext(WebApplicationContext parent) {
    return createWebApplicationContext((ApplicationContext) parent);
}
protected WebApplicationContext createWebApplicationContext(ApplicationContext parent) {
// 1. 获取Spring MVC子容器Class类型,默认为XmlWebApplicationContext
Class<?> contextClass = getContextClass();
if (this.logger.isDebugEnabled()) {
this.logger.debug("Servlet with name '" + getServletName() +
"' will try to create custom WebApplicationContext context of class '" +
contextClass.getName() + "'" + ", using parent context [" + parent + "]");
}
if (!ConfigurableWebApplicationContext.class.isAssignableFrom(contextClass)) {
throw new ApplicationContextException(
"Fatal initialization error in servlet with name '" + getServletName() +
"': custom WebApplicationContext class [" + contextClass.getName() +
"] is not of type ConfigurableWebApplicationContext");
}
// 2. 反射创建Spring MVC子容器实例
ConfigurableWebApplicationContext wac =
(ConfigurableWebApplicationContext) BeanUtils.instantiateClass(contextClass);
wac.setEnvironment(getEnvironment());
// 设置Spring MVC子容器的父容器
wac.setParent(parent);
// 设置Spring MVC子容器配置文件地址,即"classpath:spring-mvc.xml"
wac.setConfigLocation(getContextConfigLocation());
// 3. 刷新Spring MVC子容器
configureAndRefreshWebApplicationContext(wac);
return wac;
}2.3 configureAndRefreshWebApplicationContext
这里的configureAndRefreshWebApplicationContext方法和上面Spring MVC父容器刷新中的configureAndRefreshWebApplicationContext不是一个方法。该方法定义在FrameworkServlet。
protected void configureAndRefreshWebApplicationContext(ConfigurableWebApplicationContext wac) {
    if (ObjectUtils.identityToString(wac).equals(wac.getId())) {
        // The application context id is still set to its original default value
        // -> assign a more useful id based on available information
        if (this.contextId != null) {
            wac.setId(this.contextId);
        }
        else {
            // Generate default id...
            wac.setId(ConfigurableWebApplicationContext.APPLICATION_CONTEXT_ID_PREFIX +
                    ObjectUtils.getDisplayString(getServletContext().getContextPath()) + "/" + getServletName());
        }
    }

    // 1. 将ServletContext设置到Spring MVC子容器
    wac.setServletContext(getServletContext());
    wac.setServletConfig(getServletConfig());
    wac.setNamespace(getNamespace());
    wac.addApplicationListener(new SourceFilteringListener(wac, new ContextRefreshListener()));

    // The wac environment's #initPropertySources will be called in any case when the context
    // is refreshed; do it eagerly here to ensure servlet property sources are in place for
    // use in any post-processing or initialization that occurs below prior to #refresh
    ConfigurableEnvironment env = wac.getEnvironment();
    if (env instanceof ConfigurableWebEnvironment) {
        ((ConfigurableWebEnvironment) env).initPropertySources(getServletContext(), getServletConfig());
    }

    postProcessWebApplicationContext(wac);
    applyInitializers(wac);

    // 2. Spring MVC子容器刷新
    wac.refresh();
}
这里wac.refresh()最终调用的也是org.springframework.context.support.AbstractApplicationContext#refresh方法,跟上面Spring MVC父容器刷新时的方法是一样的。
完成Spring MVC子容器刷新后,我们回到2.1节的步骤6,将Spring MVC子容器设置到ServletContext。
String attrName = getServletContextAttributeName();
getServletContext().setAttribute(attrName, wac);

public String getServletContextAttributeName() {
    return SERVLET_CONTEXT_PREFIX + getServletName();
}

public static final String SERVLET_CONTEXT_PREFIX = FrameworkServlet.class.getName() + ".CONTEXT.";
所以Spring MVC子容器设置到ServletContext,是设置到ServletContext的attribute实现的,key为”org.springframework.web.servlet.FrameworkServlet.CONTEXT.” + servletName。
所以Spring MVC在DispatcherServlet的初始化过程中,同样会初始化一个WebApplicationContext的实现类(子容器),作为自己独有的上下文,这个独有的上下文,会将Tomcat StandardContext启动时创建的WebApplicationContext作为自己的父容器。所以是允许创建多个DispatcherServlet的,多个DispatcherServlet对应多个子上下文。
2.4 onRefresh
在上述2.1节步骤5,initWebApplicationContext方法中,调用了onRefresh方法,初始化DispatcherServlet中所有Spring MVC相关组件。onRefresh方法定义在FrameworkServlet中,子类DispatcherServlet中覆盖了该方法。
@Override
protected void onRefresh(ApplicationContext context) {
    initStrategies(context);
}
方法中调用了initStrategies方法,用于初始化DispatcherServlet中所有需要用到的策略成员变量。
/**
 * Initialize the strategy objects that this servlet uses.
 * <p>May be overridden in subclasses in order to initialize further strategy objects.
 */
protected void initStrategies(ApplicationContext context) {
    // 初始化文件上传解析器
    initMultipartResolver(context);
    // 初始化本地化解析器
    initLocaleResolver(context);
    // 初始化主题解析器
    initThemeResolver(context);
    // 初始化处理器映射器
    initHandlerMappings(context);
    // 初始化处理器适配器
    initHandlerAdapters(context);
    // 初始化处理器异常解析器
    initHandlerExceptionResolvers(context);
    // 初始化RequestToViewName解析器
    initRequestToViewNameTranslator(context);
    // 初始化视图解析器
    initViewResolvers(context);
    // 初始化FlashMap管理者
    initFlashMapManager(context);
}
以上就是DispatcherServlet中全部的Spring MVC相关组件,其中对我们理解Spring MVC如何工作的,最重要的就是如下三个组件:
- HandlerMapping:用于存储url和Controller方法的映射
- HandlerAdapter:用于执行请求对应的Controller方法
- ViewResolver:用于视图的匹配和渲染
我们来看一下DispatcherServlet这三个组件是如何初始化的。
private void initHandlerMappings(ApplicationContext context) {
    this.handlerMappings = null;

    // 1. 是否需要检查所有的(当前容器及当前容器的父容器)HandlerMapping Bean,默认为true
    if (this.detectAllHandlerMappings) {
        // 从当前容器,以及当前容器的父容器中查找HandlerMapping Bean,第三个参数用于指定是否需要包括父容器
        Map<String, HandlerMapping> matchingBeans =
                BeanFactoryUtils.beansOfTypeIncludingAncestors(context, HandlerMapping.class, true, false);
        if (!matchingBeans.isEmpty()) {
            this.handlerMappings = new ArrayList<>(matchingBeans.values());
            // We keep HandlerMappings in sorted order.
            AnnotationAwareOrderComparator.sort(this.handlerMappings);
        }
    }
    // 2. 如果不需要检查所有的HandlerMapping,那么仅从当前容器中获取HandlerMapping
    else {
        try {
            HandlerMapping hm = context.getBean(HANDLER_MAPPING_BEAN_NAME, HandlerMapping.class);
            this.handlerMappings = Collections.singletonList(hm);
        }
        catch (NoSuchBeanDefinitionException ex) {
            // Ignore, we'll add a default HandlerMapping later.
        }
    }

    // 3. 保证至少存在一个HandlerMapping,如果上述两个步骤都没有获取到HandlerMapping,注册一个默认的HandlerMapping
    if (this.handlerMappings == null) {
        this.handlerMappings = getDefaultStrategies(context, HandlerMapping.class);
        if (logger.isDebugEnabled()) {
            logger.debug("No HandlerMappings found in servlet '" + getServletName() + "': using default");
        }
    }
}
初始化的逻辑也非常清晰:
- 如果需要从所有容器中检查HandlerMapping,则从当前容器及当前容器的父容器查找,如果查找到了,就排序,并赋值给DispatcherServlet的handlerMappings成员
- 如果不需要从所有容器中检查HandlerMapping,则从当前容器中查找
- 如果都没有找到,则给handlerMappings赋一个默认值,这个默认值是在DispatcherServlet同级目录的DispatcherServlet.properties中指定的
这里可以看到,正常情况下到该方法调用,HandlerMapping对应的Bean已经注册到容器了。这里留下一个疑问,HandlerMapping Bean是何时注册到容器的?
private void initHandlerAdapters(ApplicationContext context) {
    this.handlerAdapters = null;

    if (this.detectAllHandlerAdapters) {
        // Find all HandlerAdapters in the ApplicationContext, including ancestor contexts.
        Map<String, HandlerAdapter> matchingBeans =
                BeanFactoryUtils.beansOfTypeIncludingAncestors(context, HandlerAdapter.class, true, false);
        if (!matchingBeans.isEmpty()) {
            this.handlerAdapters = new ArrayList<>(matchingBeans.values());
            // We keep HandlerAdapters in sorted order.
            AnnotationAwareOrderComparator.sort(this.handlerAdapters);
        }
    }
    else {
        try {
            HandlerAdapter ha = context.getBean(HANDLER_ADAPTER_BEAN_NAME, HandlerAdapter.class);
            this.handlerAdapters = Collections.singletonList(ha);
        }
        catch (NoSuchBeanDefinitionException ex) {
            // Ignore, we'll add a default HandlerAdapter later.
        }
    }

    // Ensure we have at least some HandlerAdapters, by registering
    // default HandlerAdapters if no other adapters are found.
    if (this.handlerAdapters == null) {
        this.handlerAdapters = getDefaultStrategies(context, HandlerAdapter.class);
        if (logger.isDebugEnabled()) {
            logger.debug("No HandlerAdapters found in servlet '" + getServletName() + "': using default");
        }
    }
}
private void initViewResolvers(ApplicationContext context) {
this.viewResolvers = null;
if (this.detectAllViewResolvers) {
// Find all ViewResolvers in the ApplicationContext, including ancestor contexts.
Map<String, ViewResolver> matchingBeans =
BeanFactoryUtils.beansOfTypeIncludingAncestors(context, ViewResolver.class, true, false);
if (!matchingBeans.isEmpty()) {
this.viewResolvers = new ArrayList<>(matchingBeans.values());
// We keep ViewResolvers in sorted order.
AnnotationAwareOrderComparator.sort(this.viewResolvers);
}
}
else {
try {
ViewResolver vr = context.getBean(VIEW_RESOLVER_BEAN_NAME, ViewResolver.class);
this.viewResolvers = Collections.singletonList(vr);
}
catch (NoSuchBeanDefinitionException ex) {
// Ignore, we'll add a default ViewResolver later.
}
}
// Ensure we have at least one ViewResolver, by registering
// a default ViewResolver if no other resolvers are found.
if (this.viewResolvers == null) {
this.viewResolvers = getDefaultStrategies(context, ViewResolver.class);
if (logger.isDebugEnabled()) {
logger.debug("No ViewResolvers found in servlet '" + getServletName() + "': using default");
}
}
}可以看到DispatcherServlet的HandlerAdapter、ViewResolver初始化跟HandlerMapping初始化方法逻辑完全一致。那么接下来我们来看另一个问题,容器中的这些Bean(HandlerMapping、HandlerAdapter、ViewResolver等)是何时初注册到容器的。
3. HandlerMapping Bean注册
在使用SpringMVC时,如果我们使用xml配置,会在xml文件中添加如下注解:
<mvc:annotation-driven>
    <!--解决以@ResponseBody直接返回字符串时中文乱码问题-->
    <mvc:message-converters register-defaults="true">
        <bean class="org.springframework.http.converter.StringHttpMessageConverter">
            <constructor-arg value="UTF-8"/>
        </bean>
    </mvc:message-converters>
</mvc:annotation-driven>
并且xml文件会声明命名空间:
http://www.springframework.org/schema/mvc解析<mvc:annotation-driven>注解的nameSpaceUri = “http://www.springframework.org/schema/mvc”。在spring-webmvc jar的META-INF目录下有一个spring.handlers的文件,内容如下:
http\://www.springframework.org/schema/mvc=org.springframework.web.servlet.config.MvcNamespaceHandler也就是说,当遇到”http://www.springframework.org/schema/mvc”uri的注解解析时,使用MvcNamespaceHandler配置解析。
public class MvcNamespaceHandler extends NamespaceHandlerSupport {

	@Override
	public void init() {
		registerBeanDefinitionParser("annotation-driven", new AnnotationDrivenBeanDefinitionParser());
		registerBeanDefinitionParser("default-servlet-handler", new DefaultServletHandlerBeanDefinitionParser());
		registerBeanDefinitionParser("interceptors", new InterceptorsBeanDefinitionParser());
		registerBeanDefinitionParser("resources", new ResourcesBeanDefinitionParser());
		registerBeanDefinitionParser("view-controller", new ViewControllerBeanDefinitionParser());
		registerBeanDefinitionParser("redirect-view-controller", new ViewControllerBeanDefinitionParser());
		registerBeanDefinitionParser("status-controller", new ViewControllerBeanDefinitionParser());
		registerBeanDefinitionParser("view-resolvers", new ViewResolversBeanDefinitionParser());
		registerBeanDefinitionParser("tiles-configurer", new TilesConfigurerBeanDefinitionParser());
		registerBeanDefinitionParser("freemarker-configurer", new FreeMarkerConfigurerBeanDefinitionParser());
		registerBeanDefinitionParser("groovy-configurer", new GroovyMarkupConfigurerBeanDefinitionParser());
		registerBeanDefinitionParser("script-template-configurer", new ScriptTemplateConfigurerBeanDefinitionParser());
		registerBeanDefinitionParser("cors", new CorsBeanDefinitionParser());
	}

}
所以会使用AnnotationDrivenBeanDefinitionParser解析<mvc:annotation-driven>注解。AnnotationDrivenBeanDefinitionParser的解析过程都在其parse方法中,主要用来注册Spring MVC各种组件、解析器和转换器(比如HandlerMapping、HandlerAdapter、HandlerExceptionResolver等)。下面来看一下HandlerMapping的注册逻辑:
RootBeanDefinition handlerMappingDef = new RootBeanDefinition(RequestMappingHandlerMapping.class);
handlerMappingDef.setSource(source);
handlerMappingDef.setRole(BeanDefinition.ROLE_INFRASTRUCTURE);
handlerMappingDef.getPropertyValues().add("order", 0);
handlerMappingDef.getPropertyValues().add("contentNegotiationManager", contentNegotiationManager);

if (element.hasAttribute("enable-matrix-variables")) {
    Boolean enableMatrixVariables = Boolean.valueOf(element.getAttribute("enable-matrix-variables"));
    handlerMappingDef.getPropertyValues().add("removeSemicolonContent", !enableMatrixVariables);
}

configurePathMatchingProperties(handlerMappingDef, element, parserContext);
readerContext.getRegistry().registerBeanDefinition(HANDLER_MAPPING_BEAN_NAME , handlerMappingDef);

RuntimeBeanReference corsRef = MvcNamespaceUtils.registerCorsConfigurations(null, parserContext, source);
handlerMappingDef.getPropertyValues().add("corsConfigurations", corsRef);

parserContext.registerComponent(new BeanComponentDefinition(handlerMappingDef, HANDLER_MAPPING_BEAN_NAME));
可以看到HandlerMapping的实际注册类型为RequestMappingHandlerMapping,其抽象基类AbstractHandlerMethodMapping实现了InitializingBean接口。RequestMappingHandlerMapping重写了afterPropertiesSet方法,当RequestMappingHandlerMapping对象初始化时,afterPropertiesSet方法会被调用。也就是在此方法中完成了RequestMappingHandlerMapping的一些初始化工作(比如请求url和Controller方法的映射)。
public void afterPropertiesSet() {
    this.config = new RequestMappingInfo.BuilderConfiguration();
    this.config.setUrlPathHelper(getUrlPathHelper());
    this.config.setPathMatcher(getPathMatcher());
    this.config.setSuffixPatternMatch(this.useSuffixPatternMatch);
    this.config.setTrailingSlashMatch(this.useTrailingSlashMatch);
    this.config.setRegisteredSuffixPatternMatch(this.useRegisteredSuffixPatternMatch);
    this.config.setContentNegotiationManager(getContentNegotiationManager());

    super.afterPropertiesSet();
}
public void afterPropertiesSet() {
initHandlerMethods();
}
protected void initHandlerMethods() {
if (logger.isDebugEnabled()) {
logger.debug("Looking for request mappings in application context: " + getApplicationContext());
}
// 1. 从容器上下文中获取所有Bean,如果detectHandlerMethodsInAncestorContexts为true(默认为false)则父容器中的beanNames也会返回
String[] beanNames = (this.detectHandlerMethodsInAncestorContexts ?
BeanFactoryUtils.beanNamesForTypeIncludingAncestors(obtainApplicationContext(), Object.class) :
obtainApplicationContext().getBeanNamesForType(Object.class));
// 2. 遍历处理每一个beanName
for (String beanName : beanNames) {
// 如果beanName不是以"scopedTarget."开始
if (!beanName.startsWith(SCOPED_TARGET_NAME_PREFIX)) {
Class<?> beanType = null;
try {
beanType = obtainApplicationContext().getType(beanName);
}
catch (Throwable ex) {
// An unresolvable bean type, probably from a lazy bean - let's ignore it.
if (logger.isDebugEnabled()) {
logger.debug("Could not resolve target class for bean with name '" + beanName + "'", ex);
}
}
// 如果类上有@Controller或@RequestMapping注解,则进行解析
if (beanType != null && isHandler(beanType)) {
detectHandlerMethods(beanName);
}
}
}
handlerMethodsInitialized(getHandlerMethods());
}可以看到,上述方法对于@Controller或@RequestMapping注解的类,调用detectHandlerMethods进行处理。
@Override
protected boolean isHandler(Class<?> beanType) {
    return (AnnotatedElementUtils.hasAnnotation(beanType, Controller.class) ||
            AnnotatedElementUtils.hasAnnotation(beanType, RequestMapping.class));
}
protected void detectHandlerMethods(final Object handler) {
Class<?> handlerType = (handler instanceof String ?
obtainApplicationContext().getType((String) handler) : handler.getClass());
if (handlerType != null) {
final Class<?> userType = ClassUtils.getUserClass(handlerType);
// 1. 获取类中@RequestMapping注解的方法,key -> Method | value -> RequestMappingInfo
Map<Method, T> methods = MethodIntrospector.selectMethods(userType,
(MethodIntrospector.MetadataLookup<T>) method -> {
try {
return getMappingForMethod(method, userType);
}
catch (Throwable ex) {
throw new IllegalStateException("Invalid mapping on handler class [" +
userType.getName() + "]: " + method, ex);
}
});
if (logger.isDebugEnabled()) {
logger.debug(methods.size() + " request handler methods found on " + userType + ": " + methods);
}
// 2. 遍历所有@RequestMapping注解的方法,注册到RequestMappingHandlerMapping的mappingRegistry成员中,用于确定URL-ControllerMethod映射
methods.forEach((method, mapping) -> {
Method invocableMethod = AopUtils.selectInvocableMethod(method, userType);
registerHandlerMethod(handler, invocableMethod, mapping);
});
}
}首先看一下上述detectHandlerMethods方法步骤1中,RequestMappingInfo如何生成的。
public static <T> Map<Method, T> selectMethods(Class<?> targetType, final MetadataLookup<T> metadataLookup) {
    final Map<Method, T> methodMap = new LinkedHashMap<>();
    Set<Class<?>> handlerTypes = new LinkedHashSet<>();
    Class<?> specificHandlerType = null;

    if (!Proxy.isProxyClass(targetType)) {
        specificHandlerType = ClassUtils.getUserClass(targetType);
        handlerTypes.add(specificHandlerType);
    }
    // 1. 获取当前类所有实现的父类或接口,添加到handlerTypes
    handlerTypes.addAll(ClassUtils.getAllInterfacesForClassAsSet(targetType));

    // 2. 遍历handlerTypes,获取所有的@RequestMapping注解的方法,并生成 Method -> RequestMappingInfo映射对,添加到methodMap中
    for (Class<?> currentHandlerType : handlerTypes) {
        final Class<?> targetClass = (specificHandlerType != null ? specificHandlerType : currentHandlerType);

        // 2.1 doWithMethods方法,第二个参数是个表达式参数,类型为MethodCallback,用于处理一个Method,返回值为null
        // 第三个参数也是个表达式参数,类型为MethodFilter,用于判断一个Method是否需要处理,返回boolean,false表示不处理
        ReflectionUtils.doWithMethods(currentHandlerType, method -> {
            Method specificMethod = ClassUtils.getMostSpecificMethod(method, targetClass);
            T result = metadataLookup.inspect(specificMethod);
            if (result != null) {
                Method bridgedMethod = BridgeMethodResolver.findBridgedMethod(specificMethod);
                if (bridgedMethod == specificMethod || metadataLookup.inspect(bridgedMethod) == null) {
                    methodMap.put(specificMethod, result);
                }
            }
        }, ReflectionUtils.USER_DECLARED_METHODS);
    }

    return methodMap;
}
public static void doWithMethods(Class<?> clazz, MethodCallback mc, @Nullable MethodFilter mf) {
// 1. 获取类内所有的DeclaredMethods,注意这里是所有的方法,包括private,但不包括父类的方法
Method[] methods = getDeclaredMethods(clazz);
// 2. 遍历methods,处理Method
for (Method method : methods) {
// 2.1 使用MethodFilter过滤方法,如果返回结果为false,表示不处理
if (mf != null && !mf.matches(method)) {
continue;
}
// 2.2 调用MethodCallback处理当前Method
try {
mc.doWith(method);
}
catch (IllegalAccessException ex) {
throw new IllegalStateException("Not allowed to access method '" + method.getName() + "': " + ex);
}
}
// 3. 如果当前clazz的父类不为null,处理父类的所有方法
if (clazz.getSuperclass() != null) {
doWithMethods(clazz.getSuperclass(), mc, mf);
}
// 4. 如果当前clazz是接口,则遍历当前接口的父接口,处理父接口的所有方法
else if (clazz.isInterface()) {
for (Class<?> superIfc : clazz.getInterfaces()) {
doWithMethods(superIfc, mc, mf);
}
}
}所以步骤2.2,使用了selectMethods方法中传入的MethodCallback函数式参数,如下:
method -> {
    Method specificMethod = ClassUtils.getMostSpecificMethod(method, targetClass);
    T result = metadataLookup.inspect(specificMethod);
    if (result != null) {
        Method bridgedMethod = BridgeMethodResolver.findBridgedMethod(specificMethod);
        if (bridgedMethod == specificMethod || metadataLookup.inspect(bridgedMethod) == null) {
            methodMap.put(specificMethod, result);
        }
    }
}
逻辑也非常简单,就是通过调用metadataLookup.inspect方法,通过Method获取RequestMappingInfo。然后将Method\RequestMappingInfo对添加到methodMap中。而metadataLookup参数是在上述detectHandlerMethods方法中定义的,如下:
(MethodIntrospector.MetadataLookup<T>) method -> {
    try {
        return getMappingForMethod(method, userType);
    }
    catch (Throwable ex) {
        throw new IllegalStateException("Invalid mapping on handler class [" +
                userType.getName() + "]: " + method, ex);
    }
});
getMappingForMethod方法定义在RequestMappingHandlerMapping类中:
protected RequestMappingInfo getMappingForMethod(Method method, Class<?> handlerType) {
    RequestMappingInfo info = createRequestMappingInfo(method);
    if (info != null) {
        RequestMappingInfo typeInfo = createRequestMappingInfo(handlerType);
        if (typeInfo != null) {
            info = typeInfo.combine(info);
        }
    }
    return info;
}所以,这里总结一下RequestMappingInfo如何生成的,简单地讲就是,反射clazz,获取clazz内部所有的方法,对于每个Method,调用getMappingForMethod方法生成RequestMappingInfo。
private RequestMappingInfo createRequestMappingInfo(AnnotatedElement element) {
    // 1. 获取方法注解
    RequestMapping requestMapping = AnnotatedElementUtils.findMergedAnnotation(element, RequestMapping.class);
    // 2. 后去RequestCondition,这里element传入的是Method对象,调用getCustomMethodCondition方法,返回null
    RequestCondition<?> condition = (element instanceof Class ?
            getCustomTypeCondition((Class<?>) element) : getCustomMethodCondition((Method) element));
    // 3. 如果方法无RequestMapping注解,返回null,否则调用createRequestMappingInfo获取RequestMappingInfo
    return (requestMapping != null ? createRequestMappingInfo(requestMapping, condition) : null);
}

protected RequestMappingInfo createRequestMappingInfo(
        RequestMapping requestMapping, @Nullable RequestCondition<?> customCondition) {

    // 将RequestMapping注解信息,通过Builder转为RequestMappingInfo
    RequestMappingInfo.Builder builder = RequestMappingInfo
            .paths(resolveEmbeddedValuesInPatterns(requestMapping.path()))
            .methods(requestMapping.method())
            .params(requestMapping.params())
            .headers(requestMapping.headers())
            .consumes(requestMapping.consumes())
            .produces(requestMapping.produces())
            .mappingName(requestMapping.name());
    if (customCondition != null) {
        builder.customCondition(customCondition);
    }
    return builder.options(this.config).build();
}
接下来来看一下来上述detectHandlerMethods方法步骤2中的registerHandlerMethod方法,看一下URL和Controller方法是如何绑定的。
protected void registerHandlerMethod(Object handler, Method method, T mapping) {
    this.mappingRegistry.register(mapping, handler, method);
}
可以看到,这里其实调用了成员变量mappingRegistry的register方法。其中mappingRegistry的类型为org.springframework.web.servlet.handler.AbstractHandlerMethodMapping.MappingRegistry,是AbstractHandlerMethodMapping的内部类。
class MappingRegistry {

    private final Map<T, MappingRegistration<T>> registry = new HashMap<>();

    private final Map<T, HandlerMethod> mappingLookup = new LinkedHashMap<>();

    private final MultiValueMap<String, T> urlLookup = new LinkedMultiValueMap<>();

    private final Map<String, List<HandlerMethod>> nameLookup = new ConcurrentHashMap<>();

    private final Map<HandlerMethod, CorsConfiguration> corsLookup = new ConcurrentHashMap<>();

    private final ReentrantReadWriteLock readWriteLock = new ReentrantReadWriteLock();

    // methods
}- registry:RequestMappingInfo -> MappingRegistration映射
- mappingLookup:RequestMappingInfo -> HandlerMethod映射
- urlLookup:URL -> RequestMappingInfo映射
- nameLookup:URL -> List<HandlerMethod>映射
- corsLookup:HandlerMethod -> CorsConfiguration映射
- readWriteLock:读写锁,保证上述映射的一致性
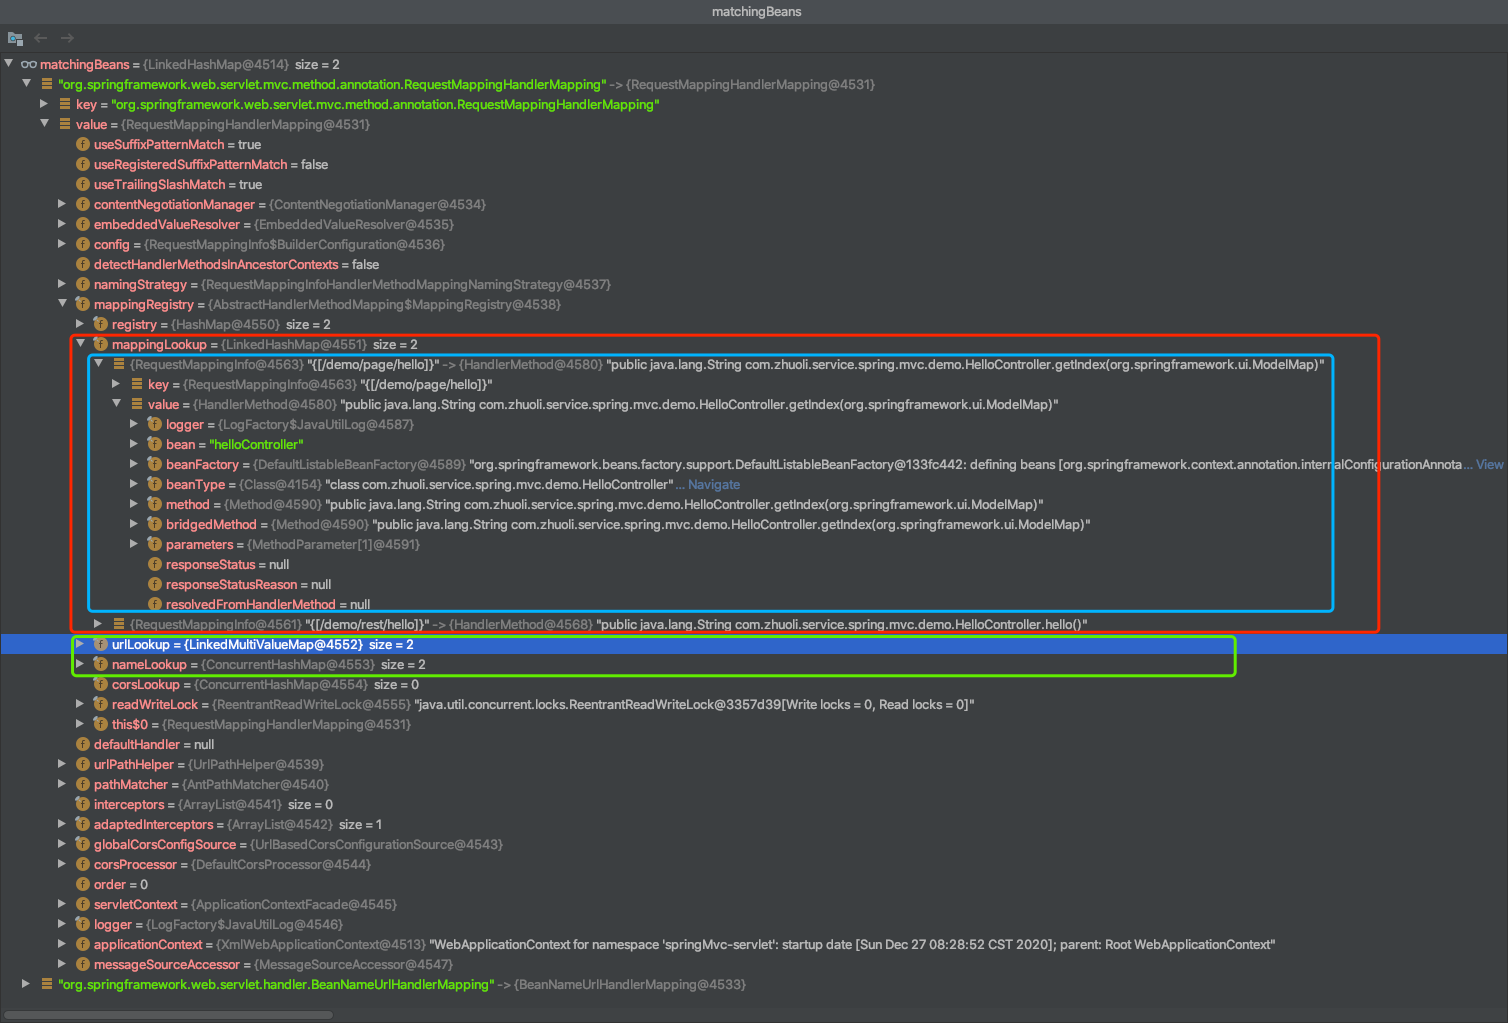
通过urlLookup和mappingLookup就能将请求的定位到Controller的某个方法上。registry存储了RequestMappingInfo到MappingRegistration的映射,MappingRegistration中保存了所有Mapping注册信息,用于unregister。
public void register(T mapping, Object handler, Method method) {
    // 加锁,保证一致性
    this.readWriteLock.writeLock().lock();
    try {
        // 1. 创建HandlerMethod,HandlerMethod持有clazz和method信息集合
        HandlerMethod handlerMethod = createHandlerMethod(handler, method);
        assertUniqueMethodMapping(handlerMethod, mapping);

        if (logger.isInfoEnabled()) {
            logger.info("Mapped \"" + mapping + "\" onto " + handlerMethod);
        }
        // 2. 添加到mappingLookup,RequestMappingInfo -> HandlerMethod
        this.mappingLookup.put(mapping, handlerMethod);

        List<String> directUrls = getDirectUrls(mapping);
        for (String url : directUrls) {
            // 3. 添加到urlLookup,URL -> List<RequestMappingInfo>
            this.urlLookup.add(url, mapping);
        }

        String name = null;
        if (getNamingStrategy() != null) {
            name = getNamingStrategy().getName(handlerMethod, mapping);
            // 4. 添加nameLookup,HandlerMethod & RequestMappingInfo获取name,name -> List<HandlerMethod>
            addMappingName(name, handlerMethod);
        }

        CorsConfiguration corsConfig = initCorsConfiguration(handler, method, mapping);
        if (corsConfig != null) {
            // 5. 如果有跨域设置,添加到corsLookup,HandlerMethod -> CorsConfiguration
            this.corsLookup.put(handlerMethod, corsConfig);
        }

        // 6. 添加到registry,RequestMappingInfo -> MappingRegistration
        this.registry.put(mapping, new MappingRegistration<>(mapping, handlerMethod, directUrls, name));
    }
    finally {
        // 解锁
        this.readWriteLock.writeLock().unlock();
    }
这样RequestMappingHandlerMapping就完成了初始化,同时也完成了它的核心功能——URL和Controller方法的映射关系的绑定。这样,在上述initStrategies方法中,调用initHandlerMappings方法初始化DispatcherServlet的成员handlerMappings变量时,就可以根据beanName HANDLER_MAPPING_BEAN_NAME从容器中获取到HandlerMapping对象了。
4. HandlerAdapter Bean注册
在使用SpringMVC时,对Controller中方法的参数和返回值的处理都非常的方便。常用类型的参数不需要任何额外配置,SpringMVC即可完美转换。而返回值也可以是ModelAndView、String、HashMap、ResponseEntity等多种类型,多种方式简单配置,完美兼容。其实上述转换,就是通过一系列的转换器来完成的。而这些转换器也是需要初始化到运行环境中的,而HandlerAdapter就是用来绑定各种转换器的。
跟HandlerMapping一样,在initStrategies内部调用initHandlerAdapters方法完成DispatcherServlet成员变量handlerAdapters初始化。前提是容器中已经存在了HandlerAdapter Bean。下面我们就来分析一下容器中的HandlerAdapter是何时注册并初始化的。
其中BeanDefinition的注册也在<mvc:annotation-driven>解析时,通过AnnotationDrivenBeanDefinitionParser的parse方法注册的。如下:
RootBeanDefinition handlerAdapterDef = new RootBeanDefinition(RequestMappingHandlerAdapter.class);
handlerAdapterDef.setSource(source);
handlerAdapterDef.setRole(BeanDefinition.ROLE_INFRASTRUCTURE);
handlerAdapterDef.getPropertyValues().add("contentNegotiationManager", contentNegotiationManager);
handlerAdapterDef.getPropertyValues().add("webBindingInitializer", bindingDef);
handlerAdapterDef.getPropertyValues().add("messageConverters", messageConverters);
addRequestBodyAdvice(handlerAdapterDef);
addResponseBodyAdvice(handlerAdapterDef);

if (element.hasAttribute("ignore-default-model-on-redirect")) {
    Boolean ignoreDefaultModel = Boolean.valueOf(element.getAttribute("ignore-default-model-on-redirect"));
    handlerAdapterDef.getPropertyValues().add("ignoreDefaultModelOnRedirect", ignoreDefaultModel);
}
if (argumentResolvers != null) {
    handlerAdapterDef.getPropertyValues().add("customArgumentResolvers", argumentResolvers);
}
if (returnValueHandlers != null) {
    handlerAdapterDef.getPropertyValues().add("customReturnValueHandlers", returnValueHandlers);
}
if (asyncTimeout != null) {
    handlerAdapterDef.getPropertyValues().add("asyncRequestTimeout", asyncTimeout);
}
if (asyncExecutor != null) {
    handlerAdapterDef.getPropertyValues().add("taskExecutor", asyncExecutor);
}

handlerAdapterDef.getPropertyValues().add("callableInterceptors", callableInterceptors);
handlerAdapterDef.getPropertyValues().add("deferredResultInterceptors", deferredResultInterceptors);
readerContext.getRegistry().registerBeanDefinition(HANDLER_ADAPTER_BEAN_NAME , handlerAdapterDef);
所以HandlerAdapter的类型为RequestMappingHandlerAdapter,跟RequestMappingHandlerMapping类一样,RequestMappingHandlerAdapter也实现了InitializingBean接口,在初始化时会调用afterPropertiesSet方法。
public void afterPropertiesSet() {
    // Do this first, it may add ResponseBody advice beans
    initControllerAdviceCache();

    // 1. 初始化参数解析器
    if (this.argumentResolvers == null) {
        List<HandlerMethodArgumentResolver> resolvers = getDefaultArgumentResolvers();
        this.argumentResolvers = new HandlerMethodArgumentResolverComposite().addResolvers(resolvers);
    }

    // 2. 初始化InitBinder解析器
    if (this.initBinderArgumentResolvers == null) {
        List<HandlerMethodArgumentResolver> resolvers = getDefaultInitBinderArgumentResolvers();
        this.initBinderArgumentResolvers = new HandlerMethodArgumentResolverComposite().addResolvers(resolvers);
    }

    // 3. 初始化返回值处理器
    if (this.returnValueHandlers == null) {
        List<HandlerMethodReturnValueHandler> handlers = getDefaultReturnValueHandlers();
        this.returnValueHandlers = new HandlerMethodReturnValueHandlerComposite().addHandlers(handlers);
    }
}
初始化参数解析器getDefaultArgumentResolvers方法:
/**
 * Return the list of argument resolvers to use including built-in resolvers
 * and custom resolvers provided via {@link #setCustomArgumentResolvers}.
 */
private List<HandlerMethodArgumentResolver> getDefaultArgumentResolvers() {
    List<HandlerMethodArgumentResolver> resolvers = new ArrayList<>();

    // Annotation-based argument resolution
    resolvers.add(new RequestParamMethodArgumentResolver(getBeanFactory(), false));
    resolvers.add(new RequestParamMapMethodArgumentResolver());
    resolvers.add(new PathVariableMethodArgumentResolver());
    resolvers.add(new PathVariableMapMethodArgumentResolver());
    resolvers.add(new MatrixVariableMethodArgumentResolver());
    resolvers.add(new MatrixVariableMapMethodArgumentResolver());
    resolvers.add(new ServletModelAttributeMethodProcessor(false));
    resolvers.add(new RequestResponseBodyMethodProcessor(getMessageConverters(), this.requestResponseBodyAdvice));
    resolvers.add(new RequestPartMethodArgumentResolver(getMessageConverters(), this.requestResponseBodyAdvice));
    resolvers.add(new RequestHeaderMethodArgumentResolver(getBeanFactory()));
    resolvers.add(new RequestHeaderMapMethodArgumentResolver());
    resolvers.add(new ServletCookieValueMethodArgumentResolver(getBeanFactory()));
    resolvers.add(new ExpressionValueMethodArgumentResolver(getBeanFactory()));
    resolvers.add(new SessionAttributeMethodArgumentResolver());
    resolvers.add(new RequestAttributeMethodArgumentResolver());

    // Type-based argument resolution
    resolvers.add(new ServletRequestMethodArgumentResolver());
    resolvers.add(new ServletResponseMethodArgumentResolver());
    resolvers.add(new HttpEntityMethodProcessor(getMessageConverters(), this.requestResponseBodyAdvice));
    resolvers.add(new RedirectAttributesMethodArgumentResolver());
    resolvers.add(new ModelMethodProcessor());
    resolvers.add(new MapMethodProcessor());
    resolvers.add(new ErrorsMethodArgumentResolver());
    resolvers.add(new SessionStatusMethodArgumentResolver());
    resolvers.add(new UriComponentsBuilderMethodArgumentResolver());

    // Custom arguments
    if (getCustomArgumentResolvers() != null) {
        resolvers.addAll(getCustomArgumentResolvers());
    }

    // Catch-all
    resolvers.add(new RequestParamMethodArgumentResolver(getBeanFactory(), true));
    resolvers.add(new ServletModelAttributeMethodProcessor(true));

    return resolvers;
}
根据解析器名称大概可以推测出其作用,比如@RequestParam解析器,@PathVariable解析器,及@RequestBody和@ResponseBody解析器等。可以看到Spring MVC默认提供了丰富的内置解析器参数解析器来应对各种参数解析场景。
初始化InitBinder解析器getDefaultInitBinderArgumentResolvers方法:
/**
 * Return the list of argument resolvers to use for {@code @InitBinder}
 * methods including built-in and custom resolvers.
 */
private List<HandlerMethodArgumentResolver> getDefaultInitBinderArgumentResolvers() {
    List<HandlerMethodArgumentResolver> resolvers = new ArrayList<>();

    // Annotation-based argument resolution
    resolvers.add(new RequestParamMethodArgumentResolver(getBeanFactory(), false));
    resolvers.add(new RequestParamMapMethodArgumentResolver());
    resolvers.add(new PathVariableMethodArgumentResolver());
    resolvers.add(new PathVariableMapMethodArgumentResolver());
    resolvers.add(new MatrixVariableMethodArgumentResolver());
    resolvers.add(new MatrixVariableMapMethodArgumentResolver());
    resolvers.add(new ExpressionValueMethodArgumentResolver(getBeanFactory()));
    resolvers.add(new SessionAttributeMethodArgumentResolver());
    resolvers.add(new RequestAttributeMethodArgumentResolver());

    // Type-based argument resolution
    resolvers.add(new ServletRequestMethodArgumentResolver());
    resolvers.add(new ServletResponseMethodArgumentResolver());

    // Custom arguments
    if (getCustomArgumentResolvers() != null) {
        resolvers.addAll(getCustomArgumentResolvers());
    }

    // Catch-all
    resolvers.add(new RequestParamMethodArgumentResolver(getBeanFactory(), true));

    return resolvers;
}
初始化返回值处理器getDefaultReturnValueHandlers方法:
/**
 * Return the list of return value handlers to use including built-in and
 * custom handlers provided via {@link #setReturnValueHandlers}.
 */
private List<HandlerMethodReturnValueHandler> getDefaultReturnValueHandlers() {
    List<HandlerMethodReturnValueHandler> handlers = new ArrayList<>();

    // Single-purpose return value types
    handlers.add(new ModelAndViewMethodReturnValueHandler());
    handlers.add(new ModelMethodProcessor());
    handlers.add(new ViewMethodReturnValueHandler());
    handlers.add(new ResponseBodyEmitterReturnValueHandler(getMessageConverters(),
            this.reactiveAdapterRegistry, this.taskExecutor, this.contentNegotiationManager));
    handlers.add(new StreamingResponseBodyReturnValueHandler());
    handlers.add(new HttpEntityMethodProcessor(getMessageConverters(),
            this.contentNegotiationManager, this.requestResponseBodyAdvice));
    handlers.add(new HttpHeadersReturnValueHandler());
    handlers.add(new CallableMethodReturnValueHandler());
    handlers.add(new DeferredResultMethodReturnValueHandler());
    handlers.add(new AsyncTaskMethodReturnValueHandler(this.beanFactory));

    // Annotation-based return value types
    handlers.add(new ModelAttributeMethodProcessor(false));
    handlers.add(new RequestResponseBodyMethodProcessor(getMessageConverters(),
            this.contentNegotiationManager, this.requestResponseBodyAdvice));

    // Multi-purpose return value types
    handlers.add(new ViewNameMethodReturnValueHandler());
    handlers.add(new MapMethodProcessor());

    // Custom return value types
    if (getCustomReturnValueHandlers() != null) {
        handlers.addAll(getCustomReturnValueHandlers());
    }

    // Catch-all
    if (!CollectionUtils.isEmpty(getModelAndViewResolvers())) {
        handlers.add(new ModelAndViewResolverMethodReturnValueHandler(getModelAndViewResolvers()));
    }
    else {
        handlers.add(new ModelAttributeMethodProcessor(true));
    }

    return handlers;
}
Spring MVC内置了对多种返回类型,返回方式的返回值处理器, 如处理@ResponseBody的处理器 RequestResponseBodyMethodProcessor。
这样HandlerAdapter Bean就在容器中完成了初始化,后面DispatcherServlet初始化时,在initStrategies方法中,调用initHandlerAdapters方法初始化DispatcherServlet的handlerAdapters成员变量时,就可以根据beanName HANDLER_MAPPING_BEAN_NAME从容器中获取到HandlerMapping对象了。
private void initHandlerAdapters(ApplicationContext context) {
    this.handlerAdapters = null;

    if (this.detectAllHandlerAdapters) {
        // Find all HandlerAdapters in the ApplicationContext, including ancestor contexts.
        Map<String, HandlerAdapter> matchingBeans =
                BeanFactoryUtils.beansOfTypeIncludingAncestors(context, HandlerAdapter.class, true, false);
        if (!matchingBeans.isEmpty()) {
            this.handlerAdapters = new ArrayList<>(matchingBeans.values());
            // We keep HandlerAdapters in sorted order.
            AnnotationAwareOrderComparator.sort(this.handlerAdapters);
        }
    }
    else {
        try {
            HandlerAdapter ha = context.getBean(HANDLER_ADAPTER_BEAN_NAME, HandlerAdapter.class);
            this.handlerAdapters = Collections.singletonList(ha);
        }
        catch (NoSuchBeanDefinitionException ex) {
            // Ignore, we'll add a default HandlerAdapter later.
        }
    }

    // Ensure we have at least some HandlerAdapters, by registering
    // default HandlerAdapters if no other adapters are found.
    if (this.handlerAdapters == null) {
        this.handlerAdapters = getDefaultStrategies(context, HandlerAdapter.class);
        if (logger.isDebugEnabled()) {
            logger.debug("No HandlerAdapters found in servlet '" + getServletName() + "': using default");
        }
    }
}
至此,关于Spring MVC的启动过程,就介绍完了,我们明白了Spring MVC的父子容器的初始化机制。最后我们来看一下,为什么Spring MVC会使用父子容器?
5. 为什么会使用Spring MVC父子容器
我们知道,在Spring的父子容器中,父容器和子容器是相互隔离的,他们内部可以存在名称相同的bean。子容器可以访问父容器中的bean,而父容器不能访问子容器中的bean。
之所以可以实现上述隔离逻辑,是因为在bean初始化的方法doGetBean方法中,有一段如下逻辑:
// Check if bean definition exists in this factory.
BeanFactory parentBeanFactory = getParentBeanFactory();
if (parentBeanFactory != null && !containsBeanDefinition(beanName)) {
    // Not found -> check parent.
    String nameToLookup = originalBeanName(name);
    if (parentBeanFactory instanceof AbstractBeanFactory) {
        return ((AbstractBeanFactory) parentBeanFactory).doGetBean(
                nameToLookup, requiredType, args, typeCheckOnly);
    }
    else if (args != null) {
        // Delegation to parent with explicit args.
        return (T) parentBeanFactory.getBean(nameToLookup, args);
    }
    else {
        // No args -> delegate to standard getBean method.
        return parentBeanFactory.getBean(nameToLookup, requiredType);
    }
}
如果存在父容器,并且当前容器中不存在该bean,那么就从父容器中获取该Bean。
为什么Spring MVC要采用这种父子容器结构?
本质上,Spring MVC采用这种父子容器的结构,还是为了Bean的有序管理。我们知道,通常我们使用springmvc的时候,采用JAEE三层层结构模式开发(controller层、service层、dao层)。父容器中会包含dao层和service层,而子容器中包含的只有controller层,这2个容器组成了父子容器的关系,controller层通常会注入service层的bean。采用父子容器可以避免在service层去注入controller层的bean,导致整个依赖层次是比较混乱的。
参考链接:
1. Spring MVC源码