 Zhuoli's Blog
之前的四篇文章,我们介绍了Tomcat启动过程的实现:
我们知道,Tomcat启动之后,就可以响应来自客户端的web请求了,本篇文章我们来看一下Tomcat容器是如何响应web请求的。
1. Servlet是如何生效的
做过Java Web的我们都知道,我们的具体业务处理逻辑是卸载Servlet中的,不难猜测,一次Tomcat的请求最后肯定是Servlet完成的。Tomcat设计了这么多层次的容器,Tomcat是怎么确定请求是由哪个Wrapper容器里的Servlet来处理的呢?答案是,Mapper组件。
Mapper组件的功能就是将用户请求的URL定位到一个Servlet,它的工作原理是: Mapper组件里保存了Web应用的配置信息,其实就是容器组件与访问路径的映射关系,比如Host容器里配置的域名、Context容器里的Web应用路径,以及 Wrapper容器里Servlet映射的路径,可以想象这些配置信息就是一个多层次的 Map。
当一个请求到来时,Mapper组件通过解析请求URL里的域名和路径,再到自己保存的Map里去查找,就能定位到一个 Servlet。需要注意的是,一个请求URL最后只会定位到一个Wrapper容器,也就是一个Servlet。接下来我通过一个例子来解释这个定位的过程。
假如有一个网购系,有面向网站管理人员的后台管理系统,还有面向终端客户的在线购物系统。这两个系统运行在在同一个Tomcat上(实际生产中肯定不会这么部署,这里仅作为示例),为了隔离它们的访问域名,配置了两个虚拟域名:manage.shopping.com和user.shopping.com,网站管理人员通过manage.shopping.com域名访问Tomcat去管理用户和商品,而用户管理和商品管理是两个单独的 Web 应用。终端客户通过user.shopping.com域名去搜索商品和下订单,搜索功能和订单管理也是两个独立的Web应用。
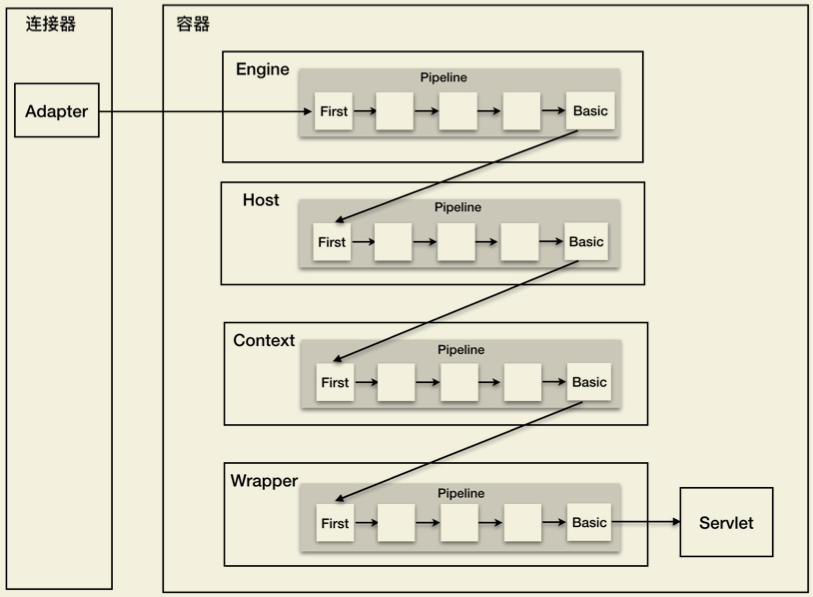
针对这样的部署了,Tomcat会创建一个Service 组件和一个 Engine 容器组件,在Engine容器下创建两个 Host 子容器,在每个Host容器下创建两个Context子容器。由于一个Web应用通常有多个Servlet,Tomcat还会在每个Context容器里创建多个Wrapper子容器。每个容器都有对应的访问路径,如下图所示:
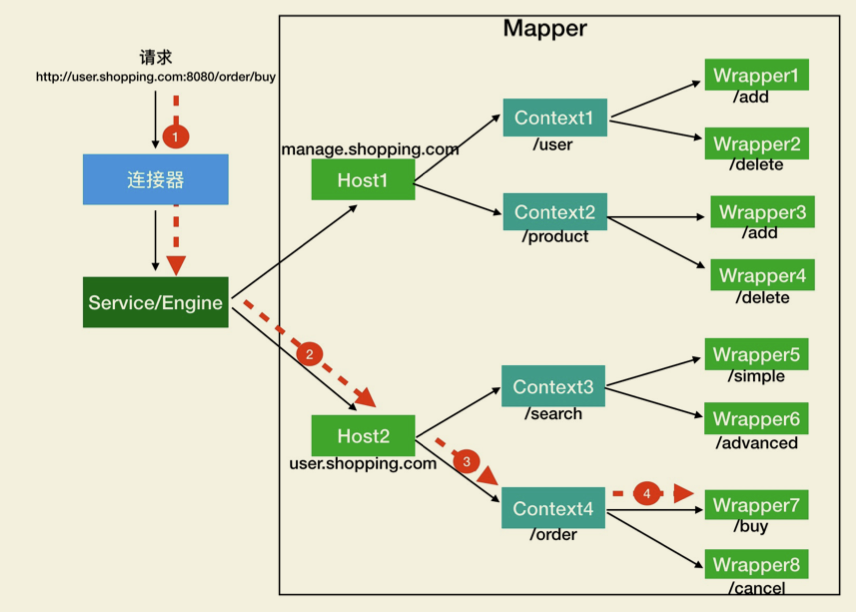
假如有用户访问一个URL,比如图中的http://user.shopping.com:8080/order/buy,Tomcat如何将这个URL定位到一个 Servlet呢?主要包含以下几个步骤。
1.1 根据协议和端口号确定Service和Engine
Tomcat的每个连接器都监听不同的端口,比如Tomcat默认的HTTP连接器监听8080端口、默认的AJP连接器监听8009端口。上面例子中的URL访问的是8080端 口,因此这个请求会被HTTP连接器接收,而一个连接器是属于一个Service组件的,这 样Service组件就确定了。我们还知道一个Service组件里除了有多个连接器,还有一个容器组件,具体来说就是一个Engine容器,因此Service确定了也就意味着Engine也确定了。
1.2 根据域名确定Host
Service和Engine确定后,Mapper组件通过URL中的域名去查找相应的Host容器,比如例子中的URL访问的域名是user.shopping.com,因此Mapper会找到 Host2这个容器。
1.3 根据URL路径确定Context组件
Host确定以后,Mapper根据URL的路径来匹配相应的Web应用的路径,比如例子中访问的是/order,因此找到了Context4这个Context容器。
1.4 根据URL路径确定Wrapper(Servlet)
Context 确定后,Mapper再根据web.xml中配置的Servlet映射路径来找到具体的Wrapper和Servlet。
看到这里,相信我们都能明白了什么是容器,以及Tomcat如何通过一层一层的父子容器找到某个Servlet来处理请求。需要注意的是,并不是说只有Servlet才会去处理请求,实际上这个查找路径上的父子容器都会对请求做一些处理。比如,连接器中的Adapter会调用容器的Service方法来执行Servlet,最先拿到请求的是Engine容器, Engine容器对请求做一些处理后,会把请求传给自己子容器Host 继续处理,依次类推,最后这个请求会传给Wrapper容器,Wrapper会调用最终的Servlet来处理。
2. 源码分析
以上是Tomcat响应一次请求的宏观过程,接下来我们来看一下相关源码,源码的细节我们主要放在以下几个方面:
- Tomcat的工作线程是如何产生的
- 客户端请求是如何转化为内部对象的
- Servlet是如何生效的
- 响应时如何回写到客户端浏览器的
之前的文章Tomcat源码解读『基础类介绍』中我们提到,Tomcat通过Connector启动后台线程,监听指定socket端口请求,实现对外服务。具体如下图所示:

由于接下来的介绍跟上图的组件密切相关,我们把之前文章对这几个组件的介绍再这里再重复介绍一下:
- ProtocolHandler
ProtocolHandler成员变量初始化是在Connector构造函数中完成的,如果调用Connector无参构造函数,ProtocolHandler默认为HTTP/1.1 NIO类型,即Http11NioProtocol。这里我们也以Http11NioProtocol为例,介绍ProtocolHandler。
ProtocolHandler用来处理网络连接和应用层协议,包含了2个重要部件:EndPoint和Processor
- Endpoint
EndPoint是通信端点,即通信监听的接口,是具体的Socket接收和发送处理器,是对传输层的抽象,因此EndPoint是用来实现TCP/IP协议的。
EndPoint是一个接口,对应的抽象实现类是AbstractEndpoint,而 AbstractEndpoint的具体子类,比如在 NioEndpoint和Nio2Endpoint中,有两个重要的子组件:Acceptor和SocketProcessor。
其中Acceptor用于监听Socket连接请求。SocketProcessor用于处理接收到的 Socket请求,它实现Runnable接口,在run()方法里调用协议处理组件Processor 进行处理。为了提高处理能力,SocketProcessor被提交到线程池来执行。
- Processor
EndPoint用来实现TCP/IP协议,Processor则用来实现应用层协议的(HTTP协议、AJP协议等),负责接收来自EndPoint的Socket,读取字节流解析成Tomcat Request和Response对象,并通过Adapter将其提交到容器处理。
- Adapter
由于协议不同,客户端发过来的请求信息也不尽相同,Tomcat定义了自己的 Request类来存放这些请求信息。ProtocolHandler接口负责解析请求并生成Tomcat Request类。但是这个Request对象不是标准的ServletRequest,也就意味着,不能用Tomcat Request作为参数来调用容器。Tomcat设计者的解决方案是引入CoyoteAdapter,这是适配器模式的经典运用,连接器调用CoyoteAdapter 的 Sevice方法,传入的是Tomcat Request对象,CoyoteAdapter负责将Tomcat Request转成ServletRequest,再调用Engine容器的pipline方法(之前文章介绍的pipline-valve机制),实现对servlet的调用。
2.1 Tomcat工作线程
2.1.1 Connector组件类型
Tomcat连接器Connector,包含两大组件ProtocolHandler和Adapter,这两个组件的初始化分别位于Connector构造函数和Connector的initInternal方法中。
我们之前介绍Degister解析server.xml时,Connector节点解析规则如下:
digester.addRule("Server/Service/Connector", new ConnectorCreateRule());所以在碰到server.xml文件中的”Server/Service/Connector”节点时将会触发 ConnectorCreateRule类的begin方法的调用:
public void begin(String namespace, String name, Attributes attributes)
        throws Exception {
    Service svc = (Service) digester.peek();
    Executor ex = null;
    String executorName = attributes.getValue("executor");
    if (executorName != null ) {
        ex = svc.getExecutor(executorName);
    }
    String protocolName = attributes.getValue("protocol");
    Connector con = new Connector(protocolName);
    if (ex != null) {
        setExecutor(con, ex);
    }
    String sslImplementationName = attributes.getValue("sslImplementationName");
    if (sslImplementationName != null) {
        setSSLImplementationName(con, sslImplementationName);
    }
    digester.push(con);
}
所以这里Connector实例化,会先获取server.xml文件中Connector节点的protocol属性名称,调用Connector的有参构造函数实例化Connector。而这里protocol,对于HTTP协议来说,我们一般配置为”HTTP/1.1″。
public Connector(String protocol) {
    boolean apr = AprLifecycleListener.isAprAvailable() &&
            AprLifecycleListener.getUseAprConnector();
    ProtocolHandler p = null;
    try {
        p = ProtocolHandler.create(protocol, apr);
    } catch (Exception e) {
        log.error(sm.getString(
                "coyoteConnector.protocolHandlerInstantiationFailed"), e);
    }
    if (p != null) {
        protocolHandler = p;
        protocolHandlerClassName = protocolHandler.getClass().getName();
    } else {
        protocolHandler = null;
        protocolHandlerClassName = protocol;
    }
    // Default for Connector depends on this system property
    setThrowOnFailure(Boolean.getBoolean("org.apache.catalina.startup.EXIT_ON_INIT_FAILURE"));
}
public static ProtocolHandler create(String protocol, boolean apr)
throws ClassNotFoundException, InstantiationException, IllegalAccessException,
IllegalArgumentException, InvocationTargetException, NoSuchMethodException, SecurityException {
if (protocol == null || "HTTP/1.1".equals(protocol)
|| (!apr && org.apache.coyote.http11.Http11NioProtocol.class.getName().equals(protocol))
|| (apr && org.apache.coyote.http11.Http11AprProtocol.class.getName().equals(protocol))) {
if (apr) {
return new org.apache.coyote.http11.Http11AprProtocol();
} else {
return new org.apache.coyote.http11.Http11NioProtocol();
}
} else if ("AJP/1.3".equals(protocol)
|| (!apr && org.apache.coyote.ajp.AjpNioProtocol.class.getName().equals(protocol))
|| (apr && org.apache.coyote.ajp.AjpAprProtocol.class.getName().equals(protocol))) {
if (apr) {
return new org.apache.coyote.ajp.AjpAprProtocol();
} else {
return new org.apache.coyote.ajp.AjpNioProtocol();
}
} else {
// Instantiate protocol handler
Class<?> clazz = Class.forName(protocol);
return (ProtocolHandler) clazz.getConstructor().newInstance();
}
}不难发现,Connector的内部组件ProtocolHandler类型为Http11NioProtocol。
而ProtocolHandler的实例化,是通过反射调用Http11NioProtocol类的无参构造函数实现的:
public Http11NioProtocol() {
    super(new NioEndpoint());
}所以ProtocolHandler的内部组件EndPoint类型为NioEndpoint。
在Connector的initInternal方法中,会为Connector的内部组件Adapter赋值,类型为CoyoteAdapter:
adapter = new CoyoteAdapter(this);EndPoint的内部组件Processor的类型为Http11Processor,细节有点复杂,后面再介绍。
所以关于上述的组件,我们可以得出结论:
Connector = ProtocolHandler + Adapter
ProtocolHandler = Endpoint + Processor

ProtocolHandler = Http11NioProtocol
Adapter = CoyoteAdapter
Endpoint = NioEndpoint
Processor = Http11Processor
2.1.2 Connector处理线程启动
上面我们介绍了Connector的相关组件类型及构建的过程,接下来我们看一下Connector的工作线程。Connector启动方法中,会启动ProtocolHandler的start方法,根据我们上面分析的Connector子组件ProtocolHandler的类型为org.apache.coyote.http11.Http11NioProtocol,可以知道,会调用Http11NioProtocol的start方法,但是该类中没有覆盖父类AbstractProtocol的start方法,所以最终会调用到org.apache.coyote.AbstractProtocol#start方法,如下:
public void start() throws Exception {
    if (getLog().isInfoEnabled()) {
        getLog().info(sm.getString("abstractProtocolHandler.start", getName()));
        logPortOffset();
    }

    endpoint.start();
    monitorFuture = getUtilityExecutor().scheduleWithFixedDelay(
            new Runnable() {
                @Override
                public void run() {
                    if (!isPaused()) {
                        startAsyncTimeout();
                    }
                }
            }, 0, 60, TimeUnit.SECONDS);
}
这里会调用EndPoint的start方法,上面我们已经介绍过Http11NioProtocol子组件EndPoint的类型为org.apache.tomcat.util.net.NioEndpoint,所以会调用最终会调用到该类的startInternal方法,如下:
/**
 * Start the NIO endpoint, creating acceptor, poller threads.
 */
@Override
public void startInternal() throws Exception {

    if (!running) {
        running = true;
        paused = false;

        if (socketProperties.getProcessorCache() != 0) {
            processorCache = new SynchronizedStack<>(SynchronizedStack.DEFAULT_SIZE,
                    socketProperties.getProcessorCache());
        }
        if (socketProperties.getEventCache() != 0) {
            eventCache = new SynchronizedStack<>(SynchronizedStack.DEFAULT_SIZE,
                    socketProperties.getEventCache());
        }
        if (socketProperties.getBufferPool() != 0) {
            nioChannels = new SynchronizedStack<>(SynchronizedStack.DEFAULT_SIZE,
                    socketProperties.getBufferPool());
        }

        // Create worker collection
        if (getExecutor() == null) {
            createExecutor();
        }

        initializeConnectionLatch();

        // Start poller thread
        poller = new Poller();
        Thread pollerThread = new Thread(poller, getName() + "-ClientPoller");
        pollerThread.setPriority(threadPriority);
        pollerThread.setDaemon(true);
        pollerThread.start();

        // create acceptor
        startAcceptorThread();
    }
}
注释中描述的很清楚了,该方法中主要完成两件事:
- 创建Poller线程,Poller线程用于处理Acceptor线程获取的客户端请求
- 创建Acceptor线程,用于监听客户端Socket请求
protected void startAcceptorThread() {
    acceptor = new Acceptor<>(this);
    String threadName = getName() + "-Acceptor";
    acceptor.setThreadName(threadName);
    Thread t = new Thread(acceptor, threadName);
    t.setPriority(getAcceptorThreadPriority());
    t.setDaemon(getDaemon());
    t.start();
}startAcceptorThreads方法中,调用org.apache.tomcat.util.net.Acceptor的构造函数构建了Acceptor对象,并启动Acceptor线程,Acceptor线程用于获取客户端socket请求。NioEndPoint的内部处理线程Acceptor类型为org.apache.tomcat.util.net.Acceptor。
2.1.3 Acceptor线程

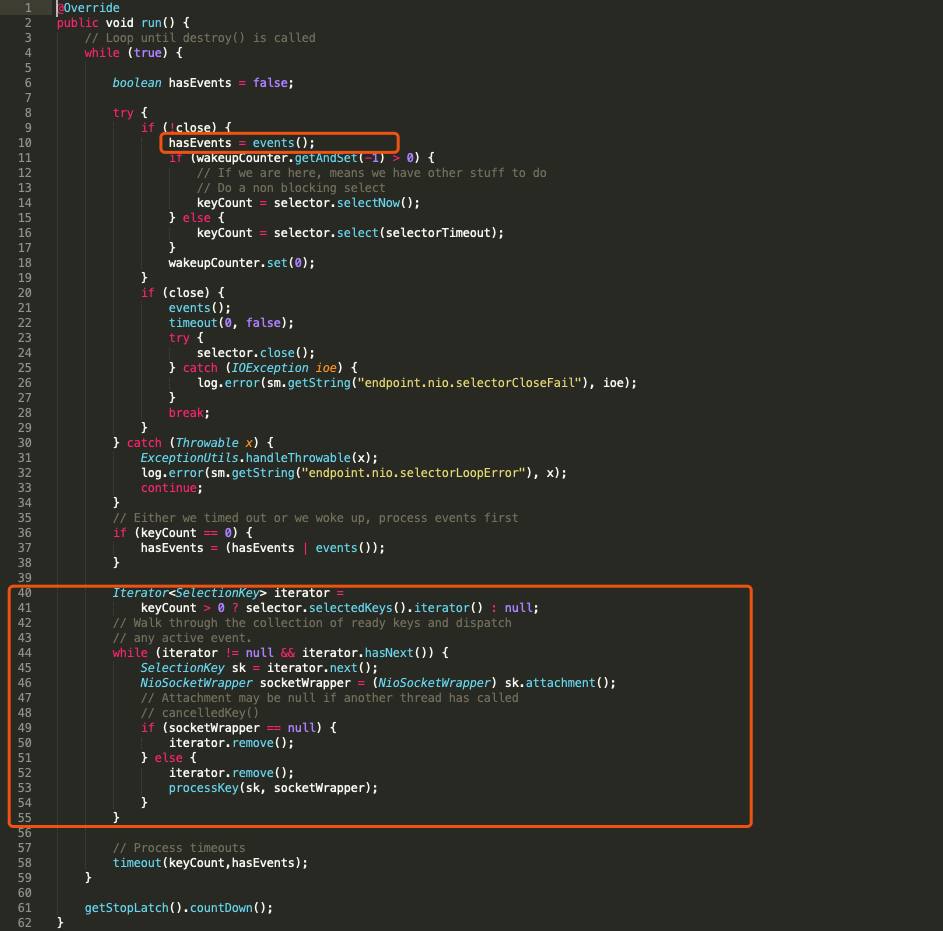
通过Acceptor的run方法,可以知道Acceptor线程核心就在获取socket并处理socket,分别在上图中红框处。
这里我们遗漏了一个问题,endpoint.serverSocketAccept()可以获取socket,肯定在NioEndPoint内部有个Nio相关的组件在监听某个端口,那么这个组件是如何实例化并初始化的?NioEndPoint的serverSocketAccept方法如下:
protected SocketChannel serverSocketAccept() throws Exception {
    return serverSock.accept();
}
可以得知,上述Nio相关的组件为serverSock,类型为java.nio.channels.ServerSocketChannel。那么serverSock又是什么时候与端口绑定的呢?我们发现NioEndPoint类中有个bind方法,如下:
public void bind() throws Exception {
    initServerSocket();

    setStopLatch(new CountDownLatch(1));

    // Initialize SSL if needed
    initialiseSsl();

    selectorPool.open(getName());
}

// Separated out to make it easier for folks that extend NioEndpoint to
// implement custom [server]sockets
protected void initServerSocket() throws Exception {
    if (!getUseInheritedChannel()) {
        serverSock = ServerSocketChannel.open();
        socketProperties.setProperties(serverSock.socket());
        InetSocketAddress addr = new InetSocketAddress(getAddress(), getPortWithOffset());
        serverSock.socket().bind(addr,getAcceptCount());
    } else {
        // Retrieve the channel provided by the OS
        Channel ic = System.inheritedChannel();
        if (ic instanceof ServerSocketChannel) {
            serverSock = (ServerSocketChannel) ic;
        }
        if (serverSock == null) {
            throw new IllegalArgumentException(sm.getString("endpoint.init.bind.inherited"));
        }
    }
    serverSock.configureBlocking(true); //mimic APR behavior
}
在该方法中完成了ServerSocketChannel和端口的绑定,那么该bind方法又是在什么时机被调用的?不难发现应该在Connector的initInternal方法中,该方法中会调用:
protocolHandler.init();通过protocolHandler的init方法到上述bind方法的调用路径如下:

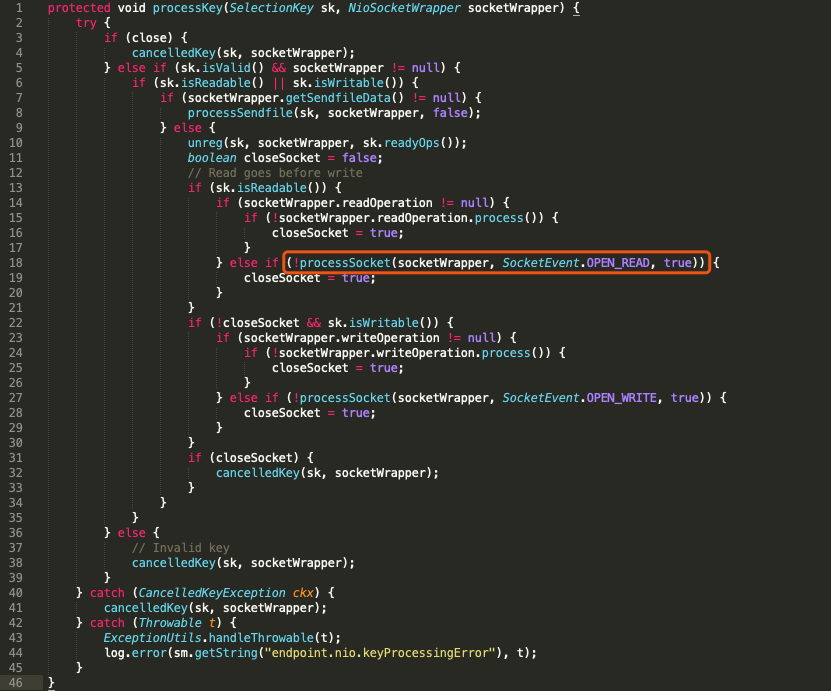
接下来我们回到本节的主题,Acceptor是如何处理上面获取的Socket,也就是setSocketOptions方法,该方法在AbstractEndpoint类中是个抽象方法,我们上面说过EndPoint的类型为NioEndPoint,所以这里调用的方法也是NioEndPoint的setSocketOptions方法。
protected boolean setSocketOptions(SocketChannel socket) {
    NioSocketWrapper socketWrapper = null;
    try {
        // Allocate channel and wrapper
        NioChannel channel = null;
        if (nioChannels != null) {
            channel = nioChannels.pop();
        }
        if (channel == null) {
            SocketBufferHandler bufhandler = new SocketBufferHandler(
                    socketProperties.getAppReadBufSize(),
                    socketProperties.getAppWriteBufSize(),
                    socketProperties.getDirectBuffer());
            if (isSSLEnabled()) {
                channel = new SecureNioChannel(bufhandler, selectorPool, this);
            } else {
                channel = new NioChannel(bufhandler);
            }
        }
        NioSocketWrapper newWrapper = new NioSocketWrapper(channel, this);
        channel.reset(socket, newWrapper);
        connections.put(socket, newWrapper);
        socketWrapper = newWrapper;

        // Set socket properties
        // Disable blocking, polling will be used
        socket.configureBlocking(false);
        socketProperties.setProperties(socket.socket());

        socketWrapper.setReadTimeout(getConnectionTimeout());
        socketWrapper.setWriteTimeout(getConnectionTimeout());
        socketWrapper.setKeepAliveLeft(NioEndpoint.this.getMaxKeepAliveRequests());
        poller.register(channel, socketWrapper);
        return true;
    } catch (Throwable t) {
        ExceptionUtils.handleThrowable(t);
        try {
            log.error(sm.getString("endpoint.socketOptionsError"), t);
        } catch (Throwable tt) {
            ExceptionUtils.handleThrowable(tt);
        }
        if (socketWrapper == null) {
            destroySocket(socket);
        }
    }
    // Tell to close the socket if needed
    return false;
}
该方法构造了,然后调用poller.register(channel, socketWrapper);将需要处理的socket连接请求提交给poller处理。这里的Poller就是我们上面介绍NioEndPoint启动方法startInternal中pollerThread。
2.1.4 Poller线程
首先我们来看一下上面Acceptor调用Poller的register方法:
public void register(final NioChannel socket, final NioSocketWrapper socketWrapper) {
    socketWrapper.interestOps(SelectionKey.OP_READ);//this is what OP_REGISTER turns into.
    PollerEvent event = null;
    if (eventCache != null) {
        event = eventCache.pop();
    }
    if (event == null) {
        event = new PollerEvent(socket, OP_REGISTER);
    } else {
        event.reset(socket, OP_REGISTER);
    }
    addEvent(event);
}
核心就是构造一个PollerEvent,然后调用addEvent方法,添加到Poller的成员events中,这里events类型为SynchronizedQueue,所以上述添加操作是线程安全的。也就是Acceptor通过调用Poller的register方法,将需要处理的Socket请求包装为PollerEvent,添加到Poller的成员变量events中,那么可以想象,Poller的run方法肯定在处理events中的PollerEvent:

可以看到Poller线程对Acceptor线程提交的PollerEvent事件的处理,其实就是创建一个SocketProcessor线程,并提交到executor线程池处理。这里createSocketProcessor方法,由于我们的EndPoint类型为NioEndPoint,所以SocketProcessor类型为org.apache.tomcat.util.net.NioEndpoint.SocketProcessor。

2.1.5 SocketProcessor
SocketProcessor继承了SocketProcessorBase,SocketProcessorBase是个抽象类,实现了Runnable接口。
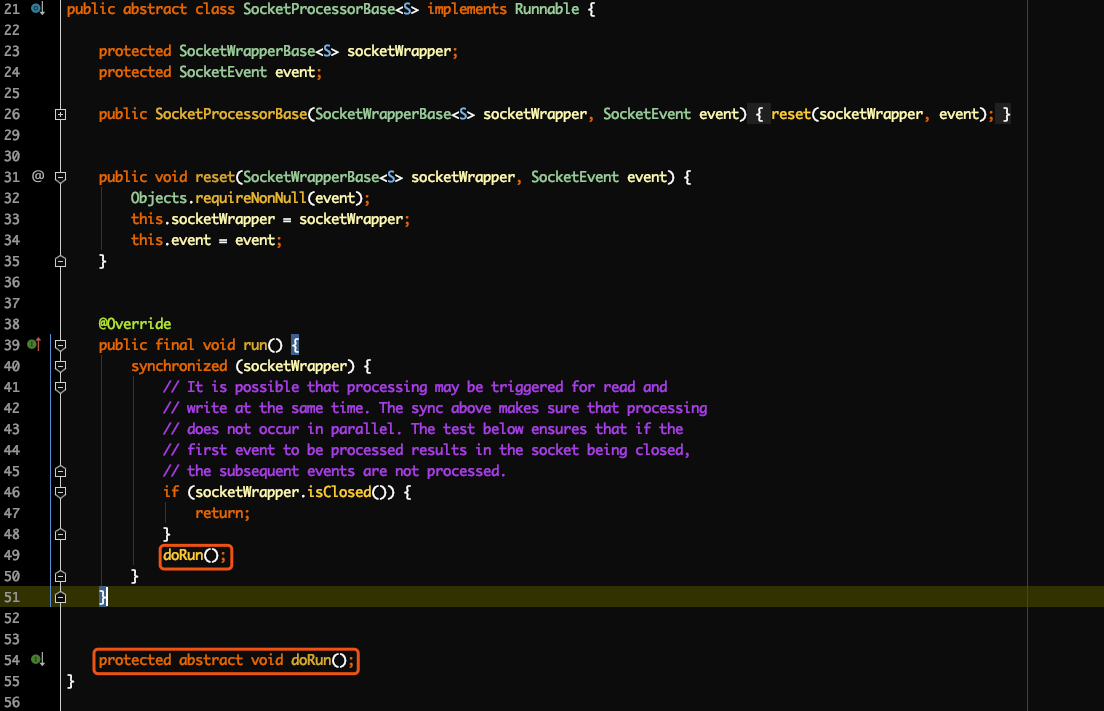
其中run方法调用了父类的模板方法doRun(),所以SocketProcessor最终生效的核心逻辑其实在org.apache.tomcat.util.net.NioEndpoint.SocketProcessor#duRun()。
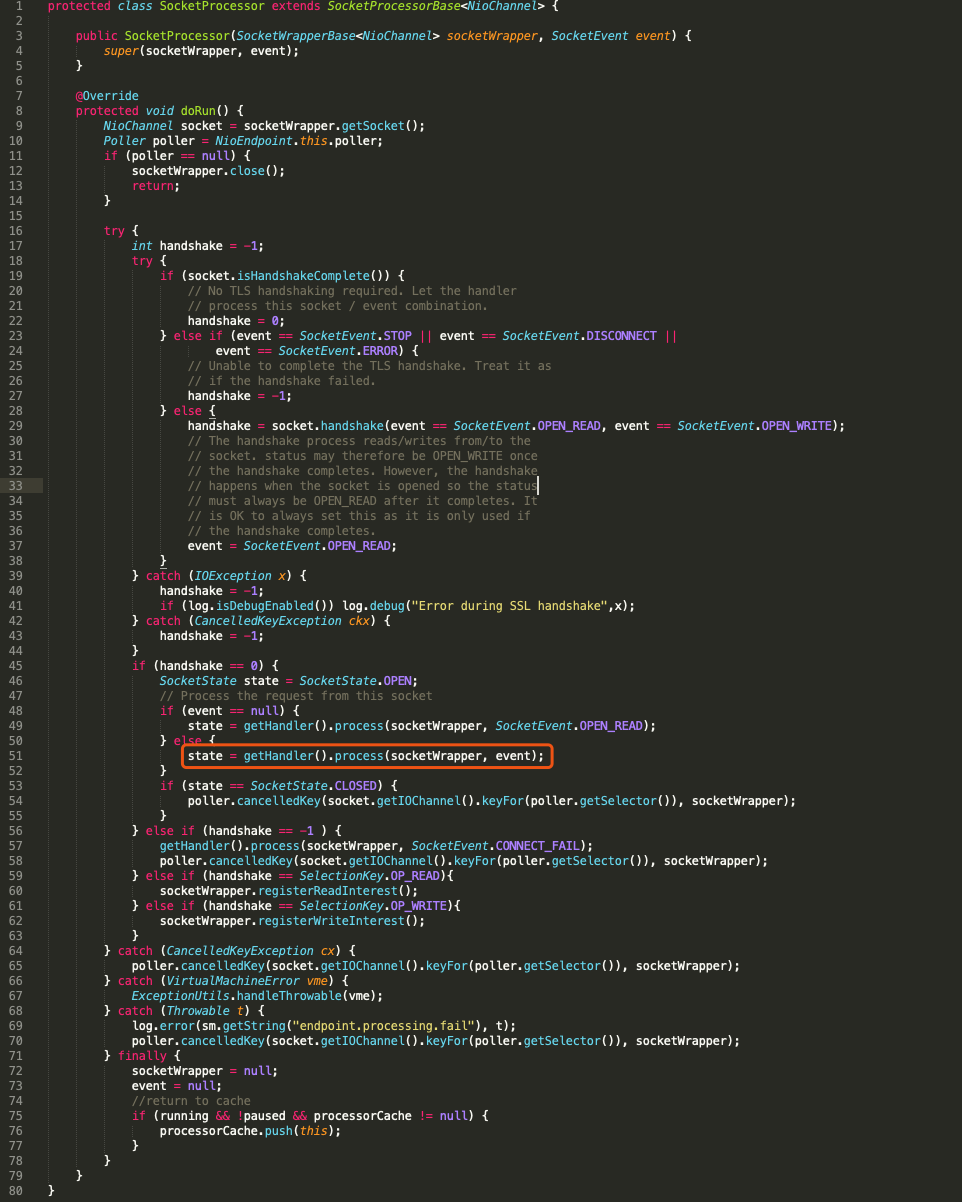
可以看到核心逻辑是调用NioEndPoint的getHandler方法,并调用获取的Handler的process方法处理socketWrapper。
这里NioEndPoint的Handler成员变量是跟着Http11NioProtocol的构造函数初始化的,如下:
public Http11NioProtocol() {
    super(new NioEndpoint());
}

public AbstractHttp11Protocol(AbstractEndpoint<S,?> endpoint) {
    super(endpoint);
    setConnectionTimeout(Constants.DEFAULT_CONNECTION_TIMEOUT);
    ConnectionHandler<S> cHandler = new ConnectionHandler<>(this);
    setHandler(cHandler);
    getEndpoint().setHandler(cHandler);
}
所以handler类型为org.apache.coyote.AbstractProtocol.ConnectionHandler。接下来我们来看一下ConnectionHandler的process方法,如下:
@Override
public SocketState process(SocketWrapperBase<S> wrapper, SocketEvent status) {
    if (getLog().isDebugEnabled()) {
        getLog().debug(sm.getString("abstractConnectionHandler.process",
                wrapper.getSocket(), status));
    }
    if (wrapper == null) {
        // Nothing to do. Socket has been closed.
        return SocketState.CLOSED;
    }

    S socket = wrapper.getSocket();

    Processor processor = (Processor) wrapper.getCurrentProcessor();
    if (getLog().isDebugEnabled()) {
        getLog().debug(sm.getString("abstractConnectionHandler.connectionsGet",
                processor, socket));
    }

    // Timeouts are calculated on a dedicated thread and then
    // dispatched. Because of delays in the dispatch process, the
    // timeout may no longer be required. Check here and avoid
    // unnecessary processing.
    if (SocketEvent.TIMEOUT == status &&
            (processor == null ||
            !processor.isAsync() && !processor.isUpgrade() ||
            processor.isAsync() && !processor.checkAsyncTimeoutGeneration())) {
        // This is effectively a NO-OP
        return SocketState.OPEN;
    }

    if (processor != null) {
        // Make sure an async timeout doesn't fire
        getProtocol().removeWaitingProcessor(processor);
    } else if (status == SocketEvent.DISCONNECT || status == SocketEvent.ERROR) {
        // Nothing to do. Endpoint requested a close and there is no
        // longer a processor associated with this socket.
        return SocketState.CLOSED;
    }

    ContainerThreadMarker.set();

    try {
        if (processor == null) {
            String negotiatedProtocol = wrapper.getNegotiatedProtocol();
            // OpenSSL typically returns null whereas JSSE typically
            // returns "" when no protocol is negotiated
            if (negotiatedProtocol != null && negotiatedProtocol.length() > 0) {
                UpgradeProtocol upgradeProtocol = getProtocol().getNegotiatedProtocol(negotiatedProtocol);
                if (upgradeProtocol != null) {
                    processor = upgradeProtocol.getProcessor(wrapper, getProtocol().getAdapter());
                    if (getLog().isDebugEnabled()) {
                        getLog().debug(sm.getString("abstractConnectionHandler.processorCreate", processor));
                    }
                } else if (negotiatedProtocol.equals("http/1.1")) {
                    // Explicitly negotiated the default protocol.
                    // Obtain a processor below.
                } else {
                    // TODO:
                    // OpenSSL 1.0.2's ALPN callback doesn't support
                    // failing the handshake with an error if no
                    // protocol can be negotiated. Therefore, we need to
                    // fail the connection here. Once this is fixed,
                    // replace the code below with the commented out
                    // block.
                    if (getLog().isDebugEnabled()) {
                        getLog().debug(sm.getString("abstractConnectionHandler.negotiatedProcessor.fail",
                                negotiatedProtocol));
                    }
                    return SocketState.CLOSED;
                    /*
                     * To replace the code above once OpenSSL 1.1.0 is
                     * used.
                    // Failed to create processor. This is a bug.
                    throw new IllegalStateException(sm.getString(
                            "abstractConnectionHandler.negotiatedProcessor.fail",
                            negotiatedProtocol));
                    */
                }
            }
        }
        if (processor == null) {
            processor = recycledProcessors.pop();
            if (getLog().isDebugEnabled()) {
                getLog().debug(sm.getString("abstractConnectionHandler.processorPop", processor));
            }
        }
        if (processor == null) {
            processor = getProtocol().createProcessor();
            register(processor);
            if (getLog().isDebugEnabled()) {
                getLog().debug(sm.getString("abstractConnectionHandler.processorCreate", processor));
            }
        }

        processor.setSslSupport(
                wrapper.getSslSupport(getProtocol().getClientCertProvider()));

        // Associate the processor with the connection
        wrapper.setCurrentProcessor(processor);

        SocketState state = SocketState.CLOSED;
        do {
            state = processor.process(wrapper, status);

            if (state == SocketState.UPGRADING) {
                // Get the HTTP upgrade handler
                UpgradeToken upgradeToken = processor.getUpgradeToken();
                // Retrieve leftover input
                ByteBuffer leftOverInput = processor.getLeftoverInput();
                if (upgradeToken == null) {
                    // Assume direct HTTP/2 connection
                    UpgradeProtocol upgradeProtocol = getProtocol().getUpgradeProtocol("h2c");
                    if (upgradeProtocol != null) {
                        // Release the Http11 processor to be re-used
                        release(processor);
                        // Create the upgrade processor
                        processor = upgradeProtocol.getProcessor(wrapper, getProtocol().getAdapter());
                        wrapper.unRead(leftOverInput);
                        // Associate with the processor with the connection
                        wrapper.setCurrentProcessor(processor);
                    } else {
                        if (getLog().isDebugEnabled()) {
                            getLog().debug(sm.getString(
                                "abstractConnectionHandler.negotiatedProcessor.fail",
                                "h2c"));
                        }
                        // Exit loop and trigger appropriate clean-up
                        state = SocketState.CLOSED;
                    }
                } else {
                    HttpUpgradeHandler httpUpgradeHandler = upgradeToken.getHttpUpgradeHandler();
                    // Release the Http11 processor to be re-used
                    release(processor);
                    // Create the upgrade processor
                    processor = getProtocol().createUpgradeProcessor(wrapper, upgradeToken);
                    if (getLog().isDebugEnabled()) {
                        getLog().debug(sm.getString("abstractConnectionHandler.upgradeCreate",
                                processor, wrapper));
                    }
                    wrapper.unRead(leftOverInput);
                    // Associate with the processor with the connection
                    wrapper.setCurrentProcessor(processor);
                    // Initialise the upgrade handler (which may trigger
                    // some IO using the new protocol which is why the lines
                    // above are necessary)
                    // This cast should be safe. If it fails the error
                    // handling for the surrounding try/catch will deal with
                    // it.
                    if (upgradeToken.getInstanceManager() == null) {
                        httpUpgradeHandler.init((WebConnection) processor);
                    } else {
                        ClassLoader oldCL = upgradeToken.getContextBind().bind(false, null);
                        try {
                            httpUpgradeHandler.init((WebConnection) processor);
                        } finally {
                            upgradeToken.getContextBind().unbind(false, oldCL);
                        }
                    }
                    if (httpUpgradeHandler instanceof InternalHttpUpgradeHandler) {
                        if (((InternalHttpUpgradeHandler) httpUpgradeHandler).hasAsyncIO()) {
                            // The handler will initiate all further I/O
                            state = SocketState.LONG;
                        }
                    }
                }
            }
        } while ( state == SocketState.UPGRADING);

        if (state == SocketState.LONG) {
            // In the middle of processing a request/response. Keep the
            // socket associated with the processor. Exact requirements
            // depend on type of long poll
            longPoll(wrapper, processor);
            if (processor.isAsync()) {
                getProtocol().addWaitingProcessor(processor);
            }
        } else if (state == SocketState.OPEN) {
            // In keep-alive but between requests. OK to recycle
            // processor. Continue to poll for the next request.
            wrapper.setCurrentProcessor(null);
            release(processor);
            wrapper.registerReadInterest();
        } else if (state == SocketState.SENDFILE) {
            // Sendfile in progress. If it fails, the socket will be
            // closed. If it works, the socket either be added to the
            // poller (or equivalent) to await more data or processed
            // if there are any pipe-lined requests remaining.
        } else if (state == SocketState.UPGRADED) {
            // Don't add sockets back to the poller if this was a
            // non-blocking write otherwise the poller may trigger
            // multiple read events which may lead to thread starvation
            // in the connector. The write() method will add this socket
            // to the poller if necessary.
            if (status != SocketEvent.OPEN_WRITE) {
                longPoll(wrapper, processor);
                getProtocol().addWaitingProcessor(processor);
            }
        } else if (state == SocketState.SUSPENDED) {
            // Don't add sockets back to the poller.
            // The resumeProcessing() method will add this socket
            // to the poller.
        } else {
            // Connection closed. OK to recycle the processor.
            // Processors handling upgrades require additional clean-up
            // before release.
            wrapper.setCurrentProcessor(null);
            if (processor.isUpgrade()) {
                UpgradeToken upgradeToken = processor.getUpgradeToken();
                HttpUpgradeHandler httpUpgradeHandler = upgradeToken.getHttpUpgradeHandler();
                InstanceManager instanceManager = upgradeToken.getInstanceManager();
                if (instanceManager == null) {
                    httpUpgradeHandler.destroy();
                } else {
                    ClassLoader oldCL = upgradeToken.getContextBind().bind(false, null);
                    try {
                        httpUpgradeHandler.destroy();
                    } finally {
                        try {
                            instanceManager.destroyInstance(httpUpgradeHandler);
                        } catch (Throwable e) {
                            ExceptionUtils.handleThrowable(e);
                            getLog().error(sm.getString("abstractConnectionHandler.error"), e);
                        }
                        upgradeToken.getContextBind().unbind(false, oldCL);
                    }
                }
            }
            release(processor);
        }
        return state;
    } catch(java.net.SocketException e) {
        // SocketExceptions are normal
        getLog().debug(sm.getString(
                "abstractConnectionHandler.socketexception.debug"), e);
    } catch (java.io.IOException e) {
        // IOExceptions are normal
        getLog().debug(sm.getString(
                "abstractConnectionHandler.ioexception.debug"), e);
    } catch (ProtocolException e) {
        // Protocol exceptions normally mean the client sent invalid or
        // incomplete data.
        getLog().debug(sm.getString(
                "abstractConnectionHandler.protocolexception.debug"), e);
    }
    // Future developers: if you discover any other
    // rare-but-nonfatal exceptions, catch them here, and log as
    // above.
    catch (OutOfMemoryError oome) {
        // Try and handle this here to give Tomcat a chance to close the
        // connection and prevent clients waiting until they time out.
        // Worst case, it isn't recoverable and the attempt at logging
        // will trigger another OOME.
        getLog().error(sm.getString("abstractConnectionHandler.oome"), oome);
    } catch (Throwable e) {
        ExceptionUtils.handleThrowable(e);
        // any other exception or error is odd. Here we log it
        // with "ERROR" level, so it will show up even on
        // less-than-verbose logs.
        getLog().error(sm.getString("abstractConnectionHandler.error"), e);
    } finally {
        ContainerThreadMarker.clear();
    }

    // Make sure socket/processor is removed from the list of current
    // connections
    wrapper.setCurrentProcessor(null);
    release(processor);
    return SocketState.CLOSED;
}
该方法的核心调用processor的process方法处理socket,这里的processor其实就是之前讲的ProtocolHandler的组件之一(ProtocolHandler = EndPoint + Processor)。而processor是通过该方法内createProcessor方法创建出来的,如下:
# org.apache.coyote.AbstractProtocol.ConnectionHandler#process
processor = getProtocol().createProcessor();

# org.apache.coyote.http11.AbstractHttp11Protocol#createProcessor
protected Processor createProcessor() {
    Http11Processor processor = new Http11Processor(this, adapter);
    return processor;
}

# org.apache.coyote.http11.Http11Processor#Http11Processor
public Http11Processor(AbstractHttp11Protocol<?> protocol, Adapter adapter) {
    super(adapter);
    this.protocol = protocol;

    httpParser = new HttpParser(protocol.getRelaxedPathChars(),
            protocol.getRelaxedQueryChars());

    inputBuffer = new Http11InputBuffer(request, protocol.getMaxHttpHeaderSize(),
            protocol.getRejectIllegalHeader(), httpParser);
    request.setInputBuffer(inputBuffer);

    outputBuffer = new Http11OutputBuffer(response, protocol.getMaxHttpHeaderSize());
    response.setOutputBuffer(outputBuffer);

    // Create and add the identity filters.
    inputBuffer.addFilter(new IdentityInputFilter(protocol.getMaxSwallowSize()));
    outputBuffer.addFilter(new IdentityOutputFilter());

    // Create and add the chunked filters.
    inputBuffer.addFilter(new ChunkedInputFilter(protocol.getMaxTrailerSize(),
            protocol.getAllowedTrailerHeadersInternal(), protocol.getMaxExtensionSize(),
            protocol.getMaxSwallowSize()));
    outputBuffer.addFilter(new ChunkedOutputFilter());

    // Create and add the void filters.
    inputBuffer.addFilter(new VoidInputFilter());
    outputBuffer.addFilter(new VoidOutputFilter());

    // Create and add buffered input filter
    inputBuffer.addFilter(new BufferedInputFilter());

    // Create and add the gzip filters.
    //inputBuffer.addFilter(new GzipInputFilter());
    outputBuffer.addFilter(new GzipOutputFilter());

    pluggableFilterIndex = inputBuffer.getFilters().length;
}
所以ProtocolHandler的Processor组件类型为Http11Processor,Http11Processor继承了父类AbstractProcessorLight的process方法,如下:
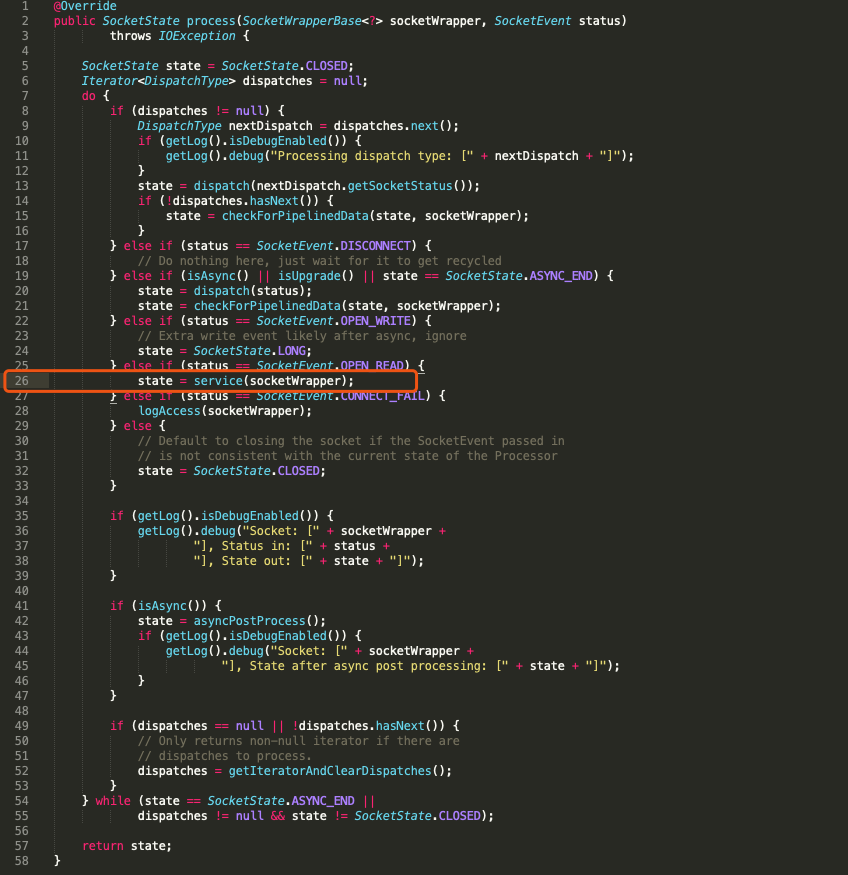
核心在26行,调用service处理socketWrapper,service方法在AbstractProcessorLight中的定义是个抽象方法,具体实现在子类Http11Processor,如下:
public SocketState service(SocketWrapperBase<?> socketWrapper)
    throws IOException {
    RequestInfo rp = request.getRequestProcessor();
    rp.setStage(org.apache.coyote.Constants.STAGE_PARSE);

    // Setting up the I/O
    setSocketWrapper(socketWrapper);

    // Flags
    keepAlive = true;
    openSocket = false;
    readComplete = true;
    boolean keptAlive = false;
    SendfileState sendfileState = SendfileState.DONE;

    while (!getErrorState().isError() && keepAlive && !isAsync() && upgradeToken == null &&
            sendfileState == SendfileState.DONE && !protocol.isPaused()) {

        // Parsing the request header
        try {
            if (!inputBuffer.parseRequestLine(keptAlive, protocol.getConnectionTimeout(),
                    protocol.getKeepAliveTimeout())) {
                if (inputBuffer.getParsingRequestLinePhase() == -1) {
                    return SocketState.UPGRADING;
                } else if (handleIncompleteRequestLineRead()) {
                    break;
                }
            }

            // Process the Protocol component of the request line
            // Need to know if this is an HTTP 0.9 request before trying to
            // parse headers.
            prepareRequestProtocol();

            if (protocol.isPaused()) {
                // 503 - Service unavailable
                response.setStatus(503);
                setErrorState(ErrorState.CLOSE_CLEAN, null);
            } else {
                keptAlive = true;
                // Set this every time in case limit has been changed via JMX
                request.getMimeHeaders().setLimit(protocol.getMaxHeaderCount());
                // Don't parse headers for HTTP/0.9
                if (!http09 && !inputBuffer.parseHeaders()) {
                    // We've read part of the request, don't recycle it
                    // instead associate it with the socket
                    openSocket = true;
                    readComplete = false;
                    break;
                }
                if (!protocol.getDisableUploadTimeout()) {
                    socketWrapper.setReadTimeout(protocol.getConnectionUploadTimeout());
                }
            }
        } catch (IOException e) {
            if (log.isDebugEnabled()) {
                log.debug(sm.getString("http11processor.header.parse"), e);
            }
            setErrorState(ErrorState.CLOSE_CONNECTION_NOW, e);
            break;
        } catch (Throwable t) {
            ExceptionUtils.handleThrowable(t);
            UserDataHelper.Mode logMode = userDataHelper.getNextMode();
            if (logMode != null) {
                String message = sm.getString("http11processor.header.parse");
                switch (logMode) {
                    case INFO_THEN_DEBUG:
                        message += sm.getString("http11processor.fallToDebug");
                        //$FALL-THROUGH$
                    case INFO:
                        log.info(message, t);
                        break;
                    case DEBUG:
                        log.debug(message, t);
                }
            }
            // 400 - Bad Request
            response.setStatus(400);
            setErrorState(ErrorState.CLOSE_CLEAN, t);
        }

        // Has an upgrade been requested?
        if (isConnectionToken(request.getMimeHeaders(), "upgrade")) {
            // Check the protocol
            String requestedProtocol = request.getHeader("Upgrade");

            UpgradeProtocol upgradeProtocol = protocol.getUpgradeProtocol(requestedProtocol);
            if (upgradeProtocol != null) {
                if (upgradeProtocol.accept(request)) {
                    response.setStatus(HttpServletResponse.SC_SWITCHING_PROTOCOLS);
                    response.setHeader("Connection", "Upgrade");
                    response.setHeader("Upgrade", requestedProtocol);
                    action(ActionCode.CLOSE,  null);
                    getAdapter().log(request, response, 0);

                    InternalHttpUpgradeHandler upgradeHandler =
                            upgradeProtocol.getInternalUpgradeHandler(
                                    socketWrapper, getAdapter(), cloneRequest(request));
                    UpgradeToken upgradeToken = new UpgradeToken(upgradeHandler, null, null);
                    action(ActionCode.UPGRADE, upgradeToken);
                    return SocketState.UPGRADING;
                }
            }
        }

        if (getErrorState().isIoAllowed()) {
            // Setting up filters, and parse some request headers
            rp.setStage(org.apache.coyote.Constants.STAGE_PREPARE);
            try {
                prepareRequest();
            } catch (Throwable t) {
                ExceptionUtils.handleThrowable(t);
                if (log.isDebugEnabled()) {
                    log.debug(sm.getString("http11processor.request.prepare"), t);
                }
                // 500 - Internal Server Error
                response.setStatus(500);
                setErrorState(ErrorState.CLOSE_CLEAN, t);
            }
        }

        int maxKeepAliveRequests = protocol.getMaxKeepAliveRequests();
        if (maxKeepAliveRequests == 1) {
            keepAlive = false;
        } else if (maxKeepAliveRequests > 0 &&
                socketWrapper.decrementKeepAlive() <= 0) {
            keepAlive = false;
        }

        // Process the request in the adapter
        if (getErrorState().isIoAllowed()) {
            try {
                rp.setStage(org.apache.coyote.Constants.STAGE_SERVICE);
                getAdapter().service(request, response);
                // Handle when the response was committed before a serious
                // error occurred.  Throwing a ServletException should both
                // set the status to 500 and set the errorException.
                // If we fail here, then the response is likely already
                // committed, so we can't try and set headers.
                if(keepAlive && !getErrorState().isError() && !isAsync() &&
                        statusDropsConnection(response.getStatus())) {
                    setErrorState(ErrorState.CLOSE_CLEAN, null);
                }
            } catch (InterruptedIOException e) {
                setErrorState(ErrorState.CLOSE_CONNECTION_NOW, e);
            } catch (HeadersTooLargeException e) {
                log.error(sm.getString("http11processor.request.process"), e);
                // The response should not have been committed but check it
                // anyway to be safe
                if (response.isCommitted()) {
                    setErrorState(ErrorState.CLOSE_NOW, e);
                } else {
                    response.reset();
                    response.setStatus(500);
                    setErrorState(ErrorState.CLOSE_CLEAN, e);
                    response.setHeader("Connection", "close"); // TODO: Remove
                }
            } catch (Throwable t) {
                ExceptionUtils.handleThrowable(t);
                log.error(sm.getString("http11processor.request.process"), t);
                // 500 - Internal Server Error
                response.setStatus(500);
                setErrorState(ErrorState.CLOSE_CLEAN, t);
                getAdapter().log(request, response, 0);
            }
        }

        // Finish the handling of the request
        rp.setStage(org.apache.coyote.Constants.STAGE_ENDINPUT);
        if (!isAsync()) {
            // If this is an async request then the request ends when it has
            // been completed. The AsyncContext is responsible for calling
            // endRequest() in that case.
            endRequest();
        }
        rp.setStage(org.apache.coyote.Constants.STAGE_ENDOUTPUT);

        // If there was an error, make sure the request is counted as
        // and error, and update the statistics counter
        if (getErrorState().isError()) {
            response.setStatus(500);
        }

        if (!isAsync() || getErrorState().isError()) {
            request.updateCounters();
            if (getErrorState().isIoAllowed()) {
                inputBuffer.nextRequest();
                outputBuffer.nextRequest();
            }
        }

        if (!protocol.getDisableUploadTimeout()) {
            int connectionTimeout = protocol.getConnectionTimeout();
            if(connectionTimeout > 0) {
                socketWrapper.setReadTimeout(connectionTimeout);
            } else {
                socketWrapper.setReadTimeout(0);
            }
        }

        rp.setStage(org.apache.coyote.Constants.STAGE_KEEPALIVE);

        sendfileState = processSendfile(socketWrapper);
    }

    rp.setStage(org.apache.coyote.Constants.STAGE_ENDED);

    if (getErrorState().isError() || (protocol.isPaused() && !isAsync())) {
        return SocketState.CLOSED;
    } else if (isAsync()) {
        return SocketState.LONG;
    } else if (isUpgrade()) {
        return SocketState.UPGRADING;
    } else {
        if (sendfileState == SendfileState.PENDING) {
            return SocketState.SENDFILE;
        } else {
            if (openSocket) {
                if (readComplete) {
                    return SocketState.OPEN;
                } else {
                    return SocketState.LONG;
                }
            } else {
                return SocketState.CLOSED;
            }
        }
    }
}
该方法核心在做两件事情:
- 获取socket中请求的输入流,解析输入流,并设置request(org.apache.coyote.Request)
- 调用adapter的service方法,将request和response交给CoyoteAdapter处理,随后经过CoyoteAdapter适配之后,交给容器处理请求
我们先来看一下request的解析,主要在parseRequestLine()方法、inputBuffer.parseHeaders()方法、prepareRequest()方法和postParseRequest()方法调用中实现,其中parseRequestLine方法用于解析Http协议的请求行,parseHeaders方法用于解析Http协议的请求头,prepareRequest方法中实现对请求体的解析,postParseRequest()方法实现request关联的Container和Pipline信息初始化,这里实现细节比较多,具体可以参考Tomcat之Http11Processor源码分析。
其次就是调用getAdapter().service(request, response);方法,将request和response交给Adapter处理,之前我们讲过Adapter的类型为org.apache.catalina.connector.CoyoteAdapter,其service方法如下:
public void service(org.apache.coyote.Request req, org.apache.coyote.Response res)
        throws Exception {

    Request request = (Request) req.getNote(ADAPTER_NOTES);
    Response response = (Response) res.getNote(ADAPTER_NOTES);

    if (request == null) {
        // Create objects
        request = connector.createRequest();
        request.setCoyoteRequest(req);
        response = connector.createResponse();
        response.setCoyoteResponse(res);

        // Link objects
        request.setResponse(response);
        response.setRequest(request);

        // Set as notes
        req.setNote(ADAPTER_NOTES, request);
        res.setNote(ADAPTER_NOTES, response);

        // Set query string encoding
        req.getParameters().setQueryStringCharset(connector.getURICharset());
    }

    if (connector.getXpoweredBy()) {
        response.addHeader("X-Powered-By", POWERED_BY);
    }

    boolean async = false;
    boolean postParseSuccess = false;

    req.getRequestProcessor().setWorkerThreadName(THREAD_NAME.get());

    try {
        // Parse and set Catalina and configuration specific
        // request parameters
        postParseSuccess = postParseRequest(req, request, res, response);
        if (postParseSuccess) {
            //check valves if we support async
            request.setAsyncSupported(
                    connector.getService().getContainer().getPipeline().isAsyncSupported());
            // Calling the container
            connector.getService().getContainer().getPipeline().getFirst().invoke(
                    request, response);
        }
        if (request.isAsync()) {
            async = true;
            ReadListener readListener = req.getReadListener();
            if (readListener != null && request.isFinished()) {
                // Possible the all data may have been read during service()
                // method so this needs to be checked here
                ClassLoader oldCL = null;
                try {
                    oldCL = request.getContext().bind(false, null);
                    if (req.sendAllDataReadEvent()) {
                        req.getReadListener().onAllDataRead();
                    }
                } finally {
                    request.getContext().unbind(false, oldCL);
                }
            }

            Throwable throwable =
                    (Throwable) request.getAttribute(RequestDispatcher.ERROR_EXCEPTION);

            // If an async request was started, is not going to end once
            // this container thread finishes and an error occurred, trigger
            // the async error process
            if (!request.isAsyncCompleting() && throwable != null) {
                request.getAsyncContextInternal().setErrorState(throwable, true);
            }
        } else {
            request.finishRequest();
            response.finishResponse();
        }

    } catch (IOException e) {
        // Ignore
    } finally {
        AtomicBoolean error = new AtomicBoolean(false);
        res.action(ActionCode.IS_ERROR, error);

        if (request.isAsyncCompleting() && error.get()) {
            // Connection will be forcibly closed which will prevent
            // completion happening at the usual point. Need to trigger
            // call to onComplete() here.
            res.action(ActionCode.ASYNC_POST_PROCESS,  null);
            async = false;
        }

        // Access log
        if (!async && postParseSuccess) {
            // Log only if processing was invoked.
            // If postParseRequest() failed, it has already logged it.
            Context context = request.getContext();
            // If the context is null, it is likely that the endpoint was
            // shutdown, this connection closed and the request recycled in
            // a different thread. That thread will have updated the access
            // log so it is OK not to update the access log here in that
            // case.
            if (context != null) {
                context.logAccess(request, response,
                        System.currentTimeMillis() - req.getStartTime(), false);
            }
        }

        req.getRequestProcessor().setWorkerThreadName(null);

        // Recycle the wrapper request and response
        if (!async) {
            request.recycle();
            response.recycle();
        }
    }
}
首先构建org.apache.catalina.connector.Request和org.apache.catalina.connector.Response对象,这里其实就是从上述Http11Processor生成的org.apache.coyote.Request和org.apache.coyote.Response对象中获取的。
其次是调用顶层容器Engine的pipline的invoke方法,通过pipline-valve机制,将请求提交给各级容器处理。
// Calling the container
connector.getService().getContainer().getPipeline().getFirst().invoke(
        request, response);
2.3 Servlet是如何生效的
2.3.1 pipline-valve机制
上面我们讲到,org.apache.catalina.connector.CoyoteAdapter是通过调用顶层容器组件Engine的Pipline的invoke方法,实现将请求提交给容器处理,这里我们再来介绍一下Tomcat的Pipeline-valve机制。
Pipeline-Valve是责任链模式,责任链模式是指在一个请求处理的过程中有很多处理者依次对请求进行处理,每个处理者负责做自己相应的处理,处理完之后将再调用下一个处理者继续处理。Valve 表示一个处理点,比如权限认证和记录日志。
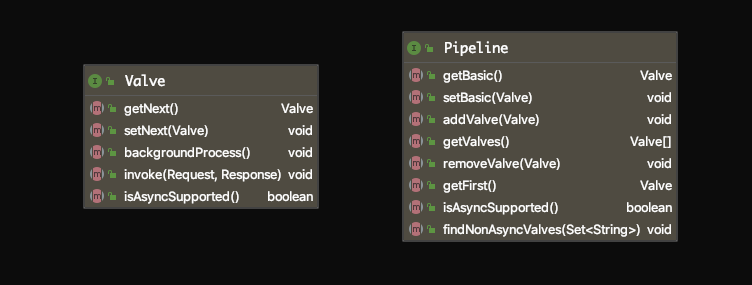
Valve是一个处理点,invoke方法是来处理请求的。Valve中有getNext和setNext 方法,我们大概可以猜到有一个链表将Valve链起来了。
Pipeline中有addValve方法,Pipeline中维护了Valve链表,Valve可以插入Pipeline中,对请求做某些处理。同时我们发现Pipeline中没有invoke方法,因为整个调用链的触发是Valve来完成的,Valve完成自己的处理后,调用 getNext.invoke()来触发下一个Valve调用。
每一个容器都有一个Pipeline对象,只要触发这个Pipeline的第一个Valve,这个容器里Pipeline中的Valve就都会被调用到。不同容器的Pipeline是怎么链式触发的呢?比如Engine中 Pipeline需要调用下层容器Host中的Pipeline。
Pipeline中还有个getBasic方法。这个BasicValve处于Valve链表的末端,它是 Pipeline中必不可少的一个Valve,负责调用下层容器的Pipeline里的第一个Valve。
搞清楚什么是Pipeline-valve机制后,我们来看另一个问题。这些容器组建的Pipline是何时初始化的,Pipeline的Valve又是何时添加进去的。
首先我们知道Pipline是跟各个容器组件绑定在一起的(一个容器组件对应一个Pipeline),可以说每个容器组件有一个org.apache.catalina.Pipeline类型的成员变量,该成员变量是定义在ContainerBase的,并且赋了初始值。
/**
 * The Pipeline object with which this Container is associated.
 */
protected final Pipeline pipeline = new StandardPipeline(this);
那么也就是说只要容器组件构造函数调用,该成员变量就会初始化了。比如我们来看一下StandardEngine的构造函数:
/**
 * Create a new StandardEngine component with the default basic Valve.
 */
public StandardEngine() {

    super();
    pipeline.setBasic(new StandardEngineValve());
    /* Set the jmvRoute using the system property jvmRoute */
    try {
        setJvmRoute(System.getProperty("jvmRoute"));
    } catch(Exception ex) {
        log.warn(sm.getString("standardEngine.jvmRouteFail"));
    }
    // By default, the engine will hold the reloading thread
    backgroundProcessorDelay = 10;

}
调用了父类无参构造函数,实现pipeline成员变量的初始化。其次调用pipeline的setBasic方法,将StandardEngineValve设置为pipeline的Basic Valve。其它容器的pipeline以及Basic Valve的初始化跟StandardEngine类似。
除了BasicValve,那么Pipline中普通的valve是如何添加到Pipline中的?这里主要有两部分来源,一是容器内部指定valve,如下:
protected synchronized void startInternal() throws LifecycleException {

    // Set error report valve
    String errorValve = getErrorReportValveClass();
    if ((errorValve != null) && (!errorValve.equals(""))) {
        try {
            boolean found = false;
            Valve[] valves = getPipeline().getValves();
            for (Valve valve : valves) {
                if (errorValve.equals(valve.getClass().getName())) {
                    found = true;
                    break;
                }
            }
            if(!found) {
                Valve valve =
                    (Valve) Class.forName(errorValve).getConstructor().newInstance();
                getPipeline().addValve(valve);
            }
        } catch (Throwable t) {
            ExceptionUtils.handleThrowable(t);
            log.error(sm.getString(
                    "standardHost.invalidErrorReportValveClass",
                    errorValve), t);
        }
    }
    super.startInternal();
}
这是StandardHost的startInternal方法,我们可以看到该方法内部初始化了一个Valve,并添加到Host容器的Pipeline中。
另一个来源是我们在配置文件中配置的Valve,比如我们可以为Context配置valve,在Context构建过程中会解析我们配置的valve:
digester.addObjectCreate(prefix + "Context/Valve",
                         null, // MUST be specified in the element
                         "className");
digester.addSetProperties(prefix + "Context/Valve");
digester.addSetNext(prefix + "Context/Valve",
                    "addValve",
                    "org.apache.catalina.Valve");
上述解析规则在org.apache.catalina.startup.ContextRuleSet中。同样HostRuleSet中也有类似的解析规则,比如:
digester.addObjectCreate(prefix + "Host/Valve",
                         null, // MUST be specified in the element
                         "className");
digester.addSetProperties(prefix + "Host/Valve");
digester.addSetNext(prefix + "Host/Valve",
                    "addValve",
                    "org.apache.catalina.Valve");
2.3.2 请求是如何到达Servlet的
上面我们介绍到Adapter通过调用如下代码,将请求提交给容器处理:
connector.getService().getContainer().getPipeline().getFirst().invoke(
        request, response);
调用了Engine容器的Pipeline中第一个Valve的invoke方法,按照上面对Pipeline-valve机制的介绍,我们知道,肯定会依次调用到各个容器组件Pipline的valve。这里我们只关心各级容器Pipline中的BasicValve,其它的Valve这里就不详细介绍了。Engine、Host、Context和Wrapper容器的Pipeline对应的BasicValve分别为StandardEngineValve、StandardHostValve、StandardContextValve和StandardWrapperValve。下面我们就来分别看一下这几个Valve的invoke方法,来看看请求是如何传递的。
- StandardEngineValve
@Override
public final void invoke(Request request, Response response)
    throws IOException, ServletException {

    // Select the Host to be used for this Request
    Host host = request.getHost();
    if (host == null) {
        // HTTP 0.9 or HTTP 1.0 request without a host when no default host
        // is defined. This is handled by the CoyoteAdapter.
        return;
    }
    if (request.isAsyncSupported()) {
        request.setAsyncSupported(host.getPipeline().isAsyncSupported());
    }

    // Ask this Host to process this request
    host.getPipeline().getFirst().invoke(request, response);
}
首先从request中获取本次请求关联的host容器,既然request中存储了容器信息,那肯定存在一个步骤,将这些关联的容器信息塞进request中,猜测跟文章开始时介绍的Mapper组件有关,request如何关联容器对象,我们下面再介绍。
其次就是调用host的Pipeline的第一个Valve的invoke方法,不用多说,最终会调用到StandardHostValve的invoke方法。
- StandardHostValve
@Override
public final void invoke(Request request, Response response)
    throws IOException, ServletException {

    // Select the Context to be used for this Request
    Context context = request.getContext();
    if (context == null) {
        return;
    }

    if (request.isAsyncSupported()) {
        request.setAsyncSupported(context.getPipeline().isAsyncSupported());
    }

    boolean asyncAtStart = request.isAsync();

    try {
        context.bind(Globals.IS_SECURITY_ENABLED, MY_CLASSLOADER);

        if (!asyncAtStart && !context.fireRequestInitEvent(request.getRequest())) {
            // Don't fire listeners during async processing (the listener
            // fired for the request that called startAsync()).
            // If a request init listener throws an exception, the request
            // is aborted.
            return;
        }

        // Ask this Context to process this request. Requests that are
        // already in error must have been routed here to check for
        // application defined error pages so DO NOT forward them to the the
        // application for processing.
        try {
            if (!response.isErrorReportRequired()) {
                context.getPipeline().getFirst().invoke(request, response);
            }
        } catch (Throwable t) {
            ExceptionUtils.handleThrowable(t);
            container.getLogger().error("Exception Processing " + request.getRequestURI(), t);
            // If a new error occurred while trying to report a previous
            // error allow the original error to be reported.
            if (!response.isErrorReportRequired()) {
                request.setAttribute(RequestDispatcher.ERROR_EXCEPTION, t);
                throwable(request, response, t);
            }
        }

        // Now that the request/response pair is back under container
        // control lift the suspension so that the error handling can
        // complete and/or the container can flush any remaining data
        response.setSuspended(false);

        Throwable t = (Throwable) request.getAttribute(RequestDispatcher.ERROR_EXCEPTION);

        // Protect against NPEs if the context was destroyed during a
        // long running request.
        if (!context.getState().isAvailable()) {
            return;
        }

        // Look for (and render if found) an application level error page
        if (response.isErrorReportRequired()) {
            // If an error has occurred that prevents further I/O, don't waste time
            // producing an error report that will never be read
            AtomicBoolean result = new AtomicBoolean(false);
            response.getCoyoteResponse().action(ActionCode.IS_IO_ALLOWED, result);
            if (result.get()) {
                if (t != null) {
                    throwable(request, response, t);
                } else {
                    status(request, response);
                }
            }
        }

        if (!request.isAsync() && !asyncAtStart) {
            context.fireRequestDestroyEvent(request.getRequest());
        }
    } finally {
        // Access a session (if present) to update last accessed time, based
        // on a strict interpretation of the specification
        if (ACCESS_SESSION) {
            request.getSession(false);
        }

        context.unbind(Globals.IS_SECURITY_ENABLED, MY_CLASSLOADER);
    }
}
获取Context容器的Pipeline,并调用第一个Valve的invoke方法。
- StandardContextValve
@Override
public final void invoke(Request request, Response response)
    throws IOException, ServletException {

    // Disallow any direct access to resources under WEB-INF or META-INF
    MessageBytes requestPathMB = request.getRequestPathMB();
    if ((requestPathMB.startsWithIgnoreCase("/META-INF/", 0))
            || (requestPathMB.equalsIgnoreCase("/META-INF"))
            || (requestPathMB.startsWithIgnoreCase("/WEB-INF/", 0))
            || (requestPathMB.equalsIgnoreCase("/WEB-INF"))) {
        response.sendError(HttpServletResponse.SC_NOT_FOUND);
        return;
    }

    // Select the Wrapper to be used for this Request
    Wrapper wrapper = request.getWrapper();
    if (wrapper == null || wrapper.isUnavailable()) {
        response.sendError(HttpServletResponse.SC_NOT_FOUND);
        return;
    }

    // Acknowledge the request
    try {
        response.sendAcknowledgement();
    } catch (IOException ioe) {
        container.getLogger().error(sm.getString(
                "standardContextValve.acknowledgeException"), ioe);
        request.setAttribute(RequestDispatcher.ERROR_EXCEPTION, ioe);
        response.sendError(HttpServletResponse.SC_INTERNAL_SERVER_ERROR);
        return;
    }

    if (request.isAsyncSupported()) {
        request.setAsyncSupported(wrapper.getPipeline().isAsyncSupported());
    }
    wrapper.getPipeline().getFirst().invoke(request, response);
}
获取Wrapper的Pipeline,并调用第一个Valve的invoke方法。
- StandardWrapperValve
@Override
public final void invoke(Request request, Response response)
    throws IOException, ServletException {

    // Initialize local variables we may need
    boolean unavailable = false;
    Throwable throwable = null;
    // This should be a Request attribute...
    long t1=System.currentTimeMillis();
    requestCount.incrementAndGet();
    StandardWrapper wrapper = (StandardWrapper) getContainer();
    Servlet servlet = null;
    Context context = (Context) wrapper.getParent();

    // Check for the application being marked unavailable
    if (!context.getState().isAvailable()) {
        response.sendError(HttpServletResponse.SC_SERVICE_UNAVAILABLE,
                       sm.getString("standardContext.isUnavailable"));
        unavailable = true;
    }

    // Check for the servlet being marked unavailable
    if (!unavailable && wrapper.isUnavailable()) {
        container.getLogger().info(sm.getString("standardWrapper.isUnavailable",
                wrapper.getName()));
        long available = wrapper.getAvailable();
        if ((available > 0L) && (available < Long.MAX_VALUE)) {
            response.setDateHeader("Retry-After", available);
            response.sendError(HttpServletResponse.SC_SERVICE_UNAVAILABLE,
                    sm.getString("standardWrapper.isUnavailable",
                            wrapper.getName()));
        } else if (available == Long.MAX_VALUE) {
            response.sendError(HttpServletResponse.SC_NOT_FOUND,
                    sm.getString("standardWrapper.notFound",
                            wrapper.getName()));
        }
        unavailable = true;
    }

    // Allocate a servlet instance to process this request
    try {
        if (!unavailable) {
            servlet = wrapper.allocate();
        }
    } catch (UnavailableException e) {
        container.getLogger().error(
                sm.getString("standardWrapper.allocateException",
                        wrapper.getName()), e);
        long available = wrapper.getAvailable();
        if ((available > 0L) && (available < Long.MAX_VALUE)) {
            response.setDateHeader("Retry-After", available);
            response.sendError(HttpServletResponse.SC_SERVICE_UNAVAILABLE,
                       sm.getString("standardWrapper.isUnavailable",
                                    wrapper.getName()));
        } else if (available == Long.MAX_VALUE) {
            response.sendError(HttpServletResponse.SC_NOT_FOUND,
                       sm.getString("standardWrapper.notFound",
                                    wrapper.getName()));
        }
    } catch (ServletException e) {
        container.getLogger().error(sm.getString("standardWrapper.allocateException",
                         wrapper.getName()), StandardWrapper.getRootCause(e));
        throwable = e;
        exception(request, response, e);
    } catch (Throwable e) {
        ExceptionUtils.handleThrowable(e);
        container.getLogger().error(sm.getString("standardWrapper.allocateException",
                         wrapper.getName()), e);
        throwable = e;
        exception(request, response, e);
        servlet = null;
    }

    MessageBytes requestPathMB = request.getRequestPathMB();
    DispatcherType dispatcherType = DispatcherType.REQUEST;
    if (request.getDispatcherType()==DispatcherType.ASYNC) dispatcherType = DispatcherType.ASYNC;
    request.setAttribute(Globals.DISPATCHER_TYPE_ATTR,dispatcherType);
    request.setAttribute(Globals.DISPATCHER_REQUEST_PATH_ATTR,
            requestPathMB);
    // Create the filter chain for this request
    ApplicationFilterChain filterChain =
            ApplicationFilterFactory.createFilterChain(request, wrapper, servlet);

    // Call the filter chain for this request
    // NOTE: This also calls the servlet's service() method
    Container container = this.container;
    try {
        if ((servlet != null) && (filterChain != null)) {
            // Swallow output if needed
            if (context.getSwallowOutput()) {
                try {
                    SystemLogHandler.startCapture();
                    if (request.isAsyncDispatching()) {
                        request.getAsyncContextInternal().doInternalDispatch();
                    } else {
                        filterChain.doFilter(request.getRequest(),
                                response.getResponse());
                    }
                } finally {
                    String log = SystemLogHandler.stopCapture();
                    if (log != null && log.length() > 0) {
                        context.getLogger().info(log);
                    }
                }
            } else {
                if (request.isAsyncDispatching()) {
                    request.getAsyncContextInternal().doInternalDispatch();
                } else {
                    filterChain.doFilter
                        (request.getRequest(), response.getResponse());
                }
            }

        }
    } catch (ClientAbortException | CloseNowException e) {
        if (container.getLogger().isDebugEnabled()) {
            container.getLogger().debug(sm.getString(
                    "standardWrapper.serviceException", wrapper.getName(),
                    context.getName()), e);
        }
        throwable = e;
        exception(request, response, e);
    } catch (IOException e) {
        container.getLogger().error(sm.getString(
                "standardWrapper.serviceException", wrapper.getName(),
                context.getName()), e);
        throwable = e;
        exception(request, response, e);
    } catch (UnavailableException e) {
        container.getLogger().error(sm.getString(
                "standardWrapper.serviceException", wrapper.getName(),
                context.getName()), e);
        //            throwable = e;
        //            exception(request, response, e);
        wrapper.unavailable(e);
        long available = wrapper.getAvailable();
        if ((available > 0L) && (available < Long.MAX_VALUE)) {
            response.setDateHeader("Retry-After", available);
            response.sendError(HttpServletResponse.SC_SERVICE_UNAVAILABLE,
                       sm.getString("standardWrapper.isUnavailable",
                                    wrapper.getName()));
        } else if (available == Long.MAX_VALUE) {
            response.sendError(HttpServletResponse.SC_NOT_FOUND,
                        sm.getString("standardWrapper.notFound",
                                    wrapper.getName()));
        }
        // Do not save exception in 'throwable', because we
        // do not want to do exception(request, response, e) processing
    } catch (ServletException e) {
        Throwable rootCause = StandardWrapper.getRootCause(e);
        if (!(rootCause instanceof ClientAbortException)) {
            container.getLogger().error(sm.getString(
                    "standardWrapper.serviceExceptionRoot",
                    wrapper.getName(), context.getName(), e.getMessage()),
                    rootCause);
        }
        throwable = e;
        exception(request, response, e);
    } catch (Throwable e) {
        ExceptionUtils.handleThrowable(e);
        container.getLogger().error(sm.getString(
                "standardWrapper.serviceException", wrapper.getName(),
                context.getName()), e);
        throwable = e;
        exception(request, response, e);
    } finally {
        // Release the filter chain (if any) for this request
        if (filterChain != null) {
            filterChain.release();
        }

        // Deallocate the allocated servlet instance
        try {
            if (servlet != null) {
                wrapper.deallocate(servlet);
            }
        } catch (Throwable e) {
            ExceptionUtils.handleThrowable(e);
            container.getLogger().error(sm.getString("standardWrapper.deallocateException",
                             wrapper.getName()), e);
            if (throwable == null) {
                throwable = e;
                exception(request, response, e);
            }
        }

        // If this servlet has been marked permanently unavailable,
        // unload it and release this instance
        try {
            if ((servlet != null) &&
                (wrapper.getAvailable() == Long.MAX_VALUE)) {
                wrapper.unload();
            }
        } catch (Throwable e) {
            ExceptionUtils.handleThrowable(e);
            container.getLogger().error(sm.getString("standardWrapper.unloadException",
                             wrapper.getName()), e);
            if (throwable == null) {
                exception(request, response, e);
            }
        }
        long t2=System.currentTimeMillis();

        long time=t2-t1;
        processingTime += time;
        if( time > maxTime) maxTime=time;
        if( time < minTime) minTime=time;
    }
}
StandardWrapperValve的invoke,这里看着很复杂,但其实核心也就完成两件事:
- 通过wrapper.allocate()方法,初始化servlet
- 创建ApplicationFilterChain,调用FilterChain的doFilter方法,在最后一个Filter方法执行结束后,会调用Servlet的Service方法,从而实现对Servlet的调用
public Servlet allocate() throws ServletException {

    // If we are currently unloading this servlet, throw an exception
    if (unloading) {
        throw new ServletException(sm.getString("standardWrapper.unloading", getName()));
    }

    boolean newInstance = false;

    // If not SingleThreadedModel, return the same instance every time
    if (!singleThreadModel) {
        // Load and initialize our instance if necessary
        if (instance == null || !instanceInitialized) {
            synchronized (this) {
                if (instance == null) {
                    try {
                        if (log.isDebugEnabled()) {
                            log.debug("Allocating non-STM instance");
                        }

                        // Note: We don't know if the Servlet implements
                        // SingleThreadModel until we have loaded it.
                        instance = loadServlet();
                        newInstance = true;
                        if (!singleThreadModel) {
                            // For non-STM, increment here to prevent a race
                            // condition with unload. Bug 43683, test case
                            // #3
                            countAllocated.incrementAndGet();
                        }
                    } catch (ServletException e) {
                        throw e;
                    } catch (Throwable e) {
                        ExceptionUtils.handleThrowable(e);
                        throw new ServletException(sm.getString("standardWrapper.allocate"), e);
                    }
                }
                if (!instanceInitialized) {
                    initServlet(instance);
                }
            }
        }

        if (singleThreadModel) {
            if (newInstance) {
                // Have to do this outside of the sync above to prevent a
                // possible deadlock
                synchronized (instancePool) {
                    instancePool.push(instance);
                    nInstances++;
                }
            }
        } else {
            if (log.isTraceEnabled()) {
                log.trace("  Returning non-STM instance");
            }
            // For new instances, count will have been incremented at the
            // time of creation
            if (!newInstance) {
                countAllocated.incrementAndGet();
            }
            return instance;
        }
    }

    synchronized (instancePool) {
        while (countAllocated.get() >= nInstances) {
            // Allocate a new instance if possible, or else wait
            if (nInstances < maxInstances) {
                try {
                    instancePool.push(loadServlet());
                    nInstances++;
                } catch (ServletException e) {
                    throw e;
                } catch (Throwable e) {
                    ExceptionUtils.handleThrowable(e);
                    throw new ServletException(sm.getString("standardWrapper.allocate"), e);
                }
            } else {
                try {
                    instancePool.wait();
                } catch (InterruptedException e) {
                    // Ignore
                }
            }
        }
        if (log.isTraceEnabled()) {
            log.trace("  Returning allocated STM instance");
        }
        countAllocated.incrementAndGet();
        return instancePool.pop();
    }
}allocate方法也比较简单,核心就在loadServlet和initServlet方法,这里印证了我们之前讲的,wrapper容器在Tomcat启动过程中就构建了,但是内部的Servlet,是在使用时才创建的。Tomcat源码解读『基础类介绍』。
关于FilterChain,之前的文章Java Web三大组件中已经详细介绍过,这里不多介绍了,总之通过Pipeline-valve机制,最终将请求提交给具体的Servlet处理。
2.3.3 Request中的容器信息如何注入的
最后我们来看一下上面遗留的一个问题,org.apache.catalina.connector.Request中的容器信息是如何注入的。
org.apache.catalina.connector.Request中获取容器组件相关的方法如下:
public Host getHost() {
    return mappingData.host;
}

public Context getContext() {
    return mappingData.context;
}

public Wrapper getWrapper() {
    return mappingData.wrapper;
}
可以看到,请求相关联的容器组件都是从mappingData中获取的。那么mappingData又是什么时候初始化的呢?答案是我们上面介绍CoyoteAdapter的postParseRequest方法。在该方法中有一段调用,会完成mappingData的初始化:
connector.getService().getMapper().map(serverName, decodedURI,
        version, request.getMappingData());
这里的getMapper获取到的就是我们最开始介绍的Mapper组件,会在Tomcat启动过程中初始化,类型为org.apache.catalina.mapper.Mapper。下面我们来看一下map方法:
/**
 * Map the specified host name and URI, mutating the given mapping data.
 *
 * @param host Virtual host name
 * @param uri URI
 * @param version The version, if any, included in the request to be mapped
 * @param mappingData This structure will contain the result of the mapping
 *                    operation
 * @throws IOException if the buffers are too small to hold the results of
 *                     the mapping.
 */
public void map(MessageBytes host, MessageBytes uri, String version,
                MappingData mappingData) throws IOException {

    if (host.isNull()) {
        host.getCharChunk().append(defaultHostName);
    }
    host.toChars();
    uri.toChars();
    internalMap(host.getCharChunk(), uri.getCharChunk(), version,
            mappingData);
}
从注释中可以看到,该方法的作用是映射hostName和Uri,并修改mappingData。
private final void internalMap(CharChunk host, CharChunk uri,
        String version, MappingData mappingData) throws IOException {

    if (mappingData.host != null) {
        // The legacy code (dating down at least to Tomcat 4.1) just
        // skipped all mapping work in this case. That behaviour has a risk
        // of returning an inconsistent result.
        // I do not see a valid use case for it.
        throw new AssertionError();
    }

    uri.setLimit(-1);

    // Virtual host mapping
    MappedHost[] hosts = this.hosts;
    MappedHost mappedHost = exactFindIgnoreCase(hosts, host);
    if (mappedHost == null) {
        // Note: Internally, the Mapper does not use the leading * on a
        //       wildcard host. This is to allow this shortcut.
        int firstDot = host.indexOf('.');
        if (firstDot > -1) {
            int offset = host.getOffset();
            try {
                host.setOffset(firstDot + offset);
                mappedHost = exactFindIgnoreCase(hosts, host);
            } finally {
                // Make absolutely sure this gets reset
                host.setOffset(offset);
            }
        }
        if (mappedHost == null) {
            mappedHost = defaultHost;
            if (mappedHost == null) {
                return;
            }
        }
    }
    mappingData.host = mappedHost.object;

    // Context mapping
    ContextList contextList = mappedHost.contextList;
    MappedContext[] contexts = contextList.contexts;
    int pos = find(contexts, uri);
    if (pos == -1) {
        return;
    }

    int lastSlash = -1;
    int uriEnd = uri.getEnd();
    int length = -1;
    boolean found = false;
    MappedContext context = null;
    while (pos >= 0) {
        context = contexts[pos];
        if (uri.startsWith(context.name)) {
            length = context.name.length();
            if (uri.getLength() == length) {
                found = true;
                break;
            } else if (uri.startsWithIgnoreCase("/", length)) {
                found = true;
                break;
            }
        }
        if (lastSlash == -1) {
            lastSlash = nthSlash(uri, contextList.nesting + 1);
        } else {
            lastSlash = lastSlash(uri);
        }
        uri.setEnd(lastSlash);
        pos = find(contexts, uri);
    }
    uri.setEnd(uriEnd);

    if (!found) {
        if (contexts[0].name.equals("")) {
            context = contexts[0];
        } else {
            context = null;
        }
    }
    if (context == null) {
        return;
    }

    mappingData.contextPath.setString(context.name);

    ContextVersion contextVersion = null;
    ContextVersion[] contextVersions = context.versions;
    final int versionCount = contextVersions.length;
    if (versionCount > 1) {
        Context[] contextObjects = new Context[contextVersions.length];
        for (int i = 0; i < contextObjects.length; i++) {
            contextObjects[i] = contextVersions[i].object;
        }
        mappingData.contexts = contextObjects;
        if (version != null) {
            contextVersion = exactFind(contextVersions, version);
        }
    }
    if (contextVersion == null) {
        // Return the latest version
        // The versions array is known to contain at least one element
        contextVersion = contextVersions[versionCount - 1];
    }
    mappingData.context = contextVersion.object;
    mappingData.contextSlashCount = contextVersion.slashCount;

    // Wrapper mapping
    if (!contextVersion.isPaused()) {
        internalMapWrapper(contextVersion, uri, mappingData);
    }

}
在internalMap方法中可以看到mappingData.host,mappingData.context及mappingData.wrapper等的赋值逻辑。
2.4 响应时如何回写到客户端浏览器的
做过Java web开发的我们都知道,我们自定义的Servlet一般会在最后输出Html语句,如下:
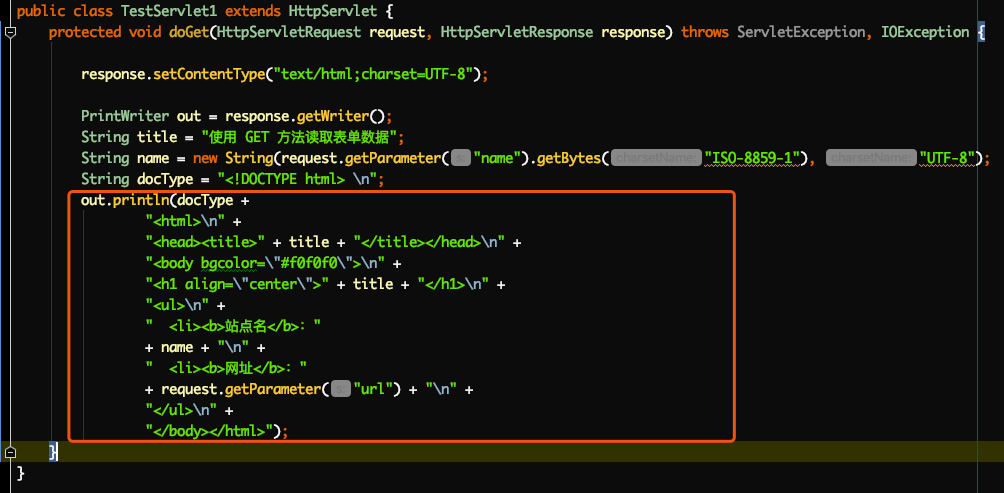
我们会从HttpServletResponse中获取Writer,然后调用println方法输出内容。
/**
 * @return the writer associated with this Response.
 *
 * @exception IllegalStateException if <code>getOutputStream</code> has
 *  already been called for this response
 * @exception IOException if an input/output error occurs
 */
@Override
public PrintWriter getWriter()
    throws IOException {

    if (usingOutputStream) {
        throw new IllegalStateException
            (sm.getString("coyoteResponse.getWriter.ise"));
    }

    if (ENFORCE_ENCODING_IN_GET_WRITER) {
        /*
         * If the response's character encoding has not been specified as
         * described in <code>getCharacterEncoding</code> (i.e., the method
         * just returns the default value <code>ISO-8859-1</code>),
         * <code>getWriter</code> updates it to <code>ISO-8859-1</code>
         * (with the effect that a subsequent call to getContentType() will
         * include a charset=ISO-8859-1 component which will also be
         * reflected in the Content-Type response header, thereby satisfying
         * the Servlet spec requirement that containers must communicate the
         * character encoding used for the servlet response's writer to the
         * client).
         */
        setCharacterEncoding(getCharacterEncoding());
    }

    usingWriter = true;
    outputBuffer.checkConverter();
    if (writer == null) {
        writer = new CoyoteWriter(outputBuffer);
    }
    return writer;
}
Writer类型为CoyoteWriter,构造函数中传入的OutPutBuffer类型为org.apache.catalina.connector.OutputBuffer,CoyoteWriter继承关系如下:

CoyoteWriter的println方法如下:
public void println(String s) {
    print(s);
    println();
}
public void println(String s) {
print(s);
println();
}
public void print(String s) {
if (s == null) {
s = "null";
}
write(s);
}
public void write(String s) {
write(s, 0, s.length());
}
public void write(String s, int off, int len) {
if (error) {
return;
}
try {
ob.write(s, off, len);
} catch (IOException e) {
error = true;
}
}所以调用CoyoteWriter的println方法,作用其实是向Response的成员变量outputBuffer中写内容。
那么回写客户端的操作其实就是Response的成员变量outputBuffer调用flush操作,如下:
/**
 * Flush bytes or chars contained in the buffer.
 *
 * @throws IOException An underlying IOException occurred
 */
@Override
public void flush() throws IOException {
    doFlush(true);
}


/**
 * Flush bytes or chars contained in the buffer.
 *
 * @param realFlush <code>true</code> if this should also cause a real network flush
 * @throws IOException An underlying IOException occurred
 */
protected void doFlush(boolean realFlush) throws IOException {

    if (suspended) {
        return;
    }

    try {
        doFlush = true;
        if (initial) {
            coyoteResponse.sendHeaders();
            initial = false;
        }
        if (cb.remaining() > 0) {
            flushCharBuffer();
        }
        if (bb.remaining() > 0) {
            flushByteBuffer();
        }
    } finally {
        doFlush = false;
    }

    if (realFlush) {
        coyoteResponse.action(ActionCode.CLIENT_FLUSH, null);
        // If some exception occurred earlier, or if some IOE occurred
        // here, notify the servlet with an IOE
        if (coyoteResponse.isExceptionPresent()) {
            throw new ClientAbortException(coyoteResponse.getErrorException());
        }
    }

}
而上述flush方法的调用,则是通过org.apache.catalina.connector.Response#finishResponse方法,该方法中调用了org.apache.catalina.connector.OutputBuffer#close方法,如下:
/**
 * Close the output buffer. This tries to calculate the response size if
 * the response has not been committed yet.
 *
 * @throws IOException An underlying IOException occurred
 */
@Override
public void close() throws IOException {

    if (closed) {
        return;
    }
    if (suspended) {
        return;
    }

    // If there are chars, flush all of them to the byte buffer now as bytes are used to
    // calculate the content-length (if everything fits into the byte buffer, of course).
    if (cb.remaining() > 0) {
        flushCharBuffer();
    }

    if ((!coyoteResponse.isCommitted()) && (coyoteResponse.getContentLengthLong() == -1)
            && !coyoteResponse.getRequest().method().equals("HEAD")) {
        // If this didn't cause a commit of the response, the final content
        // length can be calculated. Only do this if this is not a HEAD
        // request since in that case no body should have been written and
        // setting a value of zero here will result in an explicit content
        // length of zero being set on the response.
        if (!coyoteResponse.isCommitted()) {
            coyoteResponse.setContentLength(bb.remaining());
        }
    }

    if (coyoteResponse.getStatus() == HttpServletResponse.SC_SWITCHING_PROTOCOLS) {
        doFlush(true);
    } else {
        doFlush(false);
    }
    closed = true;

    // The request should have been completely read by the time the response
    // is closed. Further reads of the input a) are pointless and b) really
    // confuse AJP (bug 50189) so close the input buffer to prevent them.
    Request req = (Request) coyoteResponse.getRequest().getNote(CoyoteAdapter.ADAPTER_NOTES);
    req.inputBuffer.close();

    coyoteResponse.action(ActionCode.CLOSE, null);
}
flushCharBuffer()方法的作用是将org.apache.catalina.connector.OutputBuffer成员变量CharBuffer转化为ByteBuffer(这两个成员变量名称分别为cb、bb)。真正的向客户端回写内容其实是调用doFlush完成的,这里会调用doFlush(true)。

上图doFlush方法中,291行其实是在发送响应行和响应头,298行发送响应体。关于响应行和响应头的发送,我们不继续看了,这里重点关注一下响应体的发送,即flushByteBuffer方法,如下:
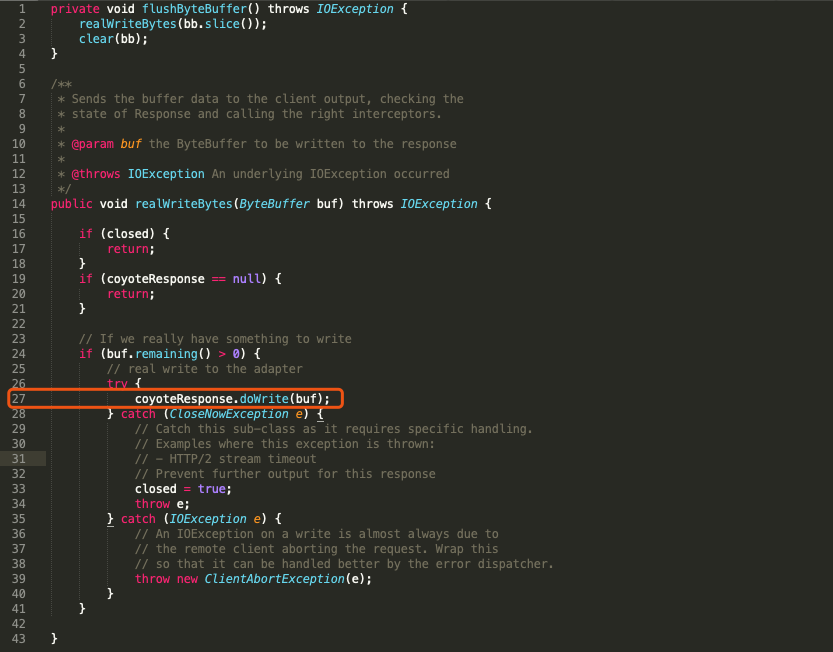
不难发现核心在27行,coyoteResponse.doWrite(buf)。coyoteResponse类型为org.apache.coyote.Response,也就是我们之前文章介绍的通过Http11Processor生成的Tomcat内部的Response。接下来我们继续来跟进org.apache.coyote.Response的doWrite方法,如下:
/**
 * Write a chunk of bytes.
 *
 * @param chunk The ByteBuffer to write
 *
 * @throws IOException If an I/O error occurs during the write
 */
public void doWrite(ByteBuffer chunk) throws IOException {
    int len = chunk.remaining();
    outputBuffer.doWrite(chunk);
    contentWritten += len - chunk.remaining();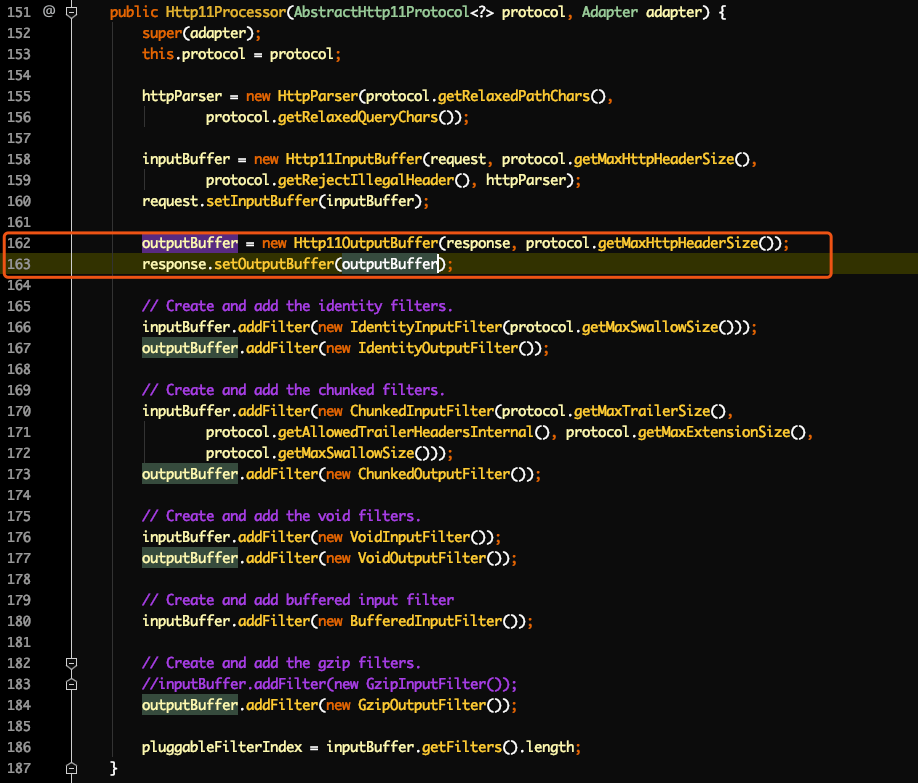
}可以看到ByteBuffer通过org.apache.coyote.Response内部的outputBuffer的doWrite方法,继续完成回写动作。需要注意的是这里的outputBuffer跟上面介绍的org.apache.catalina.connector.OutputBuffer是两个不同的类型,这里org.apache.coyote.Response成员变量outputBuffer的类型是org.apache.coyote.OutputBuffer。org.apache.coyote.Response成员变量outputBuffer是在Http11Processor构造函数中初始化的,如下:
所以outputBuffer类型为org.apache.coyote.http11.Http11OutputBuffer。继续看Http11OutputBuffer的doWrite方法,如下:
@Override
public int doWrite(ByteBuffer chunk) throws IOException {

    if (!response.isCommitted()) {
        // Send the connector a request for commit. The connector should
        // then validate the headers, send them (using sendHeaders) and
        // set the filters accordingly.
        response.action(ActionCode.COMMIT, null);
    }

    if (lastActiveFilter == -1) {
        return outputStreamOutputBuffer.doWrite(chunk);
    } else {
        return activeFilters[lastActiveFilter].doWrite(chunk);
    }
}
这里又继续调用outputStreamOutputBuffer的doWrite方法。outputStreamOutputBuffer是Http11OutputBuffer的成员变量,在Http11OutputBuffer构造函数中初始化,如下:
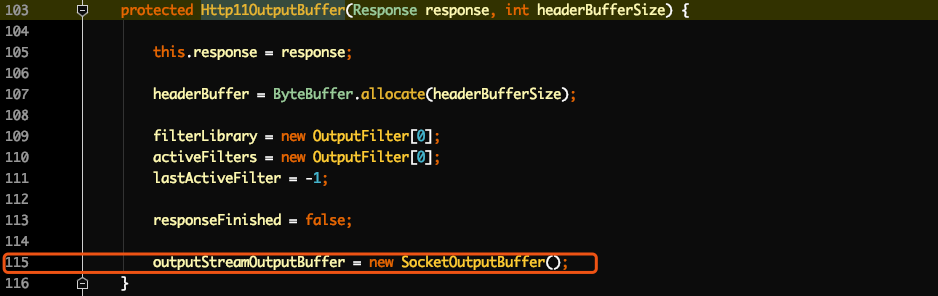
所以outputStreamOutputBuffer.doWrite,其实是调用SocketOutputBuffer的doWrite方法,如下:
public int doWrite(ByteBuffer chunk) throws IOException {
    try {
        int len = chunk.remaining();
        SocketWrapperBase<?> socketWrapper = Http11OutputBuffer.this.socketWrapper;
        if (socketWrapper != null) {
            socketWrapper.write(isBlocking(), chunk);
        } else {
            throw new CloseNowException(sm.getString("iob.failedwrite"));
        }
        len -= chunk.remaining();
        byteCount += len;
        return len;
    } catch (IOException ioe) {
        response.action(ActionCode.CLOSE_NOW, ioe);
        // Re-throw
        throw ioe;
    }
}
这里我们看到回写操作已经提交给SocketWrapper,之后一路跟下来会调用到org.apache.tomcat.util.net.NioEndpoint.NioSocketWrapper#doWrite方法,如下:
protected void doWrite(boolean block, ByteBuffer from) throws IOException {
    long writeTimeout = getWriteTimeout();
    Selector selector = null;
    try {
        selector = pool.get();
    } catch (IOException x) {
        // Ignore
    }
    try {
        pool.write(from, getSocket(), selector, writeTimeout, block);
        if (block) {
            // Make sure we are flushed
            do {
                if (getSocket().flush(true, selector, writeTimeout)) {
                    break;
                }
            } while (true);
        }
        updateLastWrite();
    } finally {
        if (selector != null) {
            pool.put(selector);
        }
    }
    // If there is data left in the buffer the socket will be registered for
    // write further up the stack. This is to ensure the socket is only
    // registered for write once as both container and user code can trigger
    // write registration.
}
这里可以看到,会调用pool.write(from, getSocket(), selector, writeTimeout, block)。其实就是org.apache.tomcat.util.net.NioSelectorPool的write方法,到这其实就是真正的socket回写相关操作了。
参考链接;
1. Tomcat源码
2. 《深入了解Tomcat&Jetty》